How to Install PostHog with Google Tag Manager - Full guide
- PostHog is a full product analytics suite. It can replace or work alongside GA4, Clarity, Mixpanel, and more with a single tool.
- Installing via GTM gives you web analytics, session replay, heatmaps, feature flags, and A/B testing. Server-side features like LLM observability and data pipelines require a backend SDK.
- To be GDPR compliant, either fire the tag only on consent, or enable cookieless mode to collect anonymised data even when users deny.
- Cookieless mode uses a daily salted hash of IP and User Agent. No cookie is ever set, and the hash cannot be reversed to recover personal data.
- Start with autocapture disabled. Tracking everything at once steepens the learning curve without adding immediate value.
What is PostHog?
No, it’s not “another” analytics tool.
It’s a complete suite of tools to help you understand how your users interact with your website or product. Honestly, if you know how to use it, coupled with their generous free tier, you can easily replace all your marketing stack with PostHog and get better results in the process.
We’re talking product analytics, session replay, A/B testing, feature flags, surveys, error tracking, heatmaps, web analytics, data warehouse and advanced analytics and more, all in one place.
In this post, we will look at what Web and Product Analytics actually are, how to install PostHog on your website using Google Tag Manager, and how to make it GDPR compliant using cookieless mode.
What Works (and Doesn’t) via GTM
Disclaimer: Not all PostHog products work with a GTM-based installation.
What works fully via GTM
The snippet in GTM enables all the standard web browser features:
- Product analytics: autocapture, custom events, pageviews, funnels, trends, retention
- Web analytics: traffic, referrers, campaigns
- Session replay: fully supported (enable it in your init config)
- Heatmaps: works out of the box
- Feature flags: fully supported
- Experiments (A/B testing): fully supported
- Surveys: works, but requires
opt_in_site_apps: truein your init config - Error tracking: works (captures JS exceptions)
What doesn’t work via GTM
These features are server-side or mobile-native, so GTM cannot help here:
| Feature | Why it doesn’t work |
|---|---|
| LLM observability | Needs a server-side SDK (Python, Node, etc.) |
| Logs | Server-side log collection |
| Data pipelines (CDP) | Server-side imports/exports |
| Revenue analytics | Typically requires backend event capture |
| Workflows | Server-side automation |
| Mobile session replay | Needs iOS/Android/React Native SDKs |
| Messaging | Needs deeper SDK integration |
Web and Product Analytics
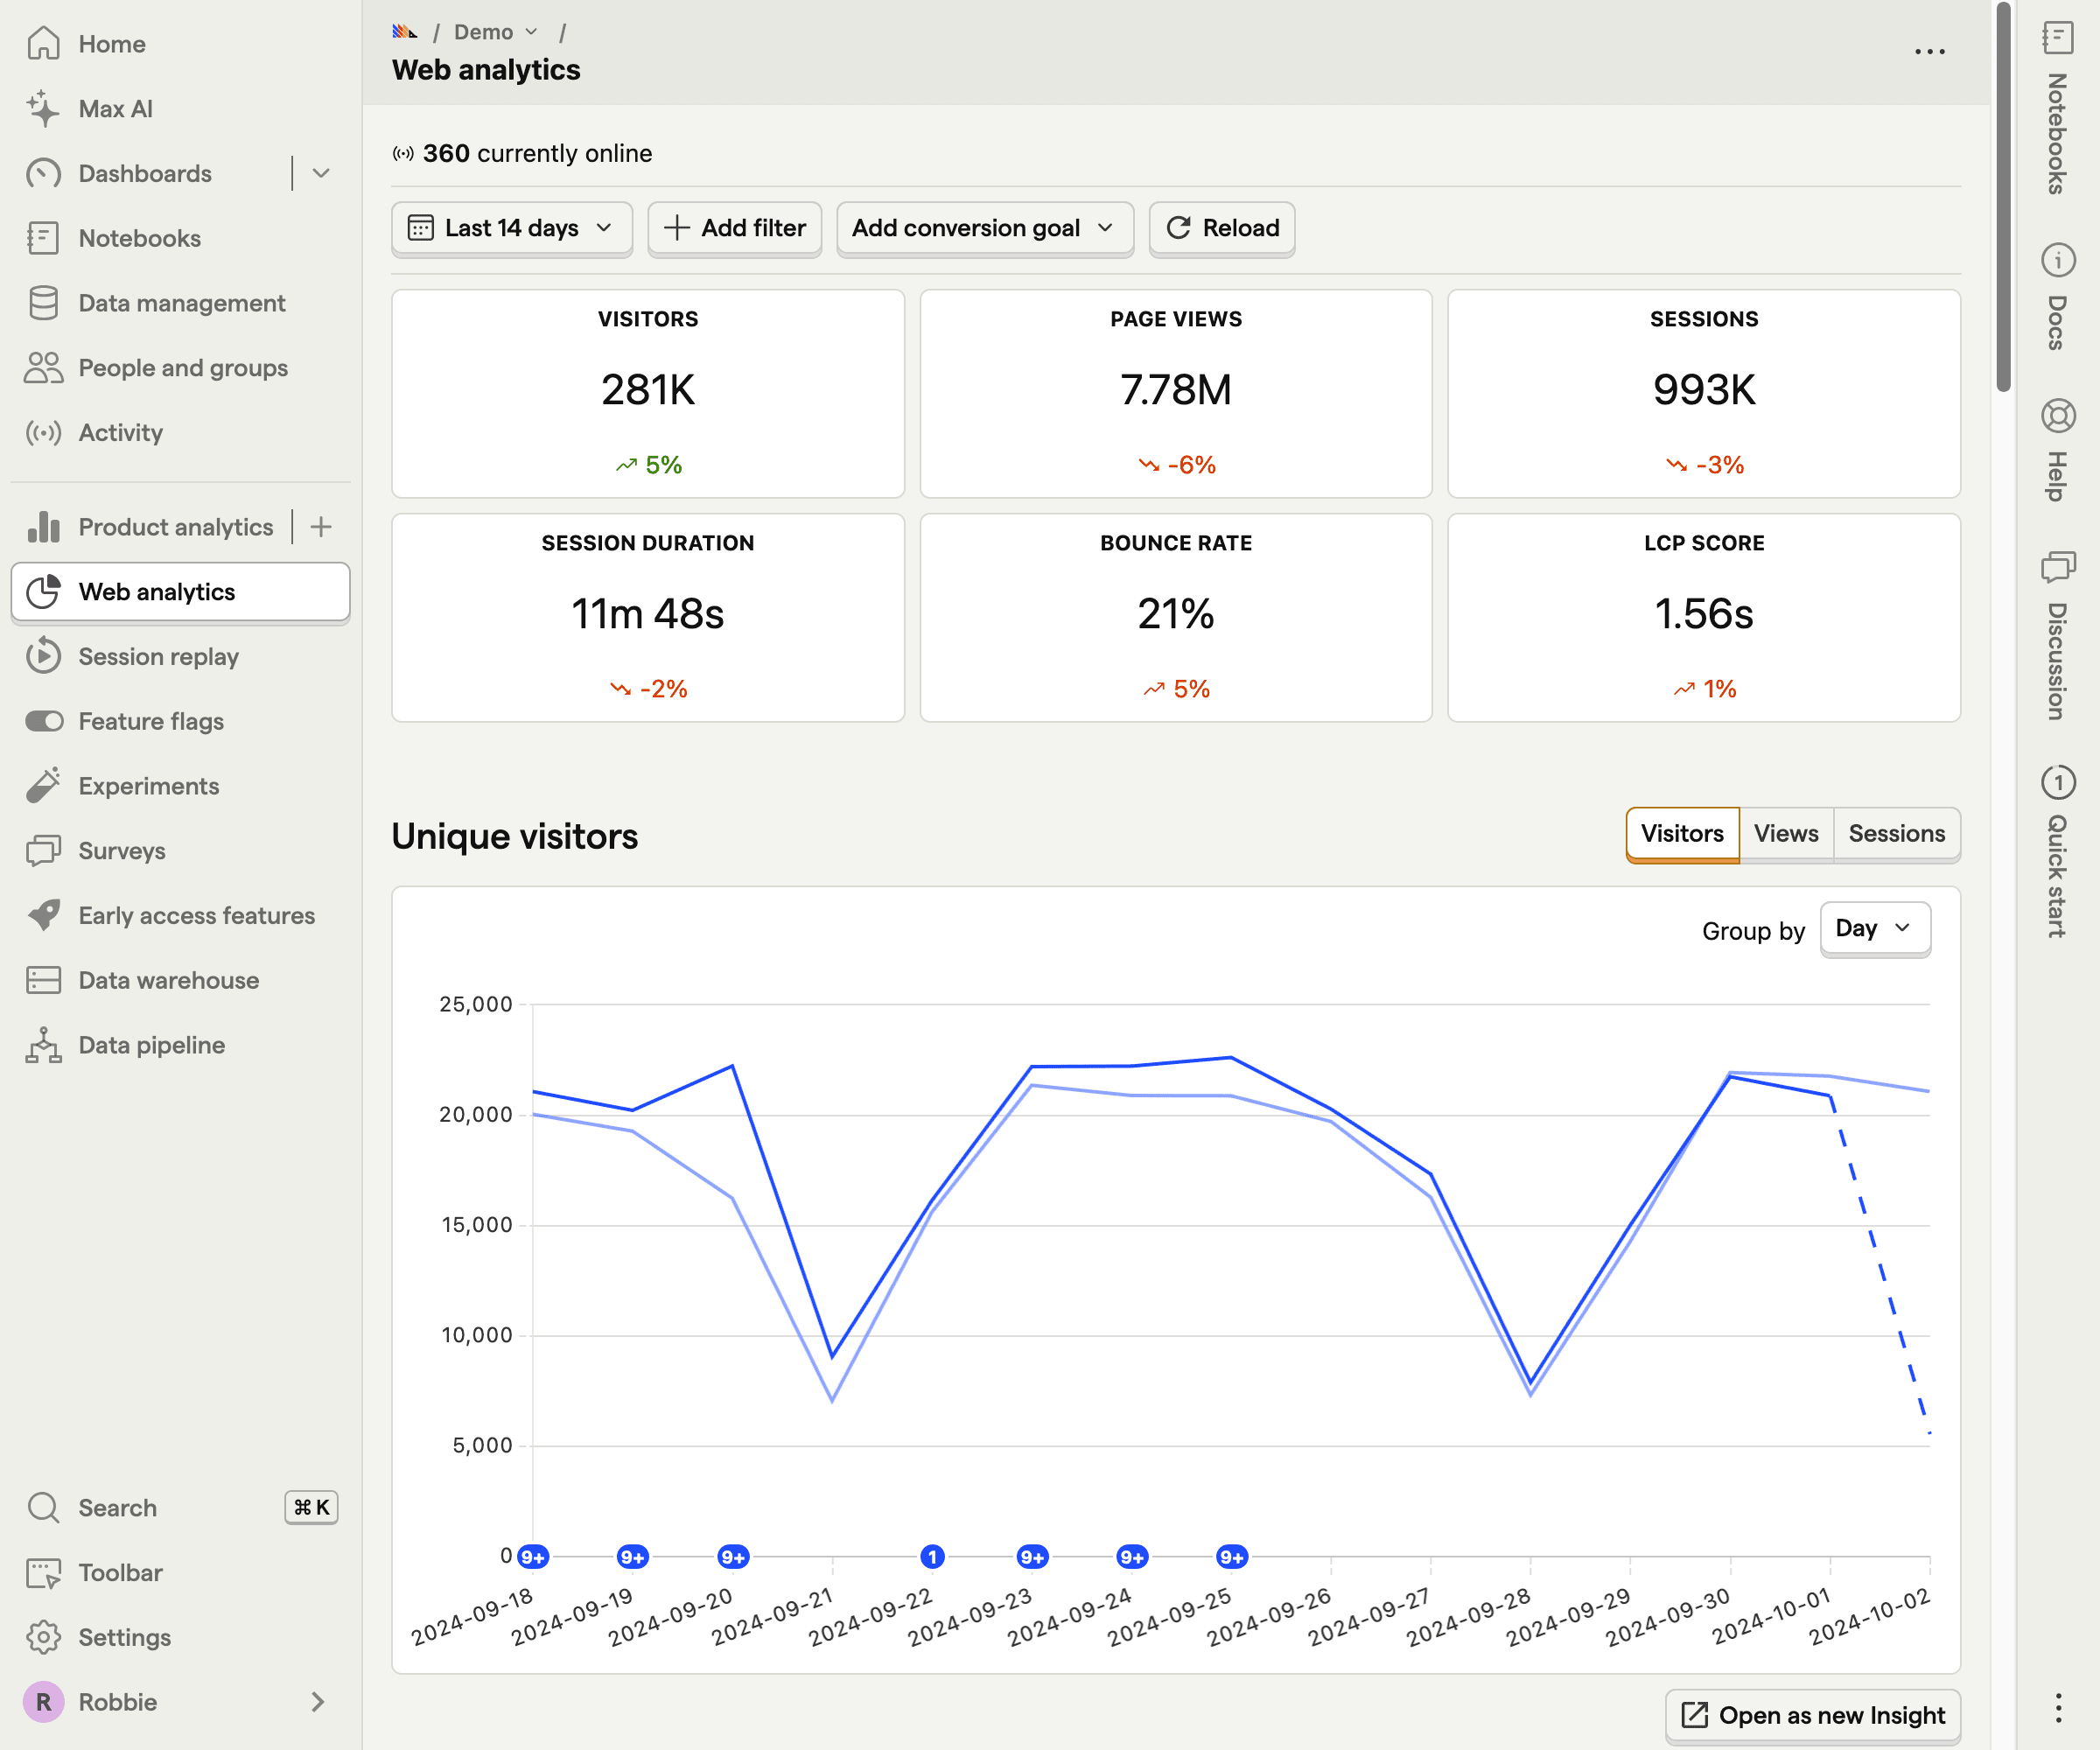
Analytics tracking in PostHog is divided into two dashboards:
- A simplified, privacy-friendly Web Analytics Dashboard
- A more advanced Product Analytics view with funnels, trends, retention, campaign tracking, and more
How to Install PostHog in GTM
TLDR
- Create an account and choose Set up manually, then select GTM
- Copy the code you get and paste it into a new Custom HTML tag in GTM
- Use All Pages as the trigger
- See the next section to make data collection GDPR compliant
Once you create your account, you will land on the Setup screen. Click Next, select Need to set up manually, and look for Google Tag Manager.
You will see two blocks of code on that page:
- The top block installs the PostHog Web SDK on your website
- The “Send Events” block is used to send custom events. If you come from the GA4 world, think of it like the
gtag()function (even though it looks more like a Data Layer push)
Grab the top block, open Google Tag Manager, create a new Custom HTML tag, and paste it in.
Anatomy of the PostHog init script
The script has two parts:
- Line 1: a minified loader (similar to GA4’s gtag.js) that fetches PostHog in the background
- Line 2: posthog.init(), which activates PostHog with your project token and any settings you choose
There are many settings you can configure in the init script. If you have a small-traffic website or no existing tracking, the default script is a good starting point. Otherwise, see the Optional: Autocapture Settings section below.
!function(t,e){ ... }(document,window.posthog||[]);
posthog.init('YOUR_PROJECT_API_KEY', {
    cookieless_mode: 'on_reject',
    opt_out_capturing_by_default: true,
    api_host: 'https://eu.i.posthog.com',
    defaults: '2026-01-30',
    disable_surveys: true,               // prevents surveys.js from loading
    // disable_session_recording: true,  // prevents recorder.js from loading
    // enable_heatmaps: false,           // disables heatmap data collection
    //autocapture: {
    //    capture_dead_clicks: false       // prevents capture of dead clicks
    //},
    autocapture: false,                 // disables all autocapture features
})
Pro tip: only load what you need
PostHog loads extra files on top of the main script for features like surveys, session recording, and heatmaps. If you’re not using them, you can disable them in
posthog.init()to keep your tag lean.
With this initial script installed, you will get basic web analytics events: pageview, pageleave, auto-captured events including Core Web Vitals on each page, session recording, and more.
After pasting the tag into GTM, choose a trigger. We will cover GDPR compliance in the next section. For now, use the same trigger you use for your current pageview tags. All Pages works fine.
How to Implement PostHog GDPR/HIPAA Compliant Using Cookieless Mode
This is not legal advice.
TLDR Once the script is installed, you have two options to make it GDPR compliant:
- Easiest: Fire PostHog only when consent is granted
- Recommended: Enable cookieless mode, similar to Google’s Advanced Consent Mode, letting you collect anonymised data even when users deny
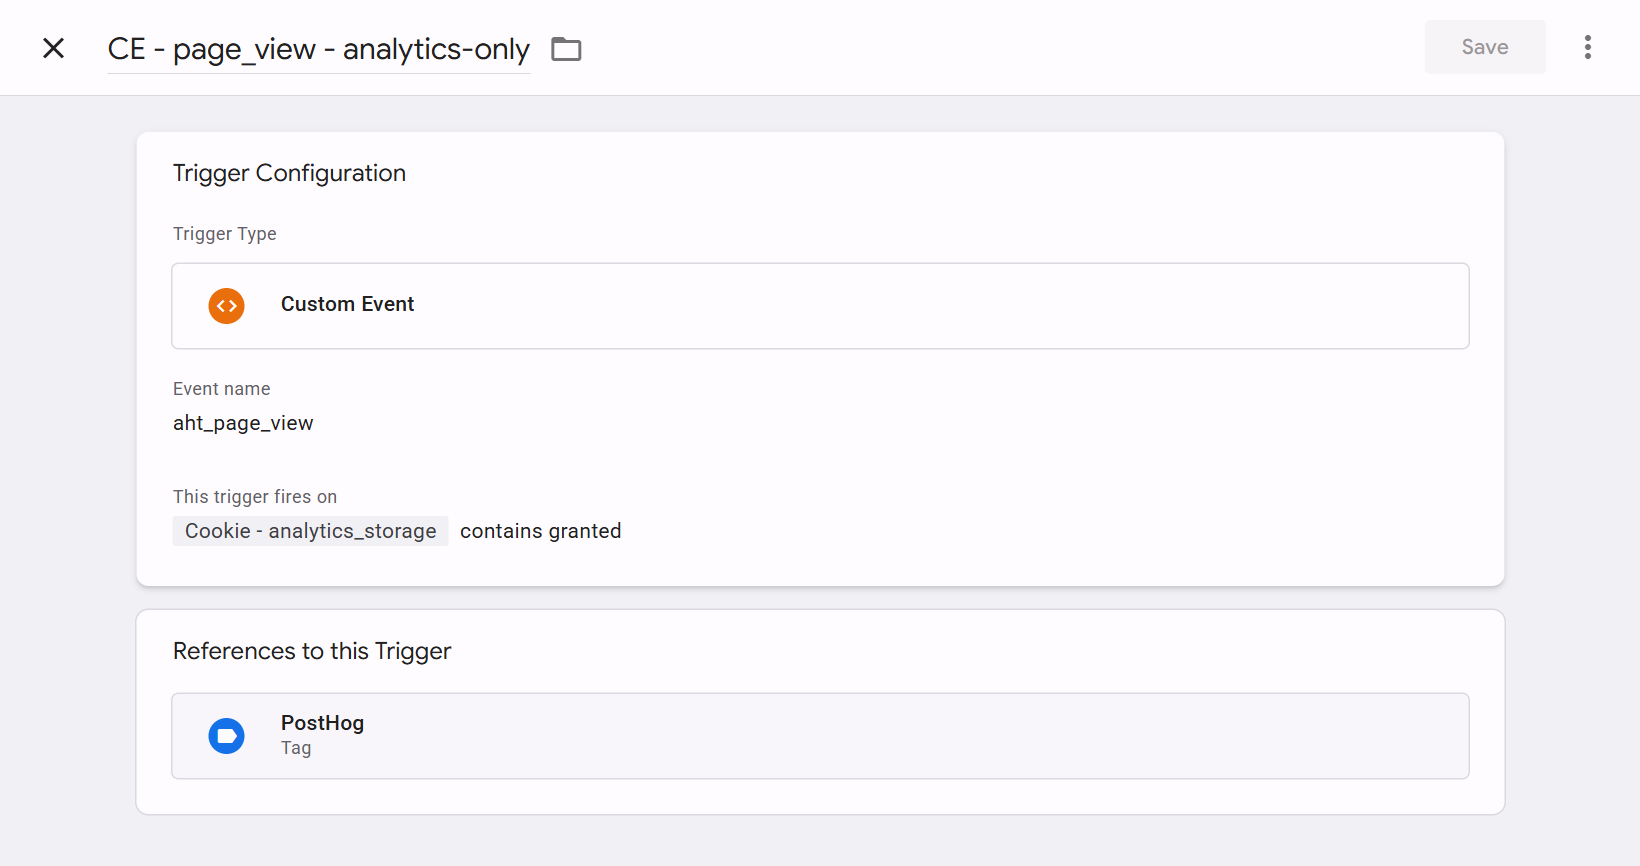
Option 1: Fire only on consent
The simplest approach in GTM is to fire the PostHog tag only when consent has been granted. Not before the user interacts with the banner, and not on deny. You can achieve this with a trigger that checks the user’s consent choice and fires only when the relevant variable is set to granted.
Option 2: Cookieless mode
If you want to collect anonymised data even when users deny, enable cookieless mode. Think of it like Google’s Advanced Consent Mode: it is the PostHog equivalent of GCS:100 with Google Tags, or ASC:G/D for Microsoft Ads. Tracking without setting any cookie.
You can set the mode to on_reject or always. Using always, if PostHog is your only analytics tool, “allows” you to remove the cookie banner entirely.
To enable cookieless mode:
- Go to your PostHog Project Settings
- Click Web Analytics
- Enable Cookieless mode

Then update your init script:
posthog.init('YOUR_PROJECT_API_KEY', {
    cookieless_mode: 'on_reject', // or 'always'
    api_host: 'https://eu.i.posthog.com',
    autocapture: false,
    defaults: '2026-01-30'
})
How cookieless mode works under the hood
PostHog still generates a user ID server-side, but it is based on a daily random salt combined with the user’s IP address and User Agent. Because of how the hash is generated, it is impossible to reverse it back to the original values.
Citing directly from the PostHog docs on why this is compliant:
A hash is an irreversible function, and a salt is a random value that changes daily which we delete once that day’s events have been processed. This means that whilst the IP address and User Agent are Personal Data, the hash is not considered Personal Data because it is impossible to obtain any Personal Data from the hash.
From PostHog: Counting unique users without cookies (April 2026)
Limitations of cookieless mode
When tracking anonymised data, some limitations apply due to the lack of a persistent cookie identifier:
- Higher user count: If a user visits today and returns tomorrow, they will be counted as two separate users. The user count will be close to the total session count
- Session replays and surveys are disabled until the user gives consent
What Events Does PostHog Offer Out of the Box?
After installing PostHog and making it GDPR compliant, here is what you get right away, without any additional configuration.
As you may have noticed in the init script above, autocapture: false is set. Starting with autocapture disabled is recommended so you can gradually get familiar with what PostHog tracks.
Tracking every single interaction is a temptation most business owners have, but most of the time it leads to abandoning the platform, increasing the learning curve that might otherwise be less steep.
Here is what you get out of the box:
- Page View / Page Leave events
- Classic Users, Sessions, Pageview data, including duration and Bounce Rate
- Information about visited pages, referrals, and device type
- A world map showing user demographics
- Active hours for your users
- Session replays, error tracking, and rage click detection
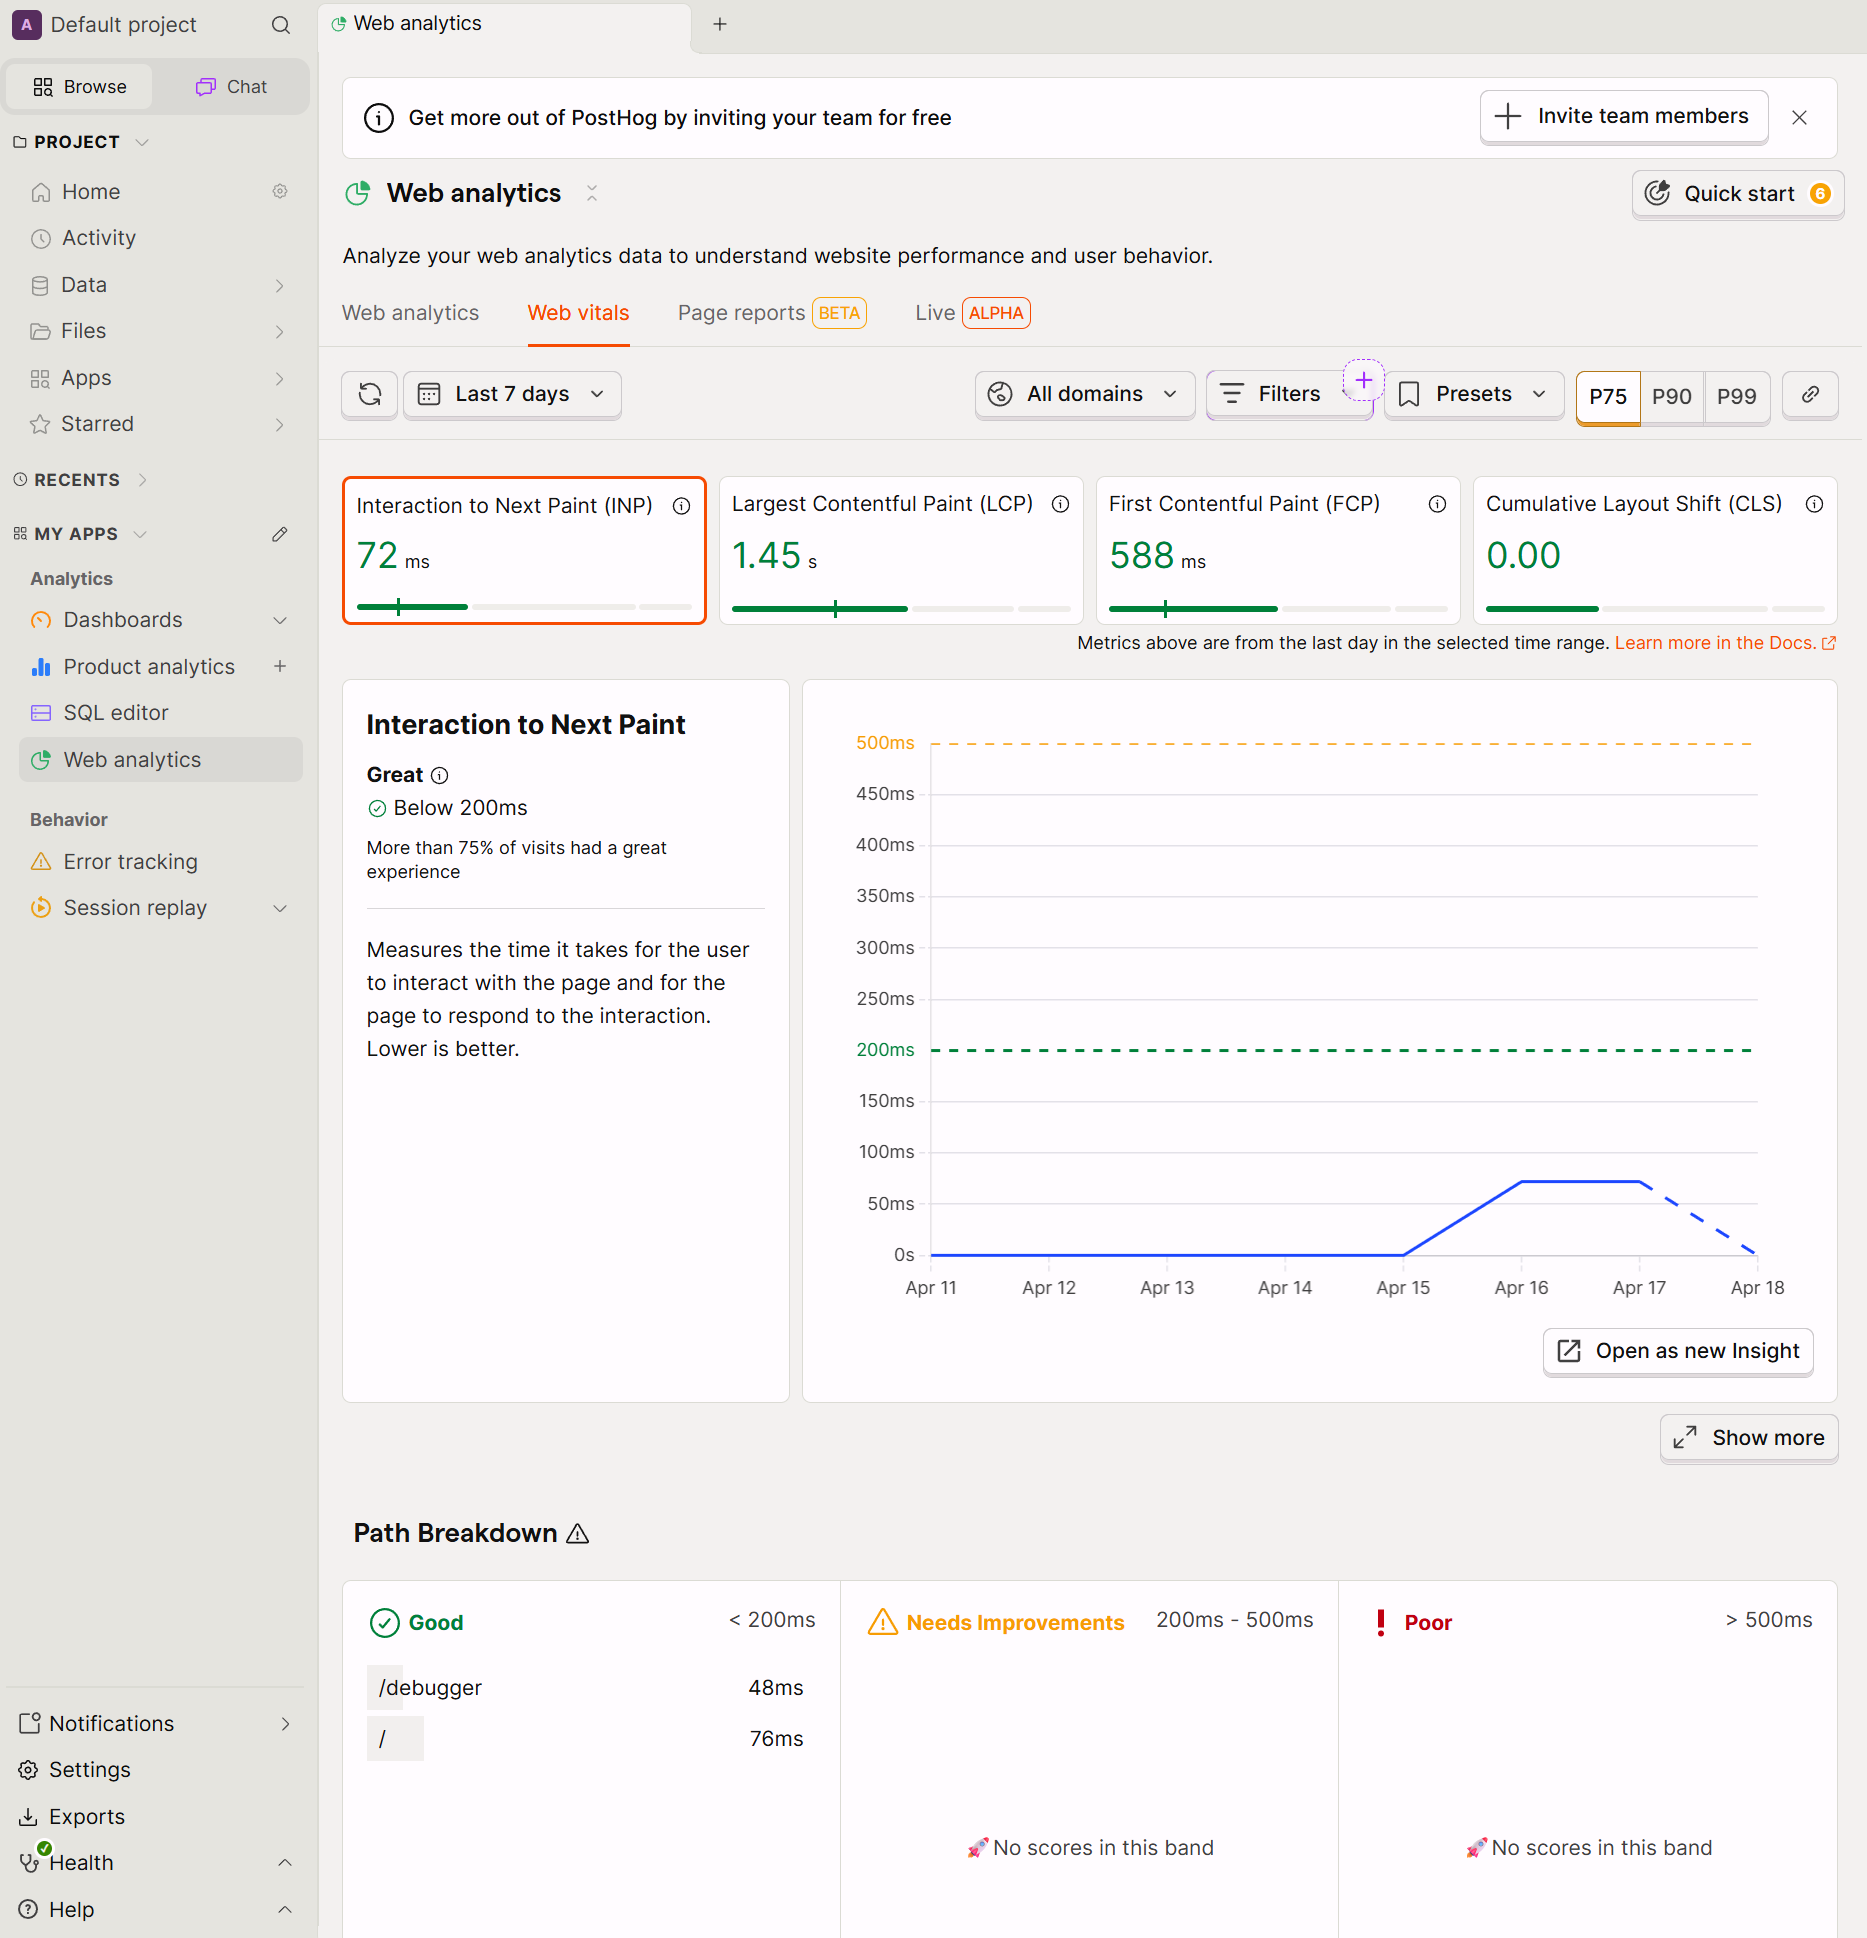
- Core Web Vitals with performance data per page
And that covers the basics. PostHog is a powerful tool with far more to offer. I have not yet found anything I can do in other similar tools that I cannot do in PostHog.
Yes, there is a steeper learning curve. But what’s better, to have something reliable but slightly more difficult to set up, or complaining every day about the unreliability of your marketing stack?
How to Verify Your PostHog Implementation
Open your browser’s developer tools (F12 on Windows, Cmd+Option+I on Mac), go to the Network tab, then reload the page. Filter by All requests and use the search box to check each feature below. You can start filtering by posthog to see PostHog-related requests.
If you see requests blocked or missing, check that your ad blocker is disabled. It can silently block PostHog requests during testing.
Quick sanity check: If you see
array.jsloading and at least onee/?request returning{"status": "Ok"}, PostHog is working. The other requests confirm specific features are active.
1. Script loading
Search for: array.js
You should see a request to us-assets.i.posthog.com (or eu-assets.i.posthog.com) fetching array.js. This is the core PostHog library loading. If this request fails or is missing, nothing else will work. Check that your GTM tag is firing.
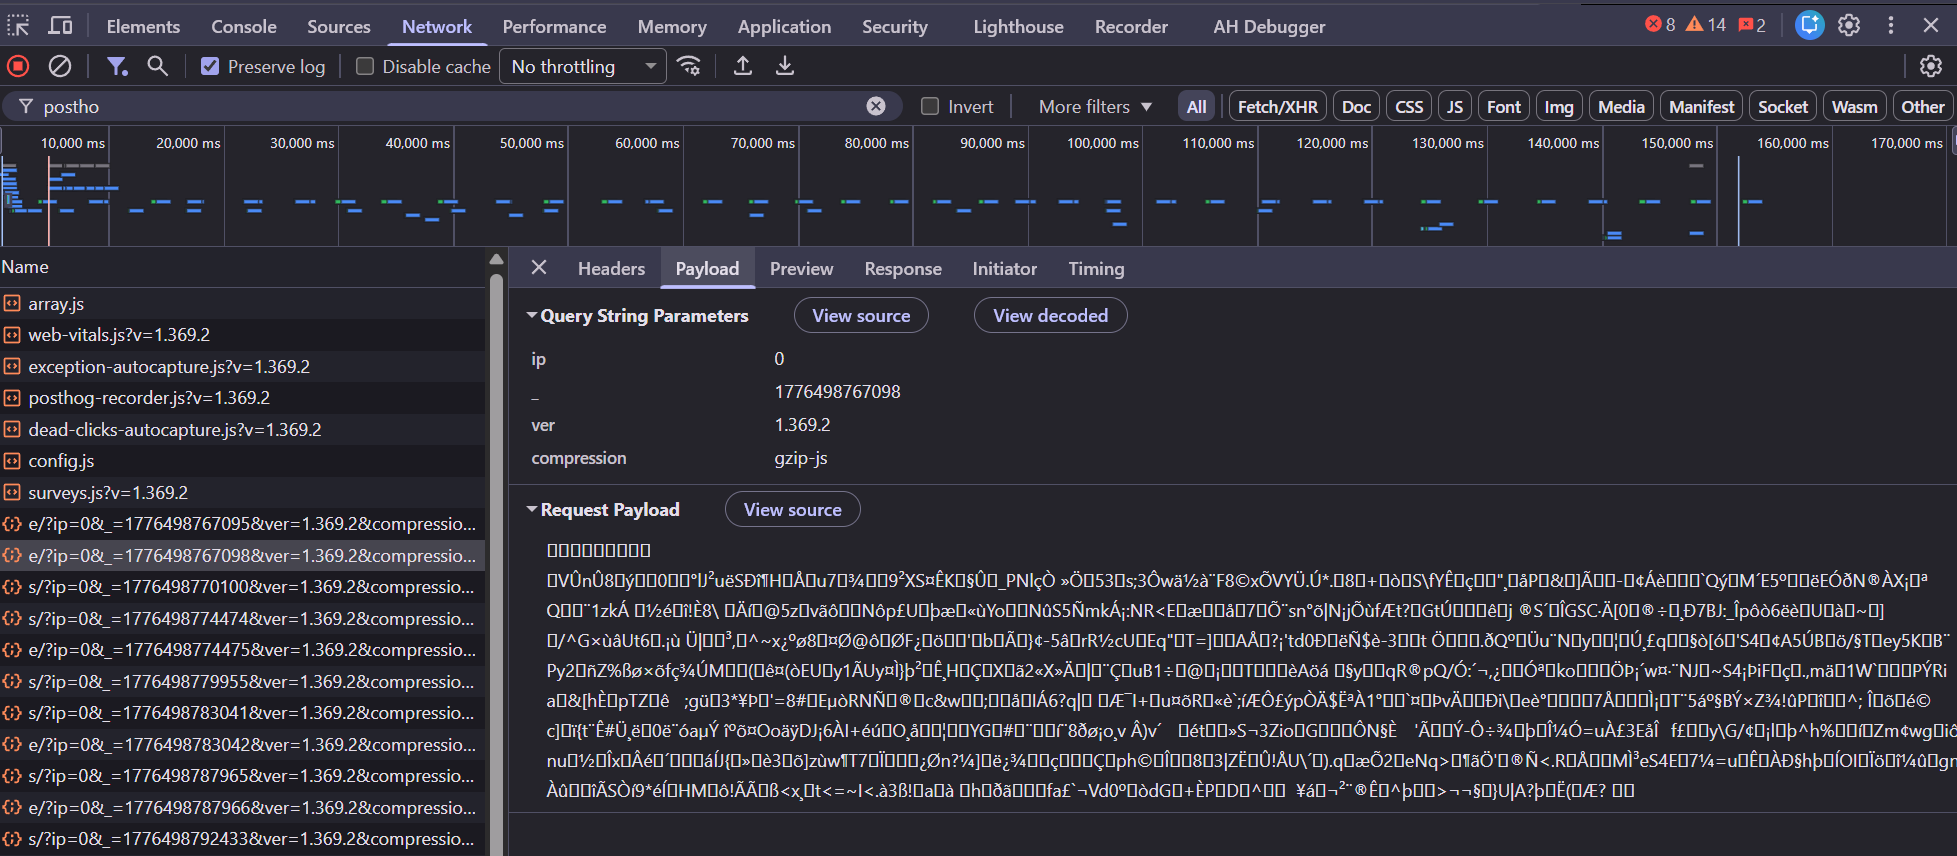
2. Pageviews and custom events
Search for: e/?
Every event PostHog captures — pageviews, pageleaves, and any custom events — is sent as a POST request to e/? on your PostHog host. Click into one of these requests and check the Payload tab to see the event name and properties.
A successful response returns {"status": "Ok"}.
3. Autocapture (clicks, interactions)
Search for: e/? (same endpoint as above)
Autocaptured events like clicks and form submissions are bundled into the same e/? requests. In the payload, look for events named $autocapture. Each one represents an interaction PostHog recorded automatically.
4. Session recording
Search for: s/?
Session recording data is uploaded separately to s/?. You’ll see these requests fire a few seconds after page load, then periodically as the user interacts with the page. If you don’t see s/? requests, confirm that disable_session_recording is not set to true in your init config.
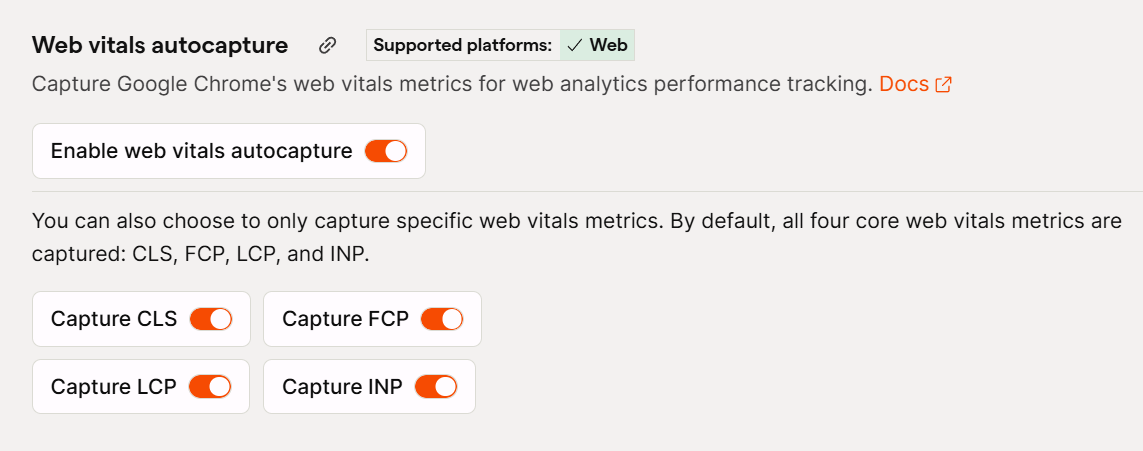
Optional: Core Web Vitals Autocapture
Core Web Vitals autocapture is separate from event autocapture. You can capture Core Web Vitals even with autocapture: false in the init script, they are enabled by default.
To adjust this, go to your Project Settings and click Web Analytics.
Optional: Autocapture Settings
The autocapture mechanism is one of PostHog’s most powerful features. The usual concern with autocapture is the sheer volume of events collected, and with most tools you have limited control over what gets tracked automatically. PostHog gives you granular control.
Navigation autocapture
PostHog supports Page View and Page Leave tracking out of the box.
If you have a Single Page Application (React, Angular, etc.), you can configure PostHog to track history-based navigation correctly, since with an SPA you need to watch for history changes rather than full URL changes:
posthog.init('YOUR_PROJECT_API_KEY', {
    api_host: 'https://eu.i.posthog.com',
    defaults: '2026-01-30',
    capture_pageview: 'history_change', // or false
    capture_pageleave: 'if_capture_pageview'
})
To disable pageview and pageleave events only:
capture_pageview: false,
capture_pageleave: false
Autocapture filtering
You can customise autocapture to:
- Enable or disable it for specific URLs
- Target specific interaction types (click, change, submit, etc.)
- Include or exclude specific DOM elements or attributes
- Capture text copy events
posthog.init('YOUR_PROJECT_API_KEY', {
    api_host: 'https://eu.i.posthog.com',
    defaults: '2026-01-30',
    autocapture: {
        // URL filtering
        url_allowlist: ['https://example.com', 'test.com/.*'],
        url_ignorelist: ['https://example.com/admin', 'test.com/private/.*'],

        // Event filtering
        dom_event_allowlist: ['click', 'change', 'submit', 'input'],

        // Element filtering
        element_allowlist: ['a', 'button', 'form', 'input', 'select', 'textarea', 'label'],
        css_selector_allowlist: ['[ph-capture]', '[data-track]'],

        // Attribute filtering
        element_attribute_ignorelist: ['aria-label', 'data-attr-pii', 'data-sensitive'],

        // Copy/cut capture
        capture_copied_text: true,
    },
})
Other notable options:
capture_dead_clicks: true: tracks clicks on non-interactive elements, helping you understand what elements people expect to be interactiverageclick: true: tracks rage clicks
For a full list of autocaptured events, features, and properties, see the PostHog autocapture documentation.
A Personal Note on PostHog
PostHog is amazing.
-
I’ve found it to be the most reliable and customisable Analytics tool, and even if it has a huge amount of features, it doesn’t feel heavy like Adobe products, for example. That kind of confusion with 3k buttons all over is not present in PostHog.
-
Deciding where to send your data, in the EU or US, is a big thing from my point of view.
-
Auto-capture for events is nothing like other tools. You can customise every inch of what you can auto-track and it’s not mandatory to use. You have choices, almost everything you can think of is already supported or a few releases away.
-
If you know your way around code and debugging, PostHog has a transparency in the code execution and in general in how the events fire that makes it very easy to follow what’s happening from the click on the CTA all the way to an automated pipeline using that event to do whatever you want.
-
Fragmented stack has always been a problem in the analytics world. Well, with PostHog you don’t need Clarity, GA4, Firebase for app tracking, BigQuery, MixPanel, and 10 other different tools. You just need PostHog. Even though the learning curve might seem a little steep at first, it’s 1 tool.
This is not an affiliated post. Genuinely impressive tool.
Code examples adapted from the PostHog documentation.
FAQ
Frequently Asked Questions
Can I install PostHog via GTM without touching my website code?
Does PostHog set cookies by default?
cookieless_mode: 'on_reject' or 'always' in your init script. In cookieless mode, no cookie is ever written to the browser.Is PostHog GDPR compliant without a cookie banner?
'always', PostHog generates a daily salted hash of IP and User Agent instead of a persistent cookie. Because the hash cannot be reversed to recover personal data, it is not classified as personal data under GDPR. This means you can collect anonymised analytics without requiring consent -and without a cookie banner.Why does my user count look higher than expected in cookieless mode?
What is the difference between autocapture and custom events in PostHog?
posthog.capture(). Starting with autocapture: false is recommended so you can build familiarity before enabling automatic tracking.