Automated Tests for GTM Data Layer Push Events
- Manual dataLayer testing doesn't scale across large GTM containers or frequent deploys. One tag change can silently break downstream events.
- AH Debugger provides real-time visibility into every dataLayer push directly in the browser, without GTM Preview mode.
- Automated tests validate event names, parameter values, and trigger logic continuously, catching regressions before they corrupt reports.
- AssertionHub simulates full user journeys against your live site and alerts you the moment something changes unexpectedly.
Automated Tests or Manual Tests for Your Data Layer Events?
Choosing between manual and automated testing for your Data Layer events depends on your scale and requirements. Let’s explore both approaches to help you make an informed decision.
Manual Testing Methods
When initially setting up your DataLayer events, manual testing is the fastest way to verify your implementation before investing in automation.
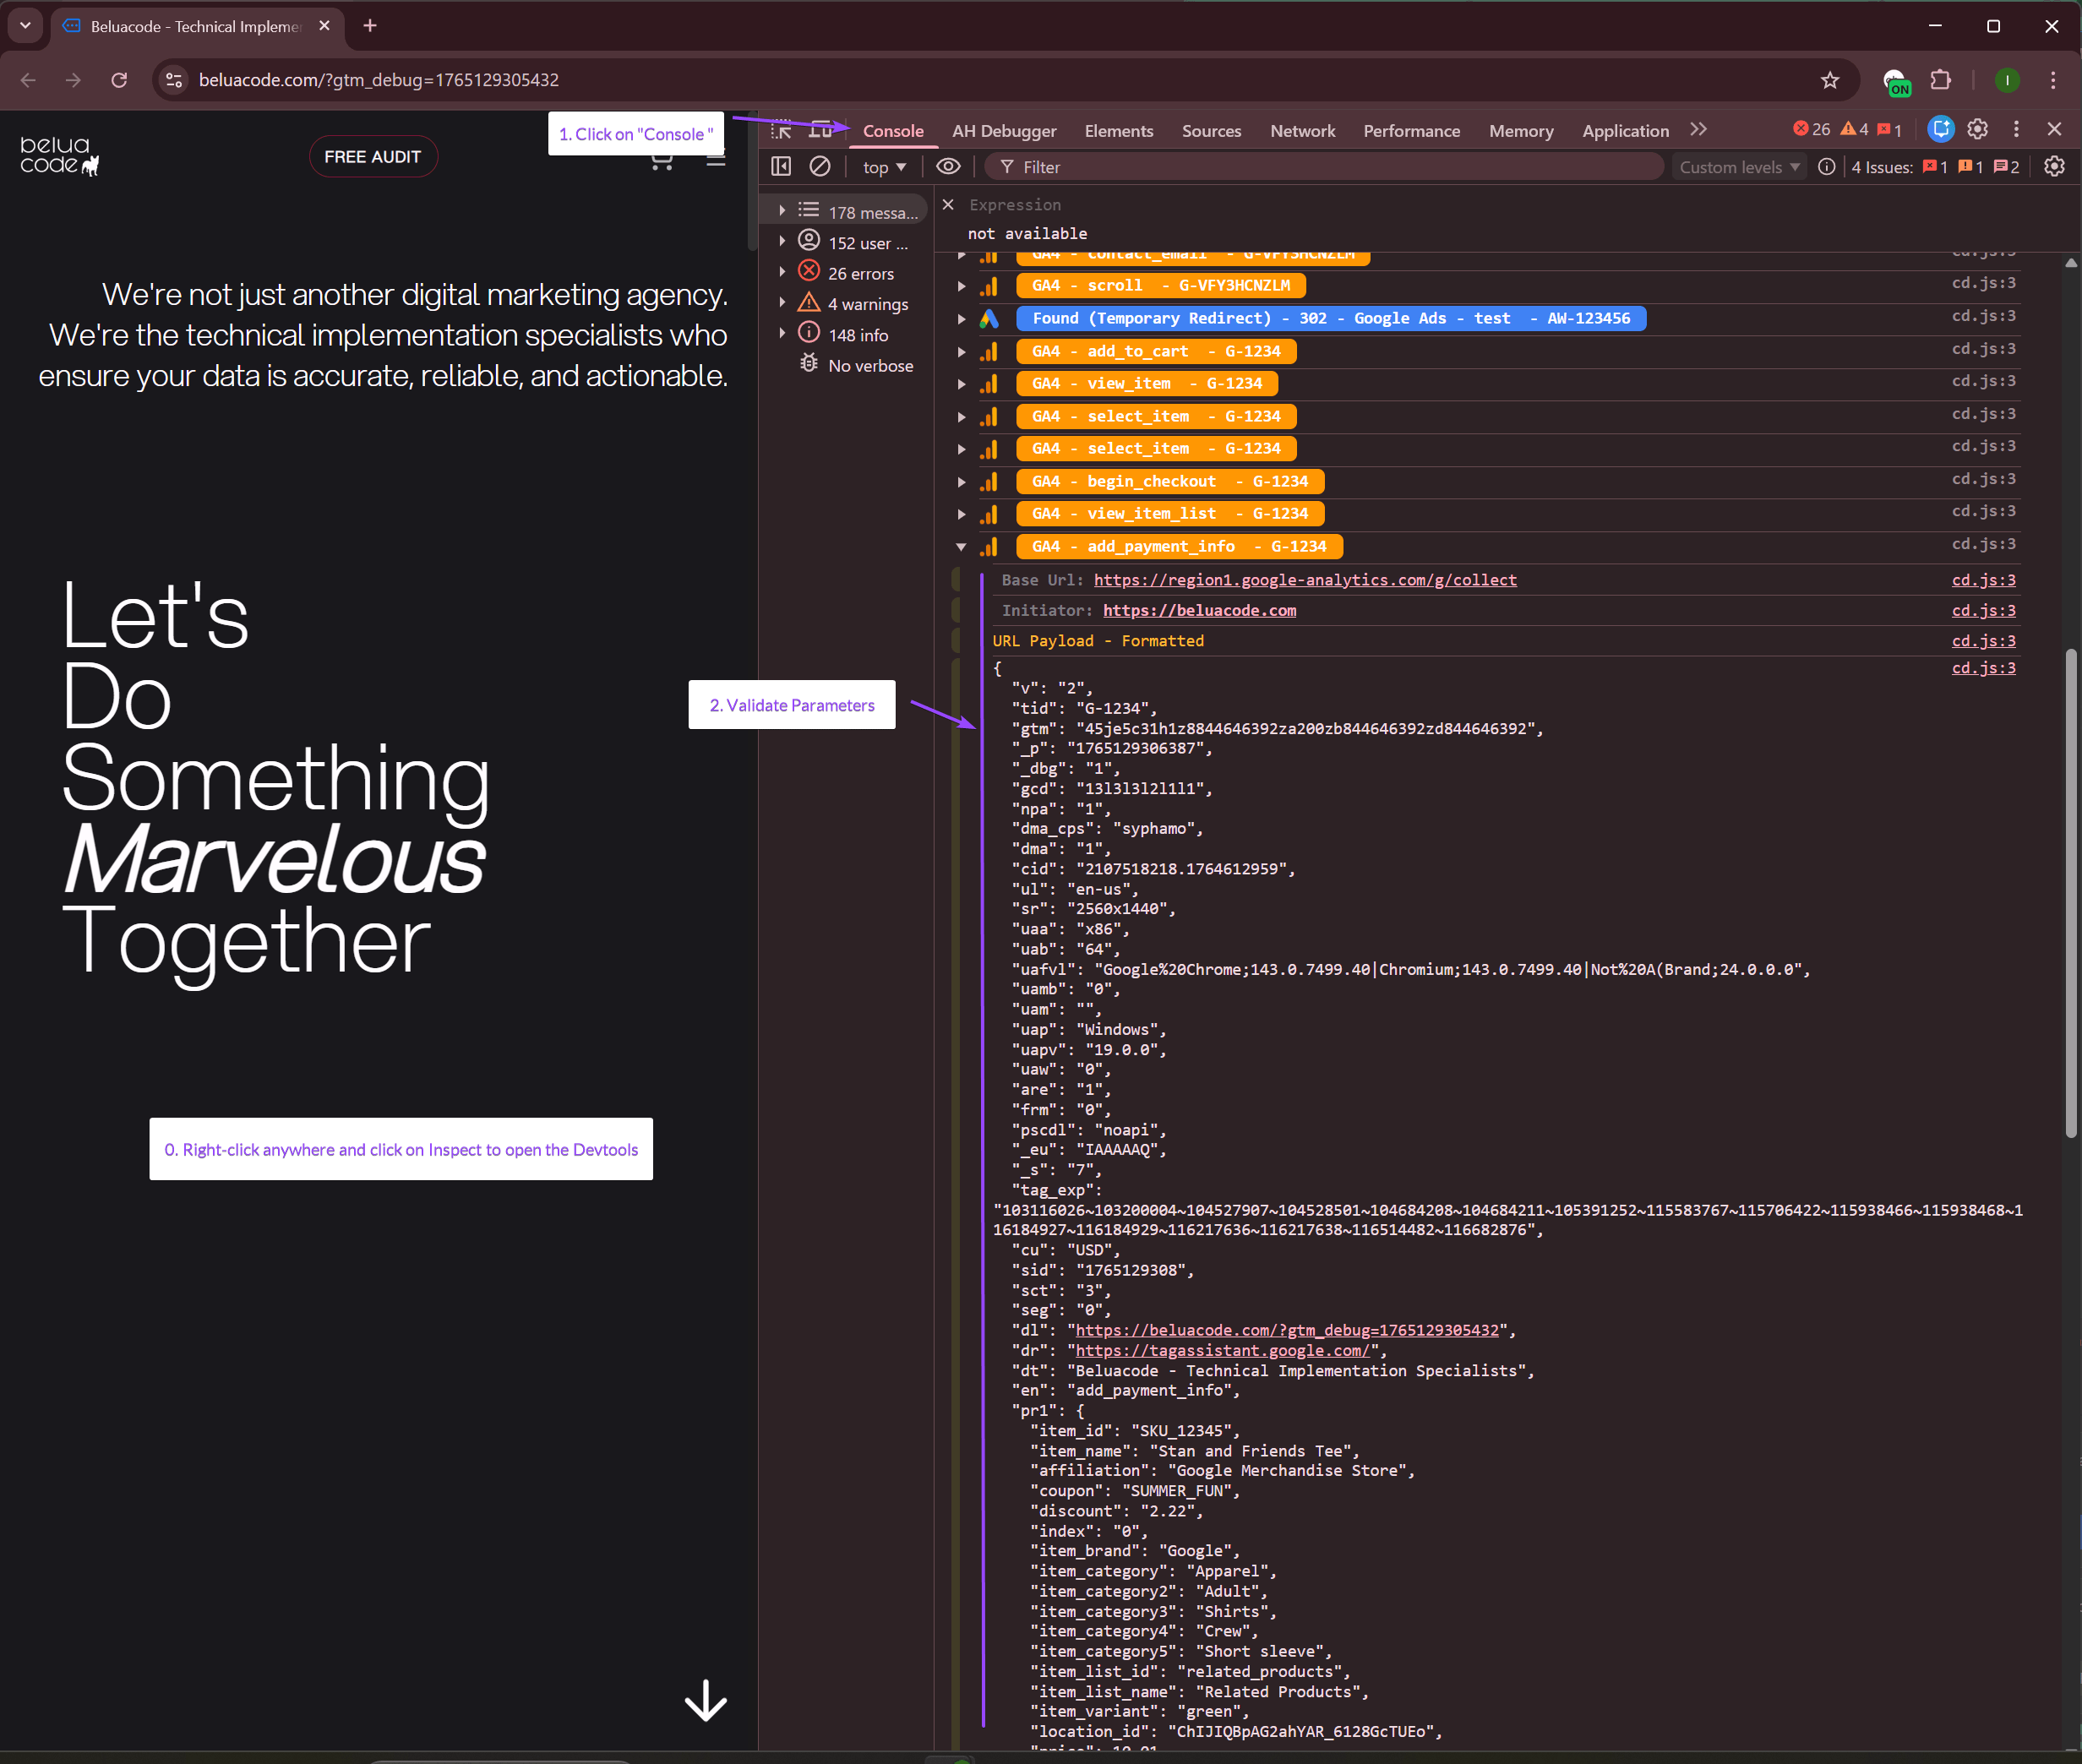
Verify GTM is Loaded
Open Chrome DevTools by pressing F12 or right-clicking and selecting Inspect.
Click the Console tab. Type window.google_tag_manager to confirm GTM is loaded and see which container IDs are active on the page. If this returns undefined, GTM hasn’t loaded at all; check for script blockers or a missing snippet.
Then type window.dataLayer to see the full array of events pushed so far on the current page. Expand any object to inspect its properties against your expected schema.
Note: If you’re using a custom Data Layer name, use window.yourCustomName instead.
Filter Specific Events in Console
Instead of scrolling through the full dataLayer array, filter for the specific event you want to validate:
// Show all ecommerce pushes
window.dataLayer.filter(e => e.ecommerce)

// Show a specific event
window.dataLayer.filter(e => e.event === 'purchase')

// Show the last event pushed
window.dataLayer[window.dataLayer.length - 1]
Check that the ecommerce object matches the expected schema: correct field names, numeric values for price and value, and a non-empty items array.
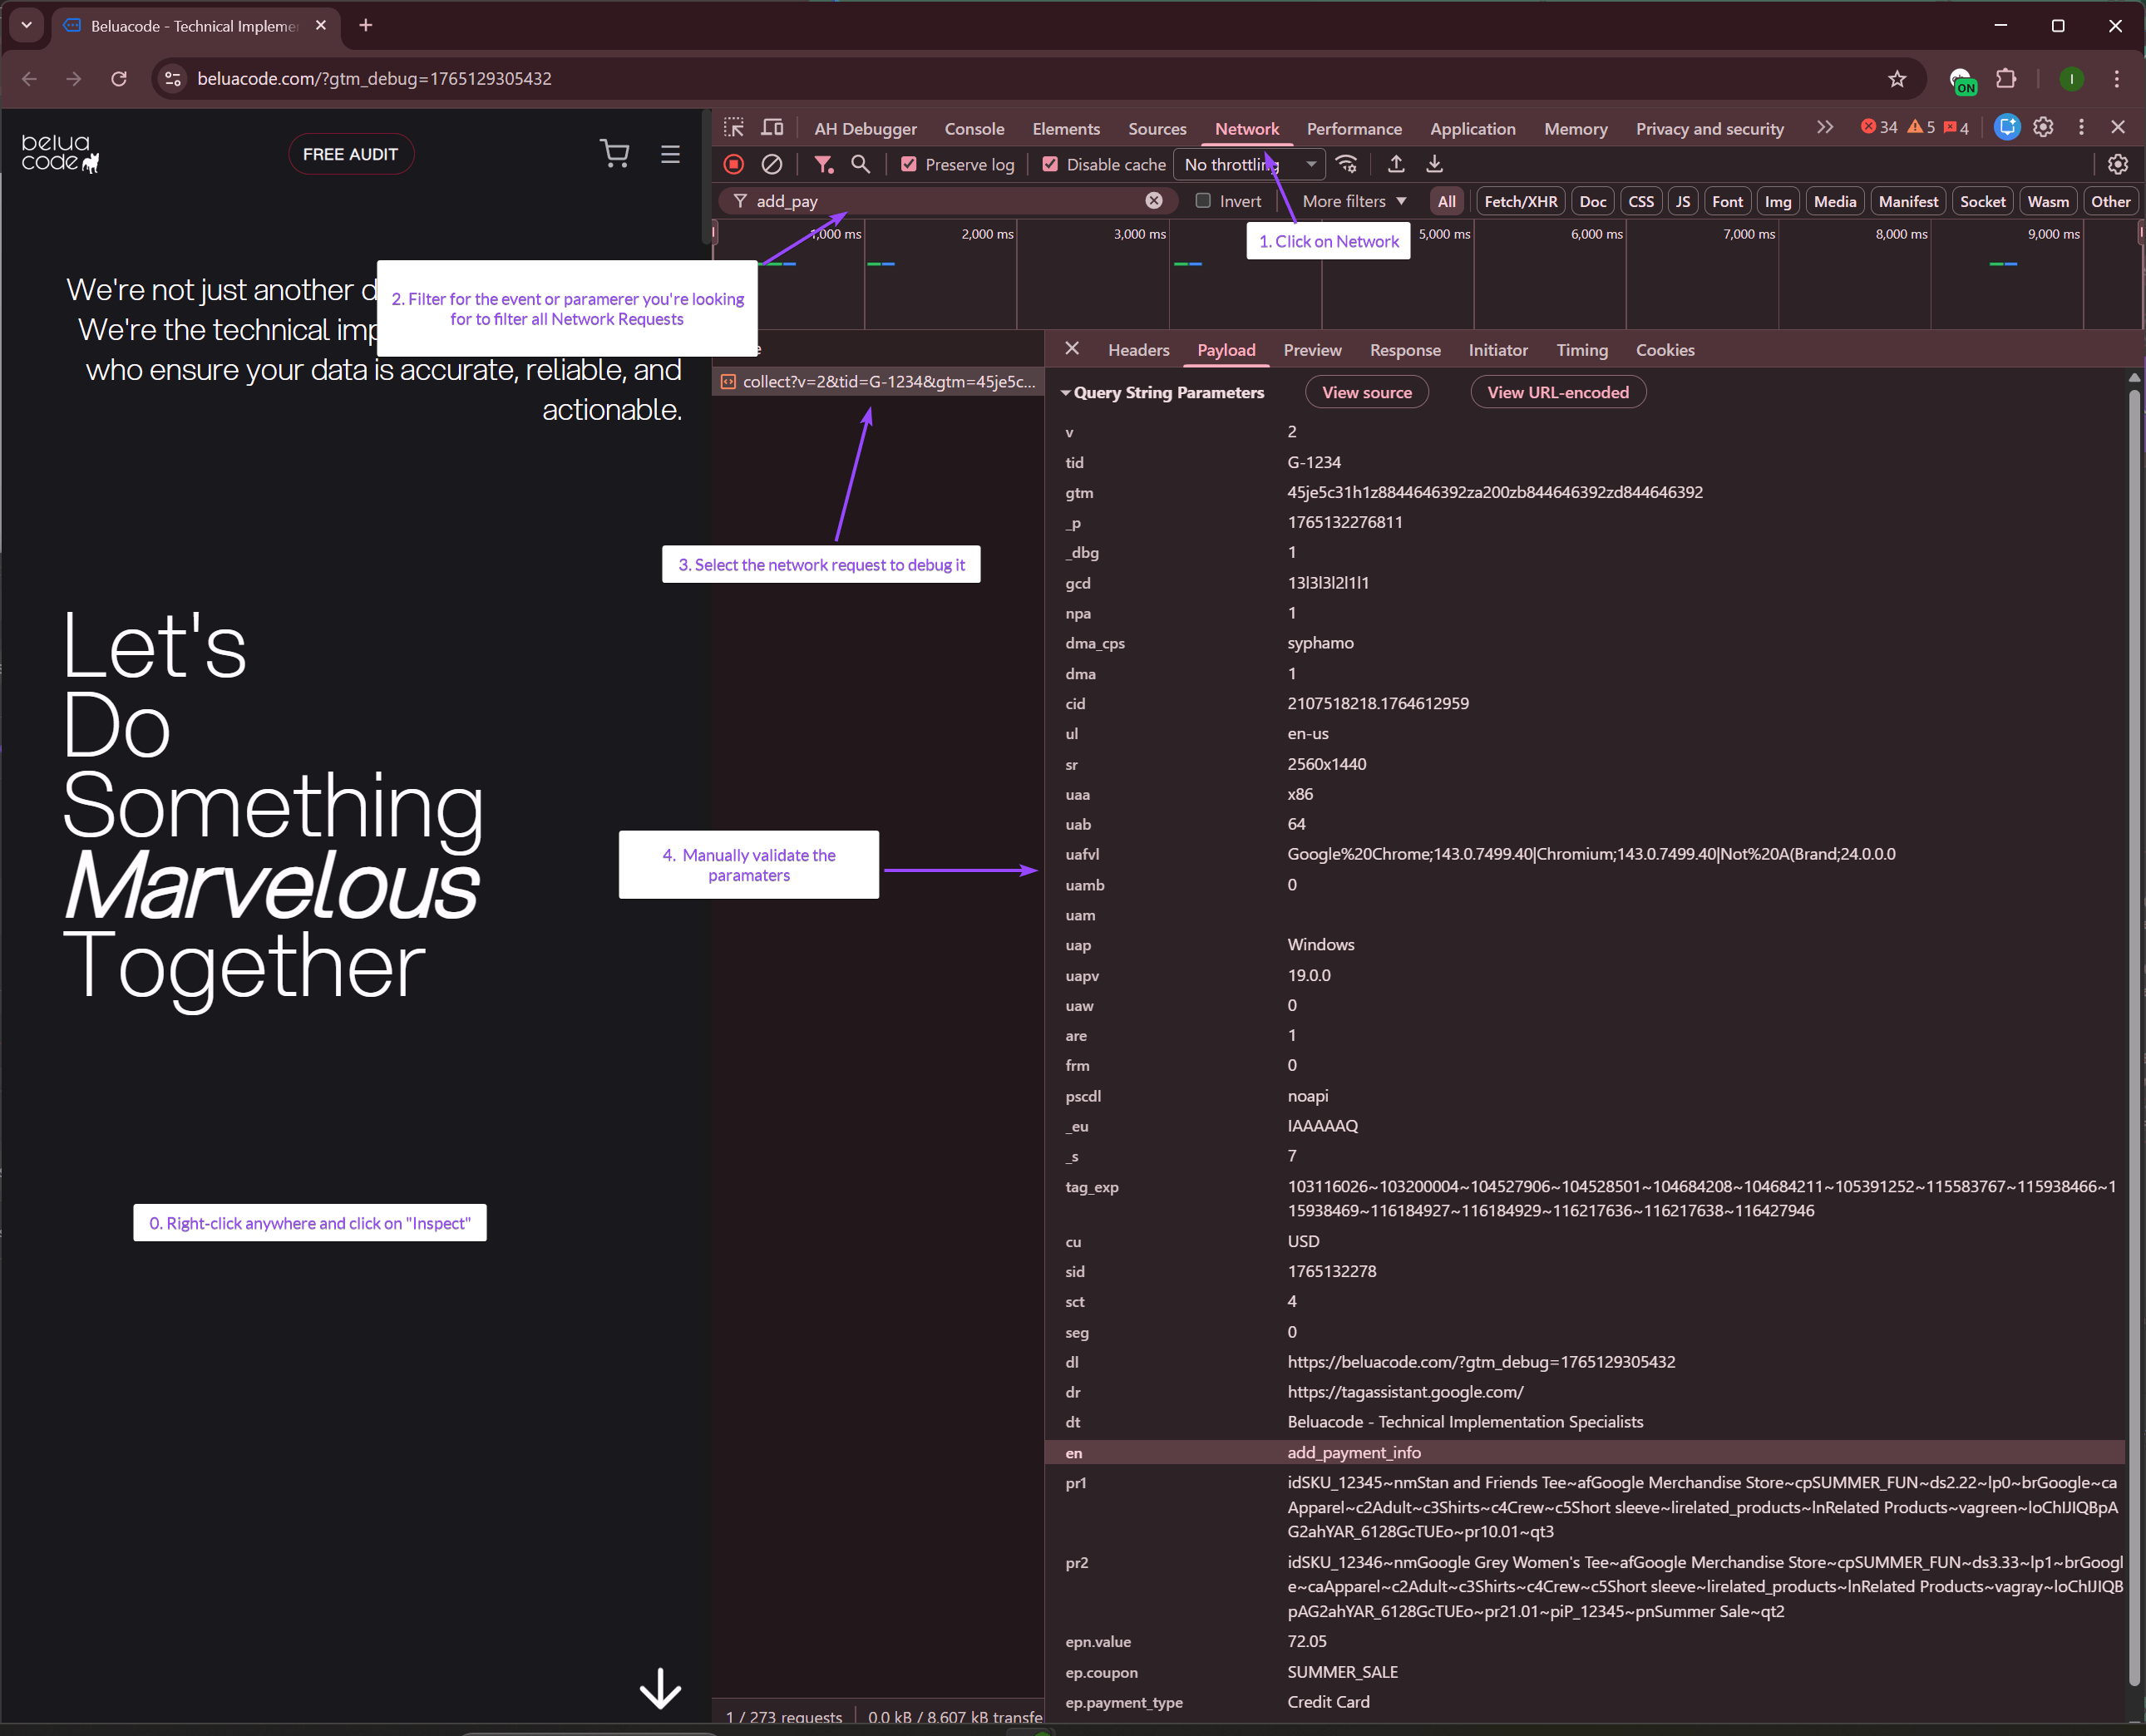
Cross-check GA4 Network Requests
Click the Network tab in DevTools. In the filter box, type collect to show only GA4 requests fired by your GTM tags.
Select a request, open the Payload tab, and find Query String Parameters to verify the event actually reached GA4 with the correct parameters.
Look at the Status column:
- 2xx (shown in green) = Success
- 4xx (red) = Bad request
- 5xx (red) = Server error
- Failed (red) = Network error, ad blocker, or Google Ads account suspended. Usually with error code “-1”
Using Chrome Extension Debuggers
Browser extensions like AH Debugger significantly streamline the debugging process, automatically validating the schema without requiring you to dig through raw JSON payloads manually.
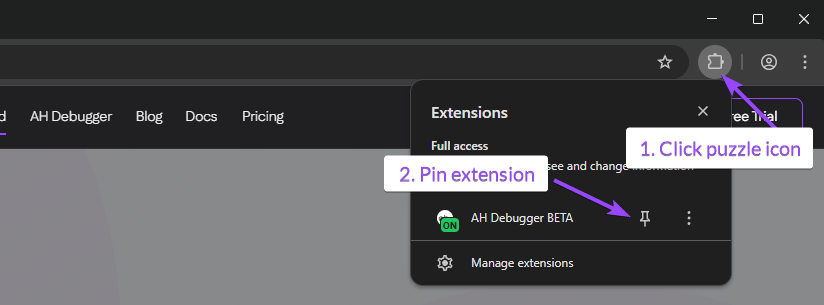
Install and Enable AH Debugger
-
Install AH Debugger extension from Chrome Web Store,
-
Click on the puzzle icon on the top right of your browser,
-
Optionally pin the AH Debugger extension for easy access.
-
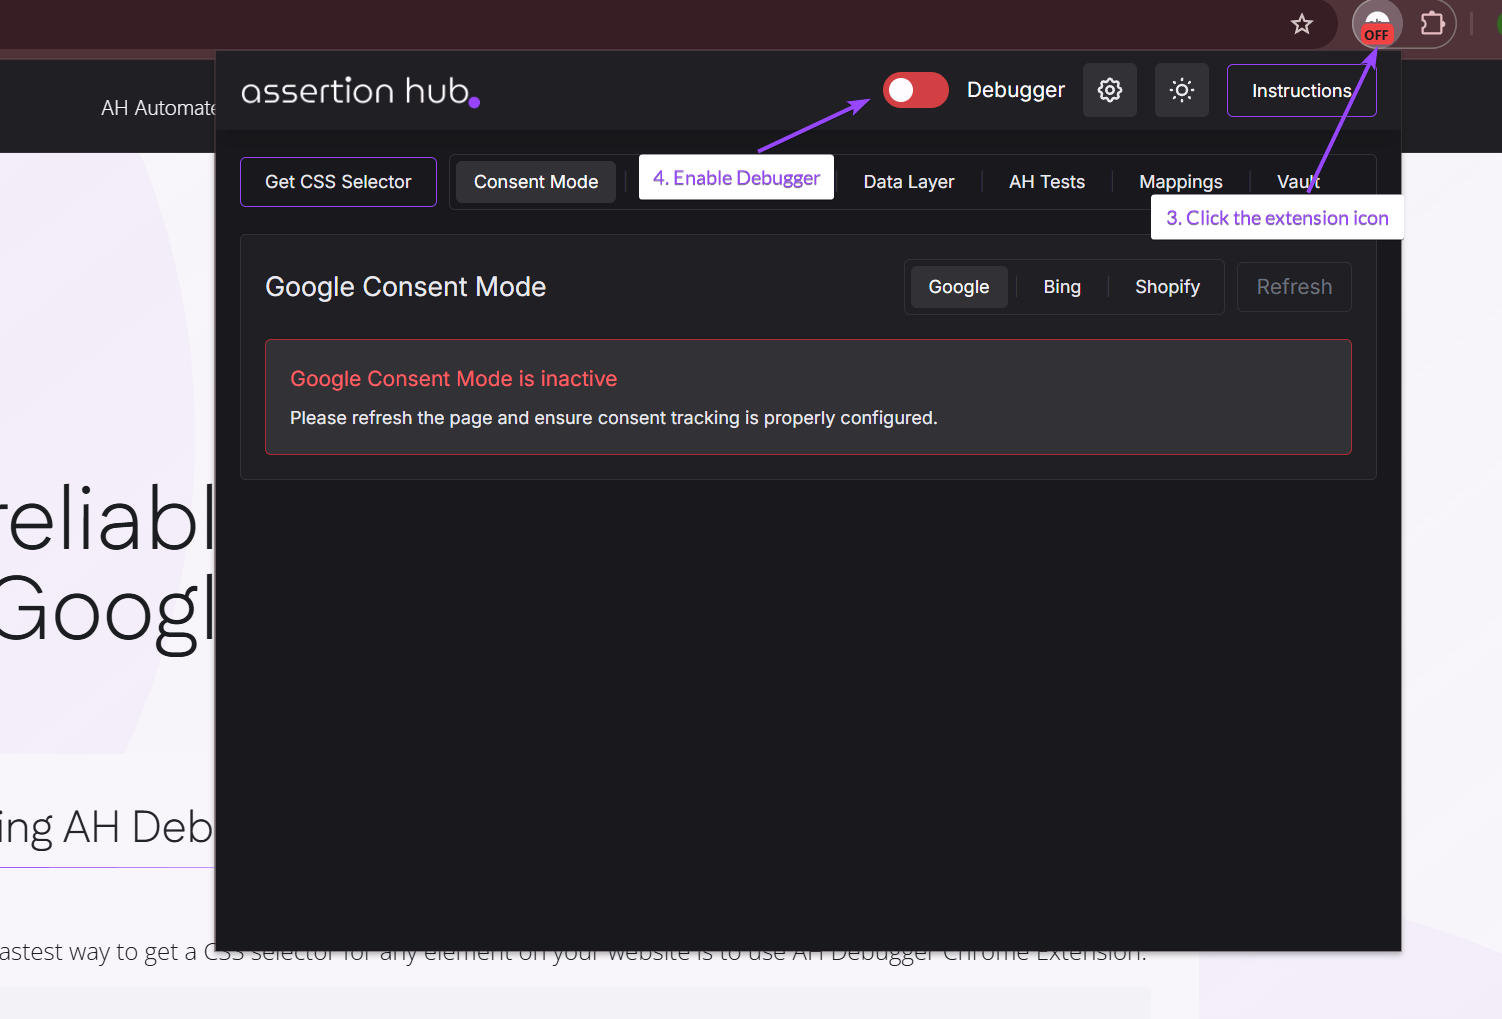
Click on the extension icon
-
Enable the debugger by clicking on the red toggle
View DataLayer Events in Console Tab
-
Open Chrome DevTools by pressing
F12or right-clicking anywhere and selecting Inspect. -
Click the Console tab in DevTools and trigger the event on your website.
-
Check for the event name you want to validate, click to expand it, and check the pushed parameters.
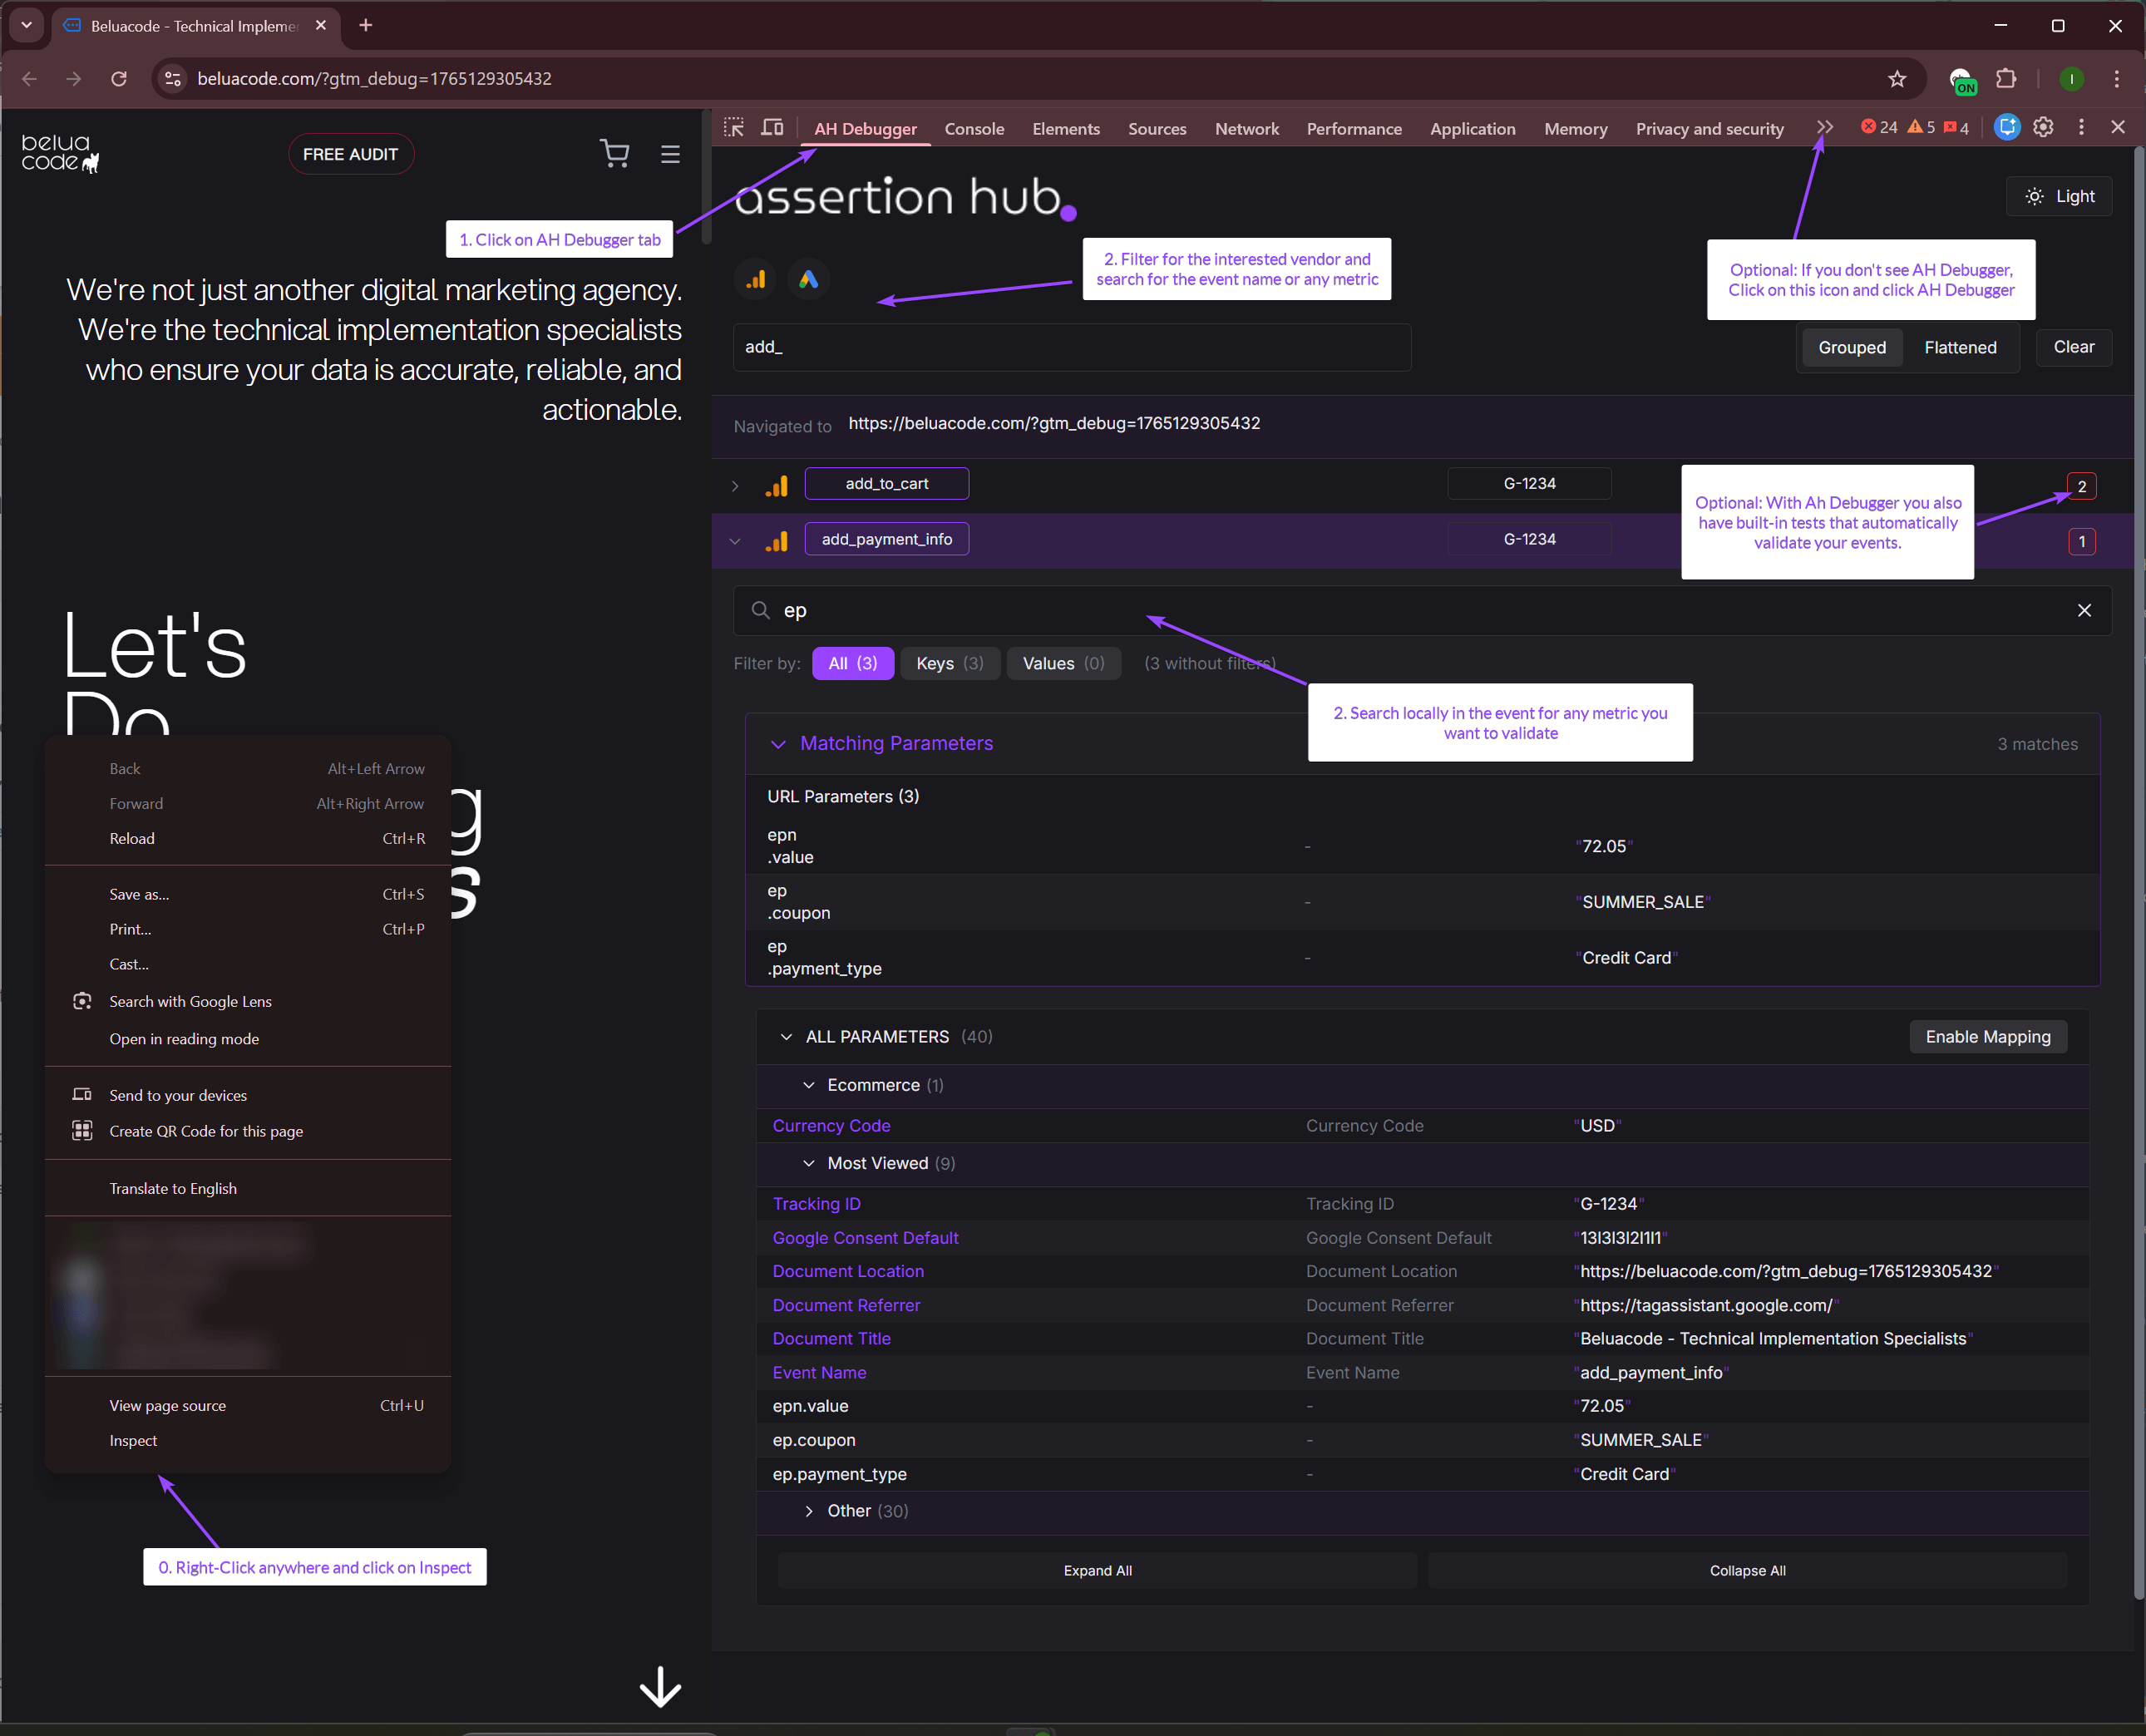
View Event in AH Debugger Panel
-
Open Chrome DevTools by pressing
F12or right-clicking anywhere and selecting Inspect. -
Click on AH Debugger panel. If not present, click on the double-arrow on the right and from the dropdown click on AH Debugger.
-
Use Global and Local search to find specific parameters you want to validate.
-
Start validating the parameters to ensure they match the expected DataLayer schema.
- Built-in Tests: If any are present, you will see the results on the right side. Click on the number and a modal with the results will show up.
GA4 Ecommerce DataLayer Push Reference
Before you can test whether your DataLayer pushes are correct, you need to know what “correct” looks like. Below are the exact schemas for every GA4 ecommerce event as defined in Google’s documentation.
One rule that applies to all events: always clear the previous ecommerce object before pushing a new one. Failing to do this causes data from previous events to bleed into subsequent ones.
// Always do this before any ecommerce push
dataLayer.push({ ecommerce: null });
Browsing & Discovery
view_item_list: User sees a list of products
dataLayer.push({ ecommerce: null });
dataLayer.push({
  event: "view_item_list",
  ecommerce: {
    item_list_id: "related_products",   // optional but recommended
    item_list_name: "Related Products", // optional but recommended
    items: [
      {
        item_id: "SKU_12345",           // required (or item_name)
        item_name: "Stan and Friends Tee",
        affiliation: "Google Store",
        coupon: "SUMMER_FUN",
        discount: 2.22,
        index: 0,                       // position in the list
        item_brand: "Google",
        item_category: "Apparel",
        item_category2: "Adult",
        item_list_id: "related_products",
        item_list_name: "Related Products",
        item_variant: "green",
        price: 9.99,                    // must be a number, not a string
        quantity: 1
      }
    ]
  }
});select_item: User clicks a product from a list
dataLayer.push({ ecommerce: null });
dataLayer.push({
  event: "select_item",
  ecommerce: {
    item_list_id: "related_products",
    item_list_name: "Related Products",
    items: [
      {
        item_id: "SKU_12345",
        item_name: "Stan and Friends Tee",
        index: 0,
        price: 9.99,
        quantity: 1
      }
    ]
  }
});view_item: User views a product detail page
dataLayer.push({ ecommerce: null });
dataLayer.push({
  event: "view_item",
  ecommerce: {
    currency: "USD",   // required
    value: 9.99,       // required: value of the item viewed, not cart total
    items: [
      {
        item_id: "SKU_12345",
        item_name: "Stan and Friends Tee",
        item_brand: "Google",
        item_category: "Apparel",
        item_variant: "green",
        price: 9.99,
        quantity: 1
      }
    ]
  }
});
Cart Interactions
add_to_cart: User adds item(s) to cart
dataLayer.push({ ecommerce: null });
dataLayer.push({
  event: "add_to_cart",
  ecommerce: {
    currency: "USD",  // required
    value: 19.98,     // required: price × quantity of items being added
    items: [
      {
        item_id: "SKU_12345",
        item_name: "Stan and Friends Tee",
        item_brand: "Google",
        item_category: "Apparel",
        item_variant: "green",
        price: 9.99,
        quantity: 2   // value above should reflect this quantity
      }
    ]
  }
});remove_from_cart: User removes item(s) from cart
dataLayer.push({ ecommerce: null });
dataLayer.push({
  event: "remove_from_cart",
  ecommerce: {
    currency: "USD",
    value: 9.99,
    items: [
      {
        item_id: "SKU_12345",
        item_name: "Stan and Friends Tee",
        price: 9.99,
        quantity: 1
      }
    ]
  }
});view_cart: User views the cart page
dataLayer.push({ ecommerce: null });
dataLayer.push({
  event: "view_cart",
  ecommerce: {
    currency: "USD",
    value: 22.98,   // total value of all items currently in cart
    items: [
      {
        item_id: "SKU_12345",
        item_name: "Stan and Friends Tee",
        price: 9.99,
        quantity: 1
      },
      {
        item_id: "SKU_67890",
        item_name: "Google Grey Women's Tee",
        price: 12.99,
        quantity: 1
      }
    ]
  }
});
Checkout Process
Important: GA4 does not use numbered checkout steps like Universal Analytics did. You must use these exact event names or the default Checkout Journey exploration report will remain empty.
begin_checkout: User starts the checkout process
dataLayer.push({ ecommerce: null });
dataLayer.push({
  event: "begin_checkout",
  ecommerce: {
    currency: "USD",
    value: 22.98,
    coupon: "SUMMER_FUN",  // optional
    items: [ /* all items in cart */ ]
  }
});add_shipping_info: User selects a shipping method
dataLayer.push({ ecommerce: null });
dataLayer.push({
  event: "add_shipping_info",
  ecommerce: {
    currency: "USD",
    value: 22.98,
    coupon: "SUMMER_FUN",
    shipping_tier: "Ground",  // suggested: e.g. "Ground", "Air", "Next-day"
    items: [ /* all items in cart */ ]
  }
});add_payment_info: User selects a payment method
dataLayer.push({ ecommerce: null });
dataLayer.push({
  event: "add_payment_info",
  ecommerce: {
    currency: "USD",
    value: 22.98,
    coupon: "SUMMER_FUN",
    payment_type: "Credit Card",  // suggested: e.g. "Credit Card", "PayPal"
    items: [ /* all items in cart */ ]
  }
});purchase: Transaction completed
dataLayer.push({ ecommerce: null });
dataLayer.push({
  event: "purchase",
  ecommerce: {
    transaction_id: "T_12345",  // required: must be unique per transaction
    affiliation: "Online Store",
    value: 28.97,               // required: total revenue inc. tax & shipping
    tax: 4.90,
    shipping: 5.99,
    currency: "USD",            // required
    coupon: "SUMMER_SALE",
    items: [
      {
        item_id: "SKU_12345",
        item_name: "Stan and Friends Tee",
        affiliation: "Online Store",
        coupon: "SUMMER_FUN",
        discount: 2.22,
        item_brand: "Google",
        item_category: "Apparel",
        item_variant: "green",
        price: 9.99,
        quantity: 2
      }
    ]
  }
});refund: Order refunded (full or partial)
dataLayer.push({ ecommerce: null });
dataLayer.push({
  event: "refund",
  ecommerce: {
    transaction_id: "T_12345",  // required
    affiliation: "Online Store",
    value: 28.97,
    tax: 4.90,
    shipping: 5.99,
    currency: "USD",
    coupon: "SUMMER_SALE",
    items: [
      // For a full refund: leave items array empty []
      // For a partial refund: include only the items being refunded
      {
        item_id: "SKU_12345",
        item_name: "Stan and Friends Tee",
        price: 9.99,
        quantity: 1
      }
    ]
  }
});
The items Array: Common Rules for All Events
| Parameter | Required | Notes |
|---|---|---|
item_id | Yes* | *Required if item_name is absent |
item_name | Yes* | *Required if item_id is absent |
price | Suggested | Must be a number, not a string |
quantity | Suggested | Defaults to 1 if omitted |
item_category | Suggested | Up to item_category5 supported |
item_brand | Suggested | |
item_variant | Suggested |
The Case for Automation
If you’re reading this, you probably understand the time investment required for proper Data Layer regression testing.
Whether you use debugger extensions like AH Debugger or rely on window.dataLayer in your console, manual testing becomes difficult to scale. Consider these challenges:
- Multiple Websites: How do you efficiently test across different properties?
- Event Complexity: What happens when you have dozens of events and numerous user journeys?
- Consistency: How do you ensure testing coverage remains comprehensive as your implementation grows?
Why Not DIY Automation?
If you’re technically inclined, you might consider building your own solution using JavaScript. While possible, this approach has significant drawbacks:
- Each website requires custom implementation
- Maintenance becomes tedious as requirements evolve
- Basic checks (like verifying GTM loads) are relatively simple, but comprehensive event validation is complex
The AI Testing Trap
Using AI for Data Layer testing might seem attractive, but it introduces problems:
- Token Costs: Each event validation requires substantial context, leading to high token consumption and costs that scale with your event count
- Reliability: AI hallucinations can produce false positives or miss critical issues
- Consistency: Results may vary between test runs
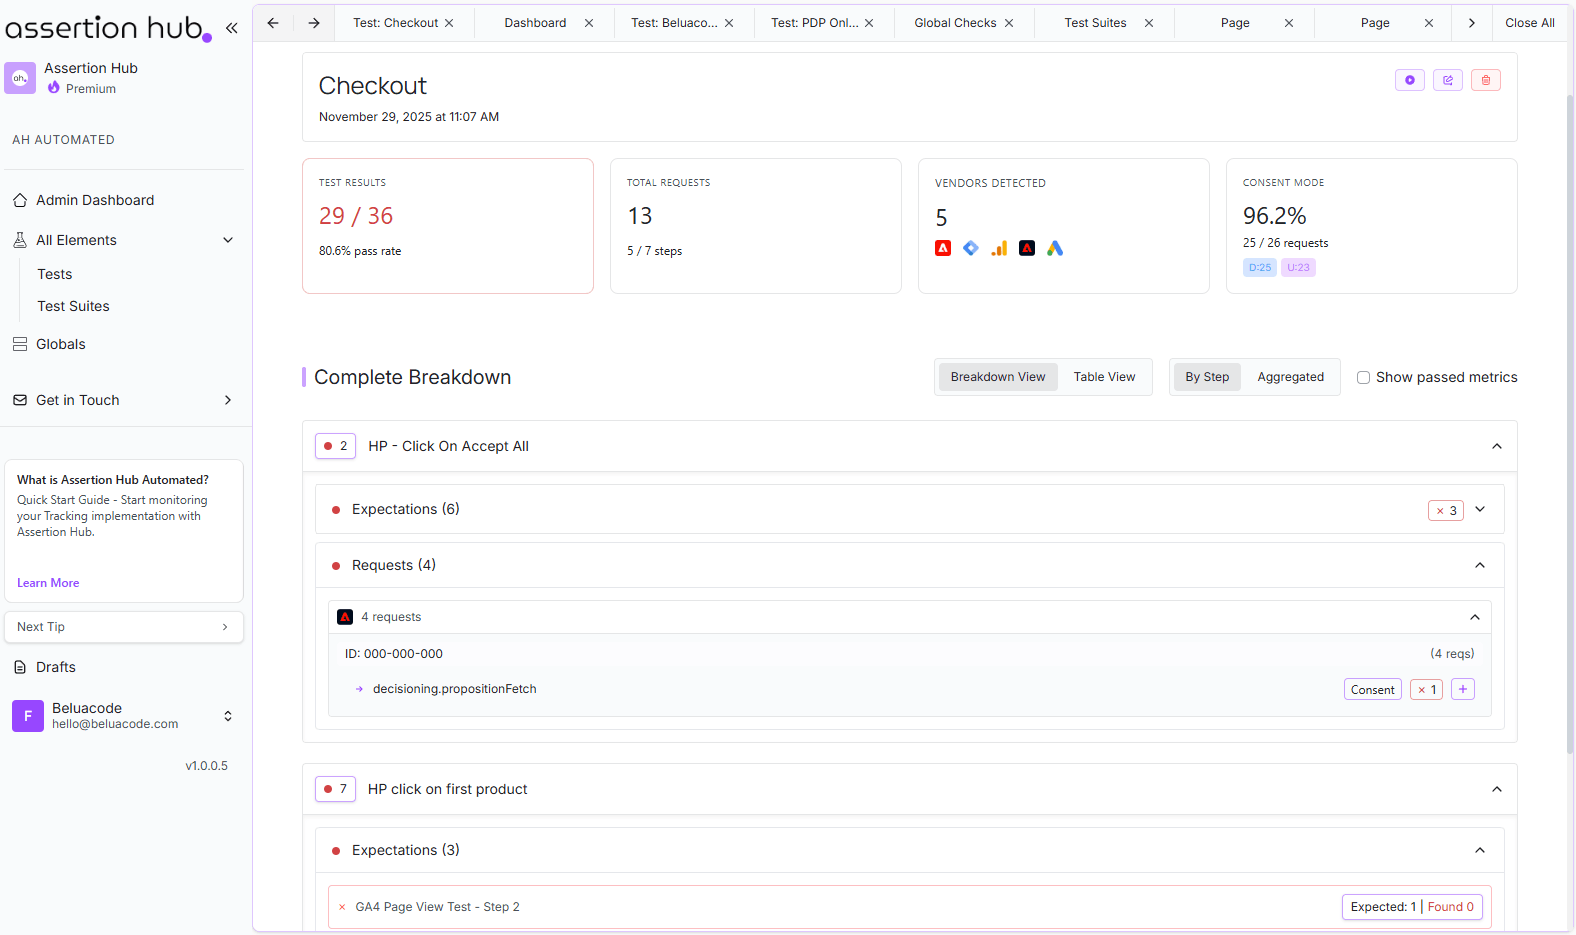
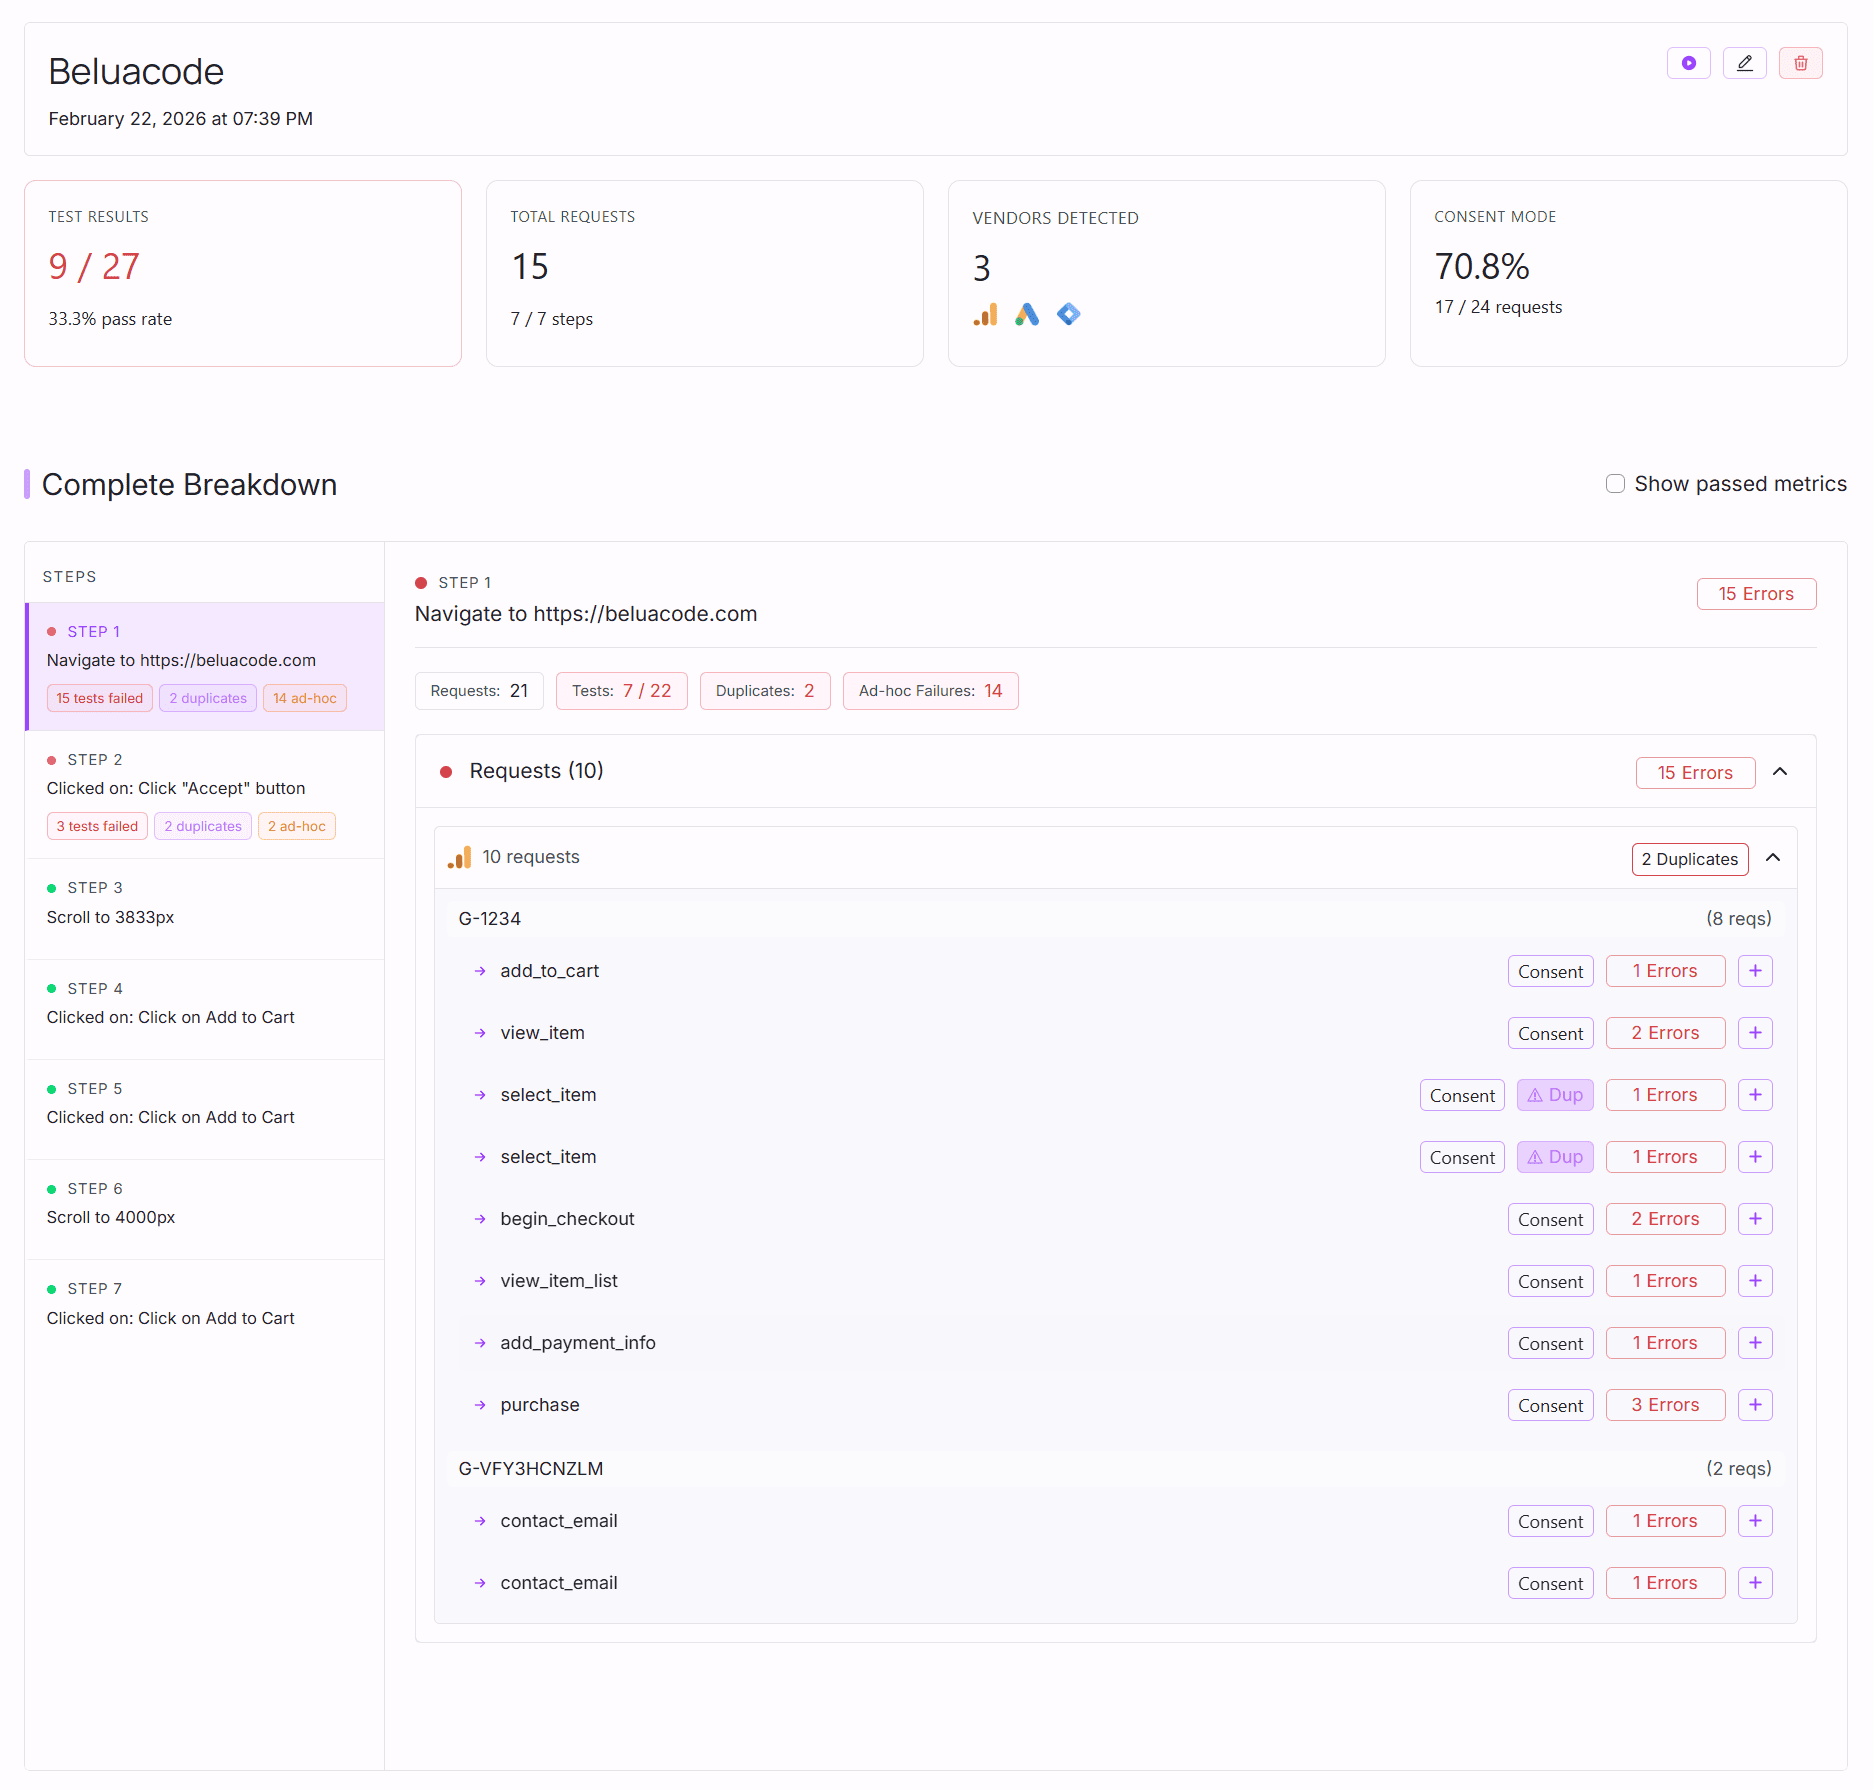
Setting Up Automated Tests with AssertionHub
AssertionHub eliminates the need for coding knowledge while providing comprehensive Data Layer testing. You can create reusable tests that work across multiple websites without recreating them for each property.
Built-in Browser Recorder
AssertionHub includes a built-in recorder. Enter your website URL, hit Start Recording, and navigate as a real user: add products to cart, go through checkout, complete a purchase. Every interaction is automatically added to the step list.
You can also describe steps in plain text and let AI handle the rest: type “add the first product to cart” and the AI picks the right element at execution time. No DOM knowledge needed.
When a site update breaks a selector, an AI fallback generates an alternative automatically; you review and decide whether to save it.
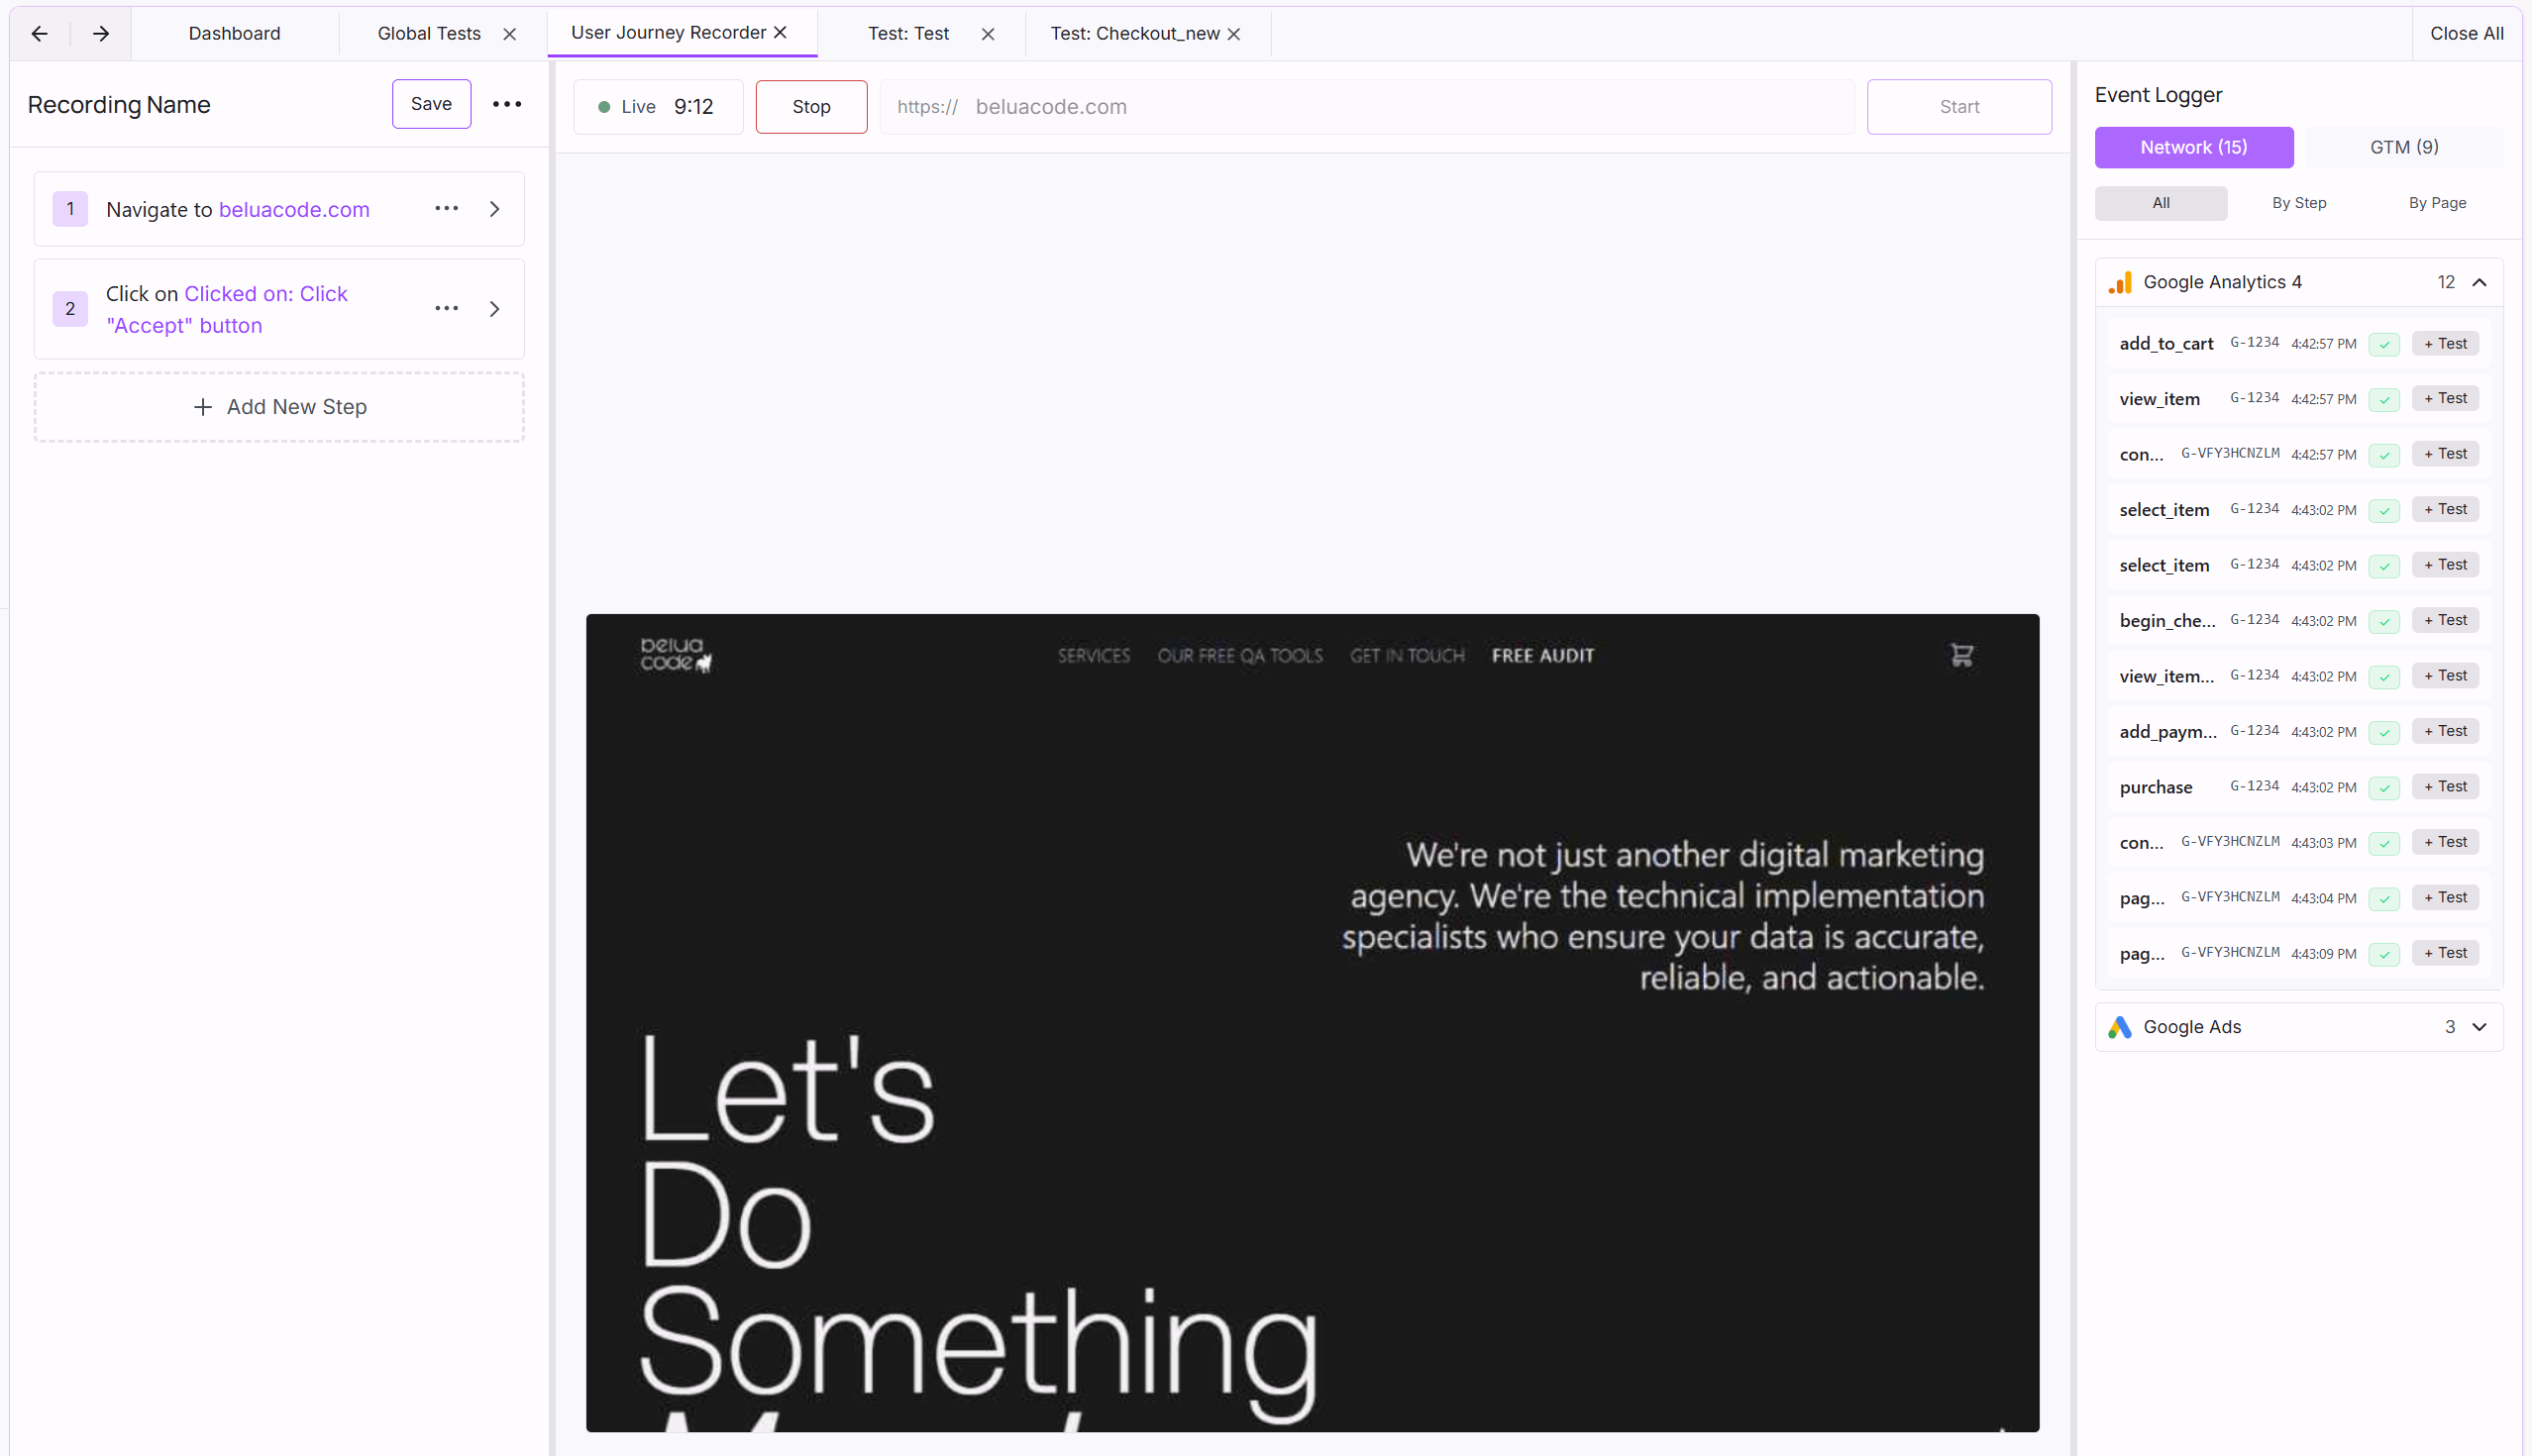
How to Start Automating Your Data Layer Events
After creating your free account, follow these steps to record your first user journey:
Think of it like simulating an actual user’s path through your website.
- Create New User Journey: Click “New User Journey”
- Record Your Session:
- Enter the website URL to record
- Start your recording
- The right panel displays detected Google Tag Manager Data Layer push events
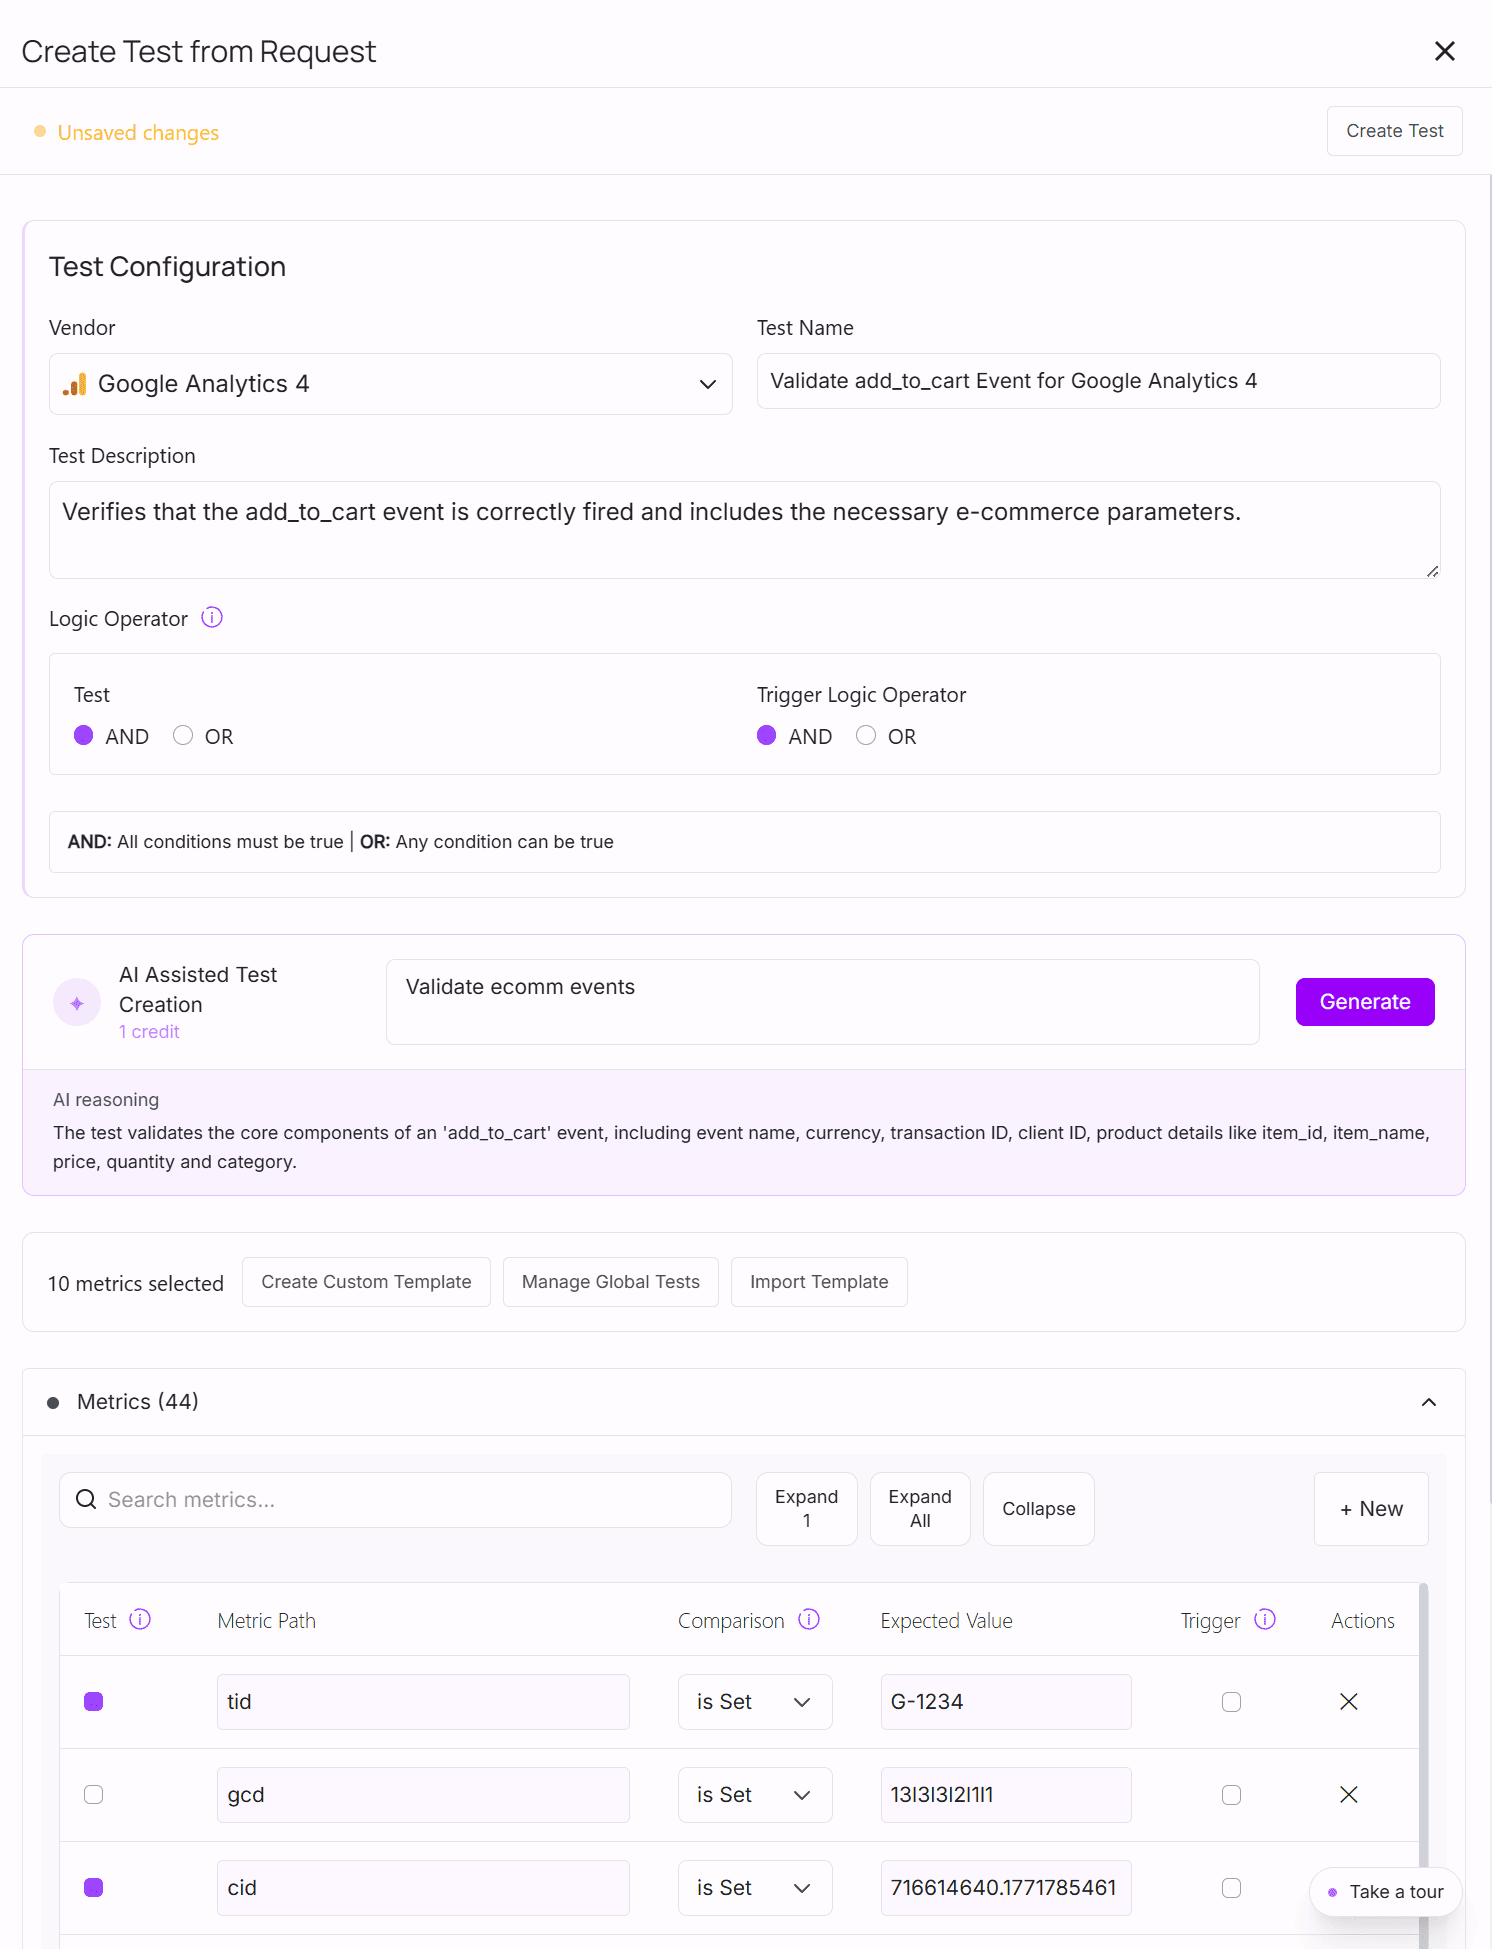
- Select Events to Monitor:
- Choose the events you want to track
- Click to create a test for each event: every captured metric is pre-filled, no guessing field names
- AI-Assisted Test Creation:
- Not sure which metrics matter? Describe what you want to validate in plain text
- The AI selects the right metrics; you review and confirm
- Finalize Recording:
- Complete your recording
- Add the test for each Data Layer event on the step where you expect it to fire
- Run and Review:
- Execute your user journey
- Review the test results
Optional: Continuous Monitoring
For ongoing validation, you can:
- Schedule user journeys to run daily
- Add your email for notifications
- Integrate with Slack for team alerts
This ensures your Data Layer implementation remains reliable as your website evolves, without manual intervention.
Frequently Asked Questions
How often should I test my GTM Data Layer implementation?
For automated testing, set to run tests daily or on every deployment.
What's the difference between manual and automated Data Layer testing?
Automated testing runs custom and built-in tests automatically, catching issues across multiple user journeys without manual intervention.
Can I test GTM Data Layer events without coding skills?
window.dataLayer in your browser console or extensions like AH Debugger. For automated testing, tools like AssertionHub let you create tests without writing code using a visual interface.How do I know if a Data Layer event fired correctly?
Extensions like AH Debugger make this verification process much faster.
Do I need to test every single Data Layer event?
How long does it take to set up automated Data Layer testing?
Can automated testing catch all Data Layer issues?
Co-founder of BeluaCode and AssertionHub
Analytics Developer specialised in tracking implementation,
implementations QA, tag management and highly customised solutions
when standard tools don't fit.
Runs
BeluaCode
as an implementation agency helping other experts when things get
too complex and
AssertionHub
to automate tracking validation on Analytics events.