How to record your first User Journeys with AssertionHub
This guide walks you through the complete workflow, from your first User Journey recording all the way to replaying it and reviewing the results.
What is a User Journey?
A User Journey is a set of instructions for AssertionHub to simulate user behavior on key conversion funnels and validate all the events firing in the process.
It is a simulation of an actual journey done by a user on your website. Adding a product to cart, completing a purchase, you get the idea.
Events detected during these steps are validated according to your settings. We will also see how to create a test and attach it to a step later in this guide.
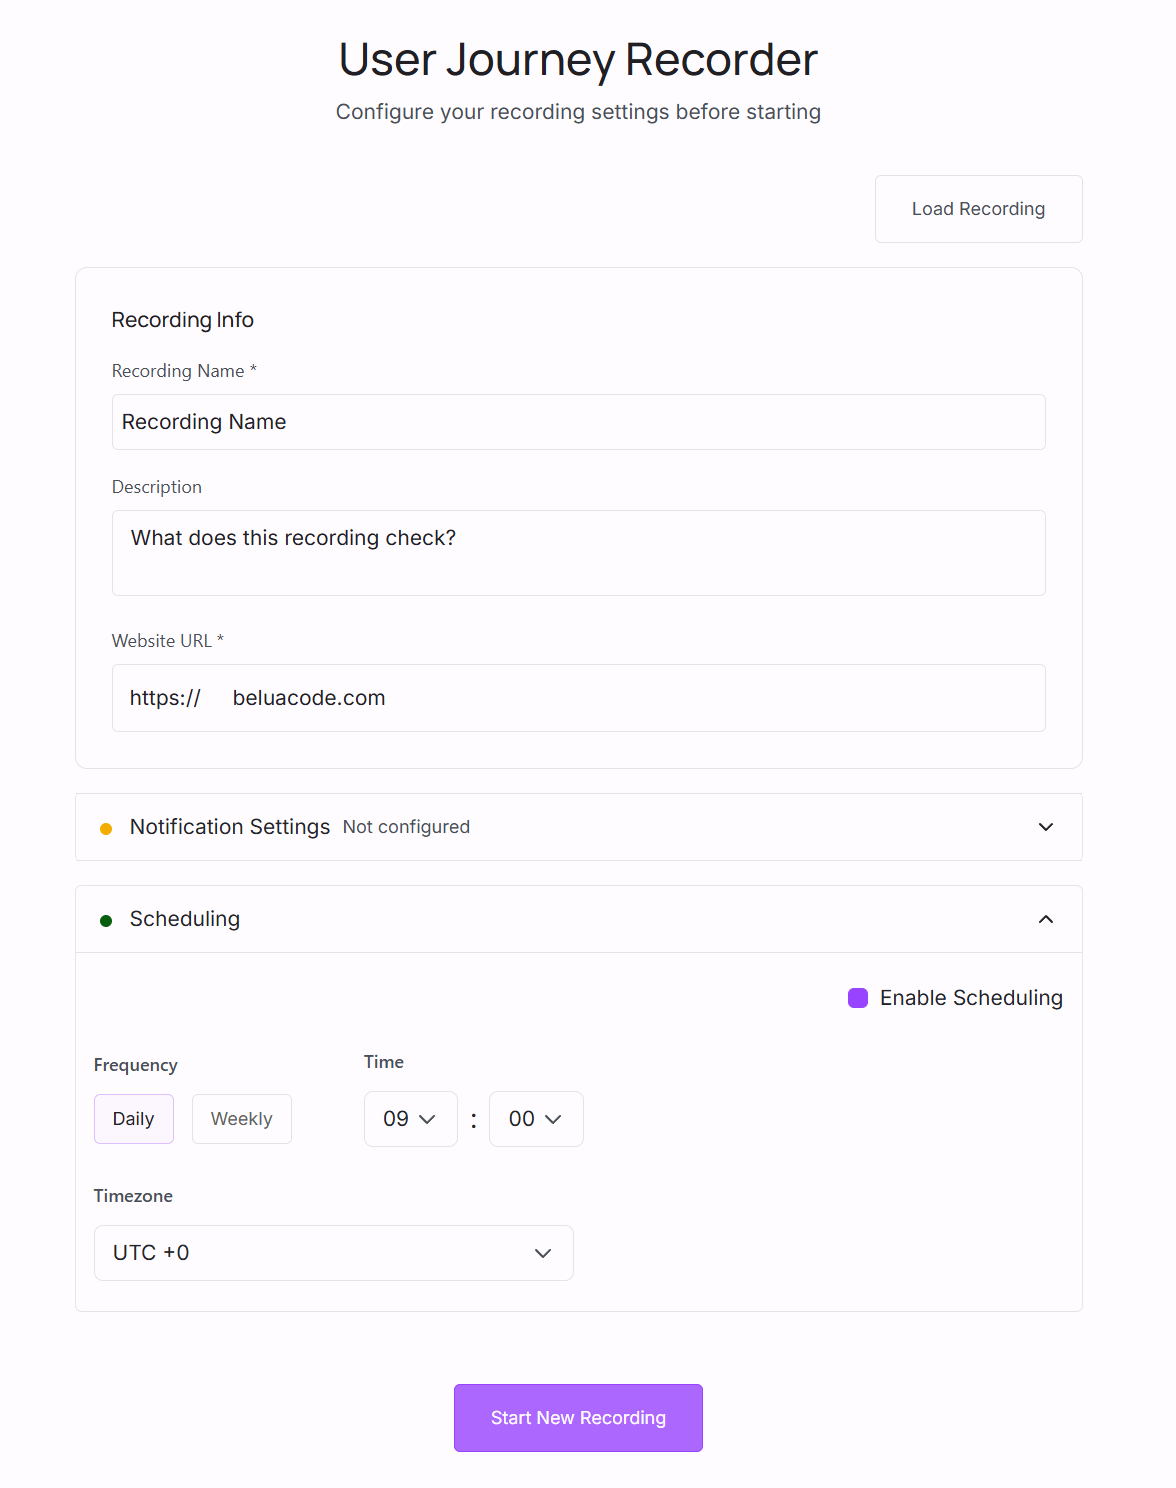
Step 1 - Start a Browser Session
- Go to app.assertionhub/user-journey-recorder
- Fill in the Recording Info and start a new recording
Step 2 - Perform Your Actions
Simply use the live browser as you would any normal webpage. Every interaction you make is automatically captured as a step in the Control Panel on the left.
| What you do in the browser | What gets recorded |
|---|---|
| Navigate to a URL | A Navigate step |
| Click a button or link | A Click step with the element’s text |
| Type into a text field | A Type step with the text you entered |
| Scroll the page | A Scroll step |
After each action you will see a brief semi-transparent overlay on the canvas with a countdown. This is the Recorder converting your raw interaction into a clean, replayable step. Wait for it to disappear before performing the next action. All the detected events will be stored in the Request Logger on the right, divided by Step and Page. This section will be useful later when creating custom tests to validate each step’s events.
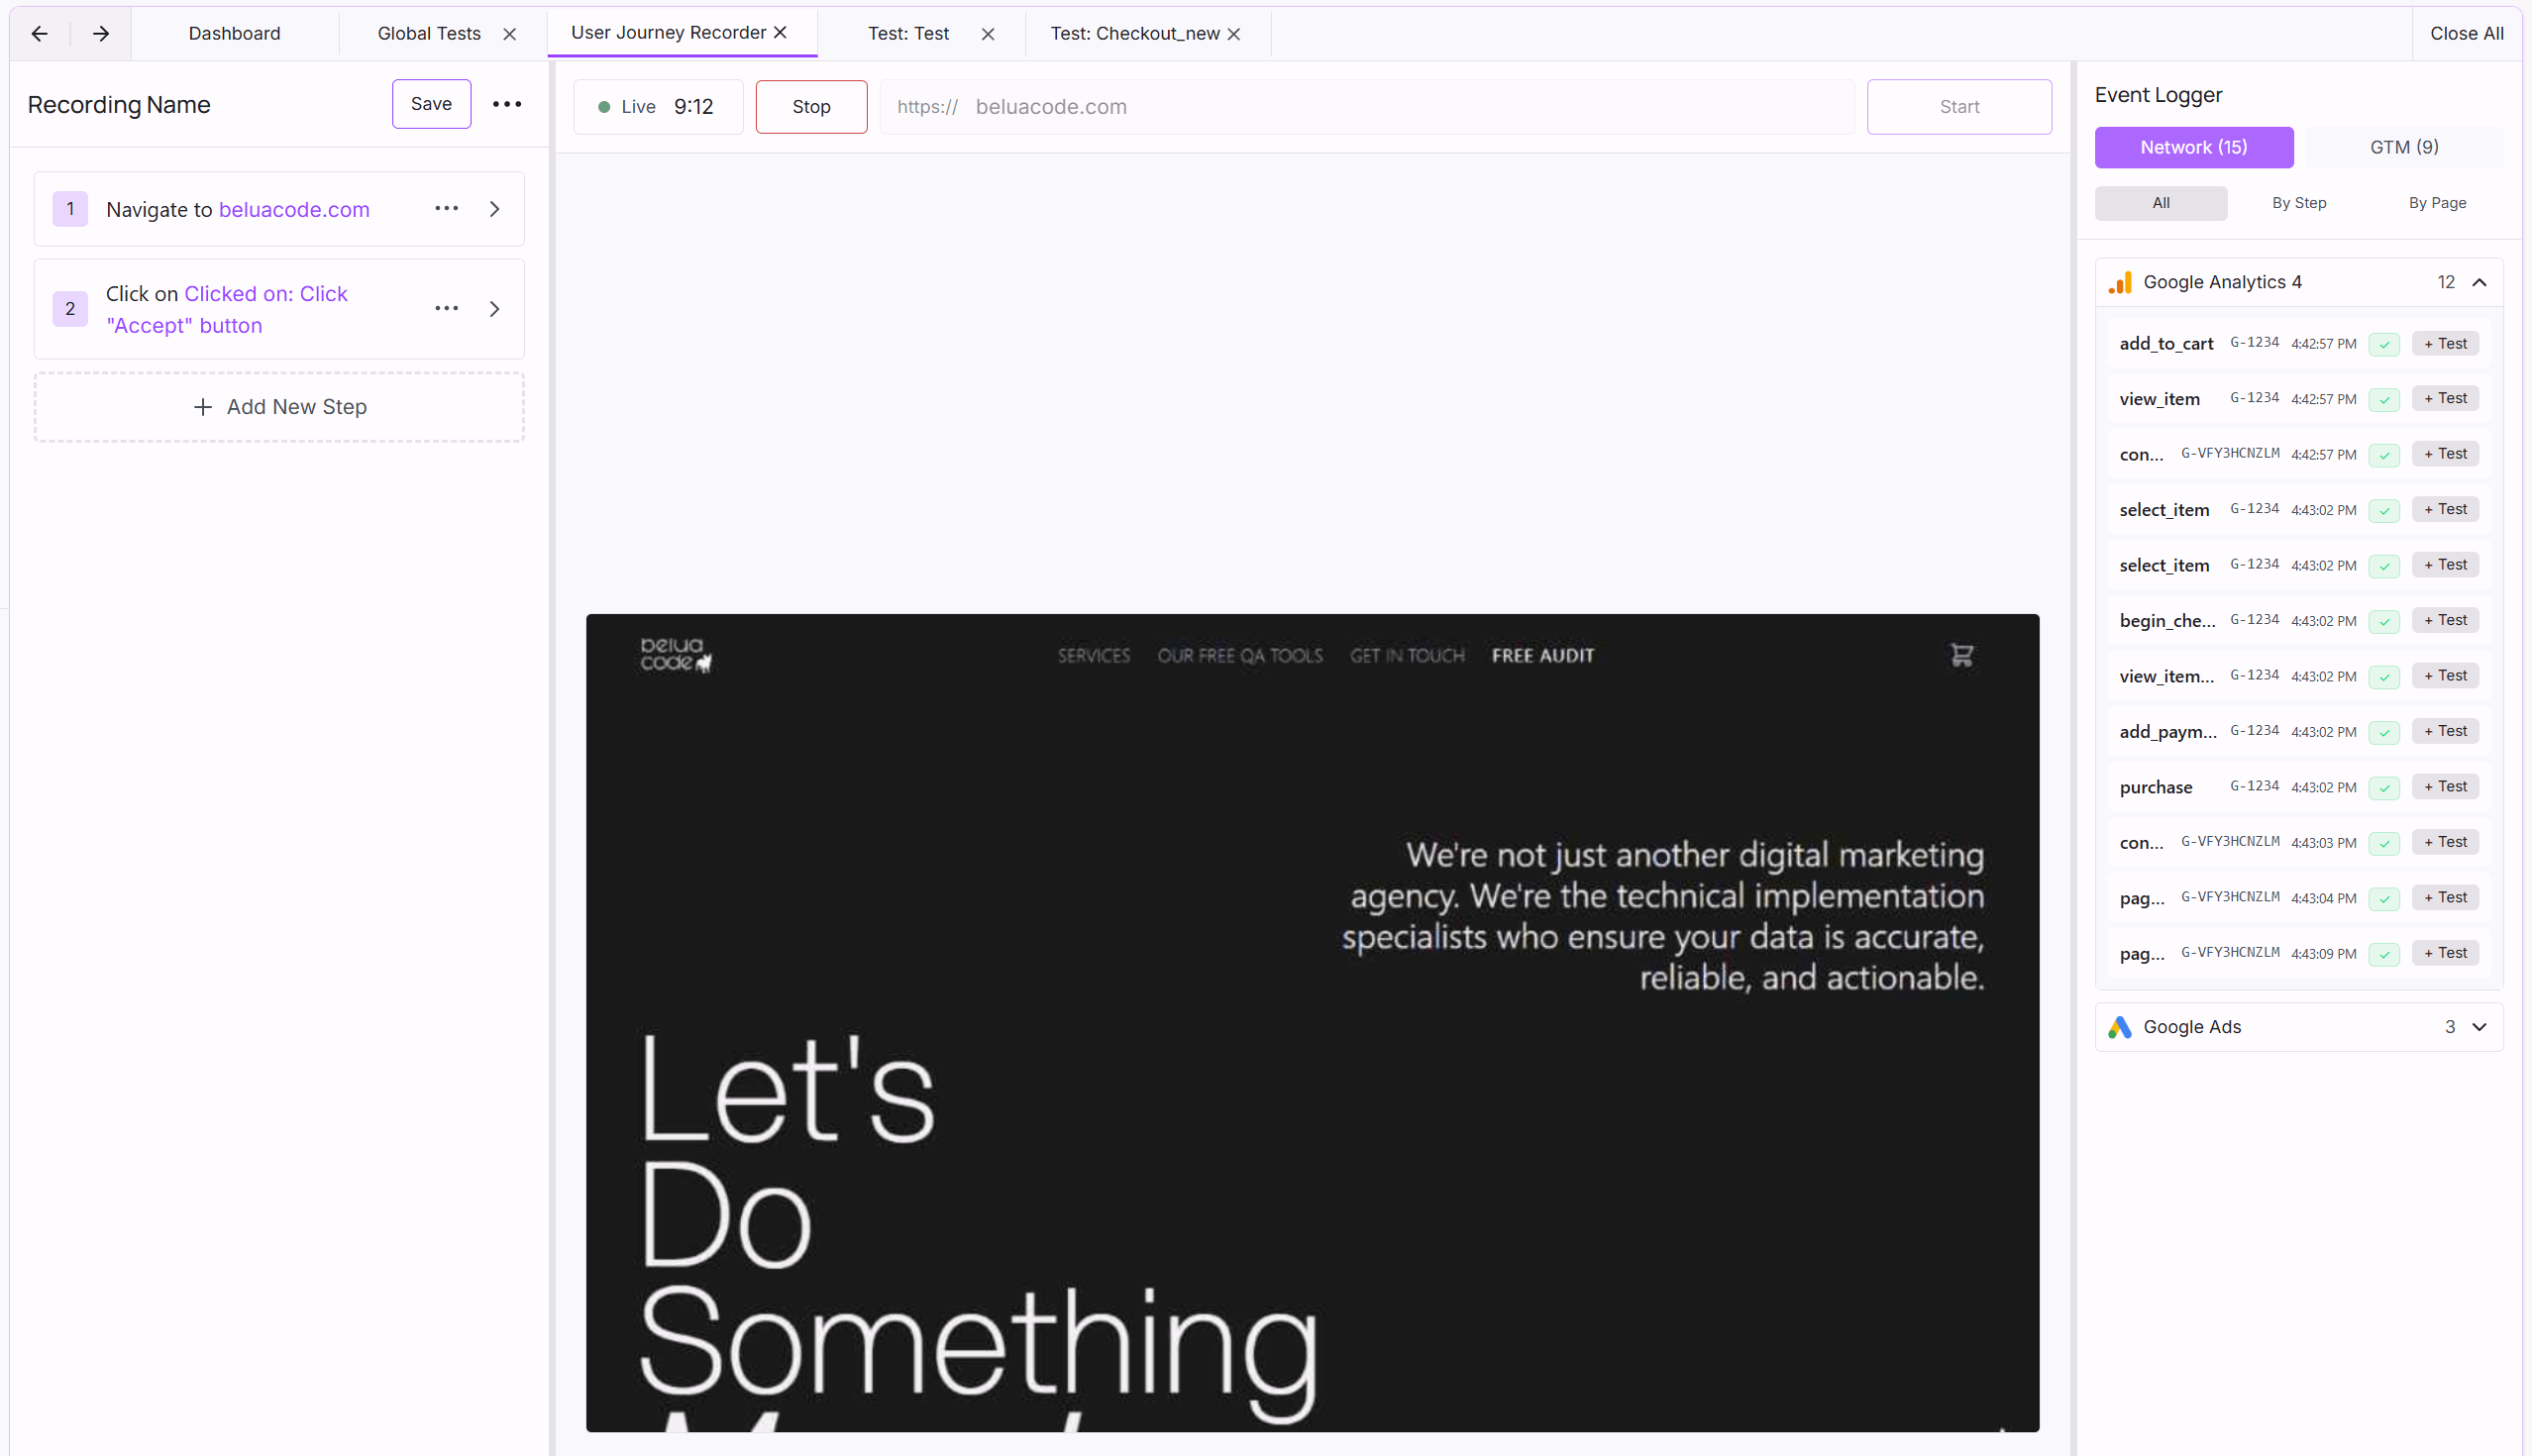
Example flow:
- The browser loads your homepage: a
Navigate to yourstore.comstep appears. - You click “Shop Now”: a
Click on Shop Nowstep appears. - You click on a product: a
Click on Product Namestep appears. - You click “Add to Cart”: a
Click on Add to Cartstep appears. - You type your email into a checkout field: a
Type "[email protected]"step appears.
Step 3 - Create Analytics and Data Layer Tests
Once you’re done recording, save it and move on to creating tests.
AssertionHub includes numerous built-in validations for GA4, Google Ads, and other vendors that are frequently updated. For anything more specific, you can create custom tests.
Quick guide: create a test from a detected event
- Check the Request Logger on the right. If events are already listed from your recording, skip to step 3.
- If the logger is empty, click Continue Rec and wait for the replay to finish so events are captured.
- Find an event you want to test and click the + icon next to it.
- Name your test and choose a Logical Operator (AND / OR) for both the Test and the Trigger.
- Select at least one metric as a Trigger (e.g. event name) and one as a Test (e.g. a custom dimension).
- Click Create Test.
Once created, come back here and follow Step 5 to attach the test to a step. For more options (creating from scratch or from the Results page), see the full Tests and Triggers guide.
Step 4 - Run Your Automated Test
Once your recording is saved, you can run it as an automated test directly from the User Journey Recorder.
- Click the Run button in the top-left of the Control Panel.
- A confirmation modal appears. Click Start to begin the automated test run.
Note: The Run button is only available after your recording has been saved. If you have unsaved changes, click Update first.
After the automated test runs, results are available immediately in the Admin Dashboard — see Step 8.
If you want to add or refine steps, attach analytics tests, adjust selectors, or configure wait times, continue to Step 5.
Step 5 - Review and Edit Your Steps
Attach an Analytics Test to a Step
If you want to verify that an analytics event fires correctly when a step runs, you can attach a test to it.
- Open the step by clicking on it.
- In the Step Edit Modal, go to the Validations section and click the Analytics Tests tab.
- In the test management area, find the test you want to attach and click Add.
- Set the expected count: how many times you expect this event to fire, and choose an assertion type (equal to, greater than, etc.).
- The step card now shows a blue badge with the number of attached tests (e.g. “2 tests”).
Rename a step description
Click the description text on any step to edit it inline. Press Enter to save.
Change a step’s wait time
Each step has a time chip on the right (e.g. ”10s”). Click it and type a new value in seconds. This controls how long the Recorder pauses after that step before continuing to the next one during replay. Increase it if the page needs more time to load.
Open the full step editor
Click anywhere on a step card to open the Step Edit Modal. From here you can:
- Change the Action type (Navigate, Click, Type, Scroll, Hover, Keypress)
- Adjust the Wait Time in milliseconds for fine-grained control
- Add or edit Selectors, the instructions the Recorder uses to find the element on the page
- Toggle Stop on Failure. When on, the replay halts if this step fails; when off, it marks the step as skipped and continues
Reorder steps
Grab the drag handle (⋮⋮) on the left of any step and drag it up or down to change its position.
Add a step manually
Click the dashed “Add New Step” button at the bottom of the step list to insert a blank step and configure it in the editor.
Delete a step
Click the three-dot menu (⋯) on the step card and select Delete.
Add a Selector Manually or by Picking (Optional)
If a step’s selector needs to be improved, or if you are adding a step manually, you can use the element picker to capture the exact element from the live page.
- Click the three-dot menu on the step just before the one you want to adjust and select Continue from here.
- Wait for the replay to finish
- Open the step to modify by clicking on it.
- In the Selectors section, make sure Manual mode is selected.
- Click the 🎯 Pick button.
- Click the element. The Recorder captures its selector and adds it to the list automatically.
- Close the modal to return to the step list.
Step 6 - Replay Your Recording
Run your saved recording to verify that all steps execute correctly.
- Click the ⋯ menu in the Control Panel header.
- Select Replay Recording.
- A confirmation modal shows how many steps will run. Click Start Replay.
What happens next:
- The browser session restarts at the first navigation step.
- Steps execute one by one, each waiting the configured time before the next.
- As each step runs, its status badge updates in real time:
- Yellow “Running”: currently executing
- Green ✓: completed successfully
- Red ✗: failed
- When all steps complete, a summary modal appears showing the overall result.
Stop a replay early
Click the red Stop Replay button at the top of the Control Panel at any time.
Resume from a specific step
If you want to re-run only part of the journey, click the three-dot menu on any step and select Continue from here. The replay starts from that step onward.
Step 7 (Optional) - Handle a Failed Step (AI Suggestions)
If a step fails during replay, the AI may automatically analyse the page and suggest a better selector.
A yellow banner appears on the failed step showing the suggested fix. You have three options:
| Option | What it does |
|---|---|
| Apply → Prepend | Adds the suggestion as the highest-priority selector for this step |
| Apply → Replace | Replaces the current primary selector with the suggestion |
| Apply → New Step | Creates a new step using the suggestion |
| Dismiss | Hides the banner |
| Retry | Asks the AI to analyse the page again |
After applying a suggestion, click Update to save the improvement to your recording.
Step 8 - Review Results from the Admin Dashboard
After the automated test runs, results are available in the Admin dashboard.
- Go to the Admin dashboard.
- In the Latest Test Results section, find your recording by name.
- Click the row to open the User Journey Result page, where you can see:
- Which steps passed and which failed
- Execution timestamps
- Analytics test results (if you attached tests)
You can also see any running or scheduled tasks in the Tasks tab of the same panel. Each task card shows:
- Status: Running, Pending, Scheduled, or Failed
- The recording name
- For scheduled tasks: the next scheduled run time
Tips and Good Practices
Keep recordings focused Record one specific user flow per recording (e.g. “Login”, “Add to Cart”, “Form Submission”) rather than trying to capture everything in one long journey. Focused recordings are easier to maintain and debug.
Use descriptive names Rename your steps to plain English so anyone on your team can understand what each step does at a glance.
Adjust wait times for slow pages If a step consistently fails because a page element is slow to appear, increase the Wait Time on the step before it. A few extra seconds can make a replay much more reliable.
Add multiple selectors for robustness Use the Pick tool or AI mode to add a backup selector to important steps. If the primary selector breaks (e.g. because a class name changed), the Recorder automatically tries the next one.
Check the Request Logger The right panel shows every network request and GTM event. Use it during recording to confirm your analytics tags are firing before you attach a test to a step.
Save often Click Update after any meaningful change. The Recorder does not auto-save yet.
Glossary
| Term | Definition |
|---|---|
| Recording | A saved sequence of browser interactions |
| Step | A single action within a recording (Navigate, Click, Type, etc.) |
| Selector | Instructions that tell the Recorder how to find an element on the page |
| Replay | Automated execution of all steps in a recording |
| Session | An active live browser instance, lasts up to 10 minutes |
| Test Expectation | A check that verifies an analytics event or data layer push fires the expected number of times |
| Wait Time | How long the Recorder pauses after a step before running the next one |
| Stop on Failure | A per-step toggle that controls whether replay halts or continues if the step fails |
Manually create a User Journey
To manually Create a user Journey, please follow this guide