How to Test All GA4 Ecommerce Events (Manual, Extension, Automated)
- GA4 ecommerce tracking spans 8 checkout funnel events. Each has required parameters that must be validated independently.
- A single missing transaction_id on the purchase event causes GA4 to deduplicate all revenue as one transaction.
- AH Debugger gives you real-time ecommerce event validation without opening DevTools or decoding URL-encoded request strings.
- Automated tests let you run the full checkout funnel on every deploy without any manual effort.
Overview
Most companies test their softwares, websites, and applications before releasing them to the public. They have QA teams, automated tests, staging environments, and release checklists, and I can go on and on.
But when it comes to data tracking, these same companies forget that “Analytics” is code too. Even if it is hidden behind a “nice” Google Tag Manager UI we’re still injecting code that might not behave as we expect.
The most well-intentioned teams I’ve seen unfortunately have their backlog full of tasks to do “comprehensive regression tests”. The time is what it is and manually testing everything is simply not feasible.
That leaves you with three real options, and which one you reach for depends on how mature you are in terms of testing your Martech Stack.
1. The Old Way: Manual Testing with Chrome DevTools
When initially setting up your tags, manual testing is usually step one. Most analysts rely on the browser’s Network tab to cross-check what GA4 actually received.
Open Chrome DevTools Network
Navigate to the page where the ecommerce event fires, then press F12 (Windows/Linux) or Cmd+Option+I (Mac). Alternatively, right-click anywhere on the page and select Inspect.
Click the Network tab in the DevTools panel.
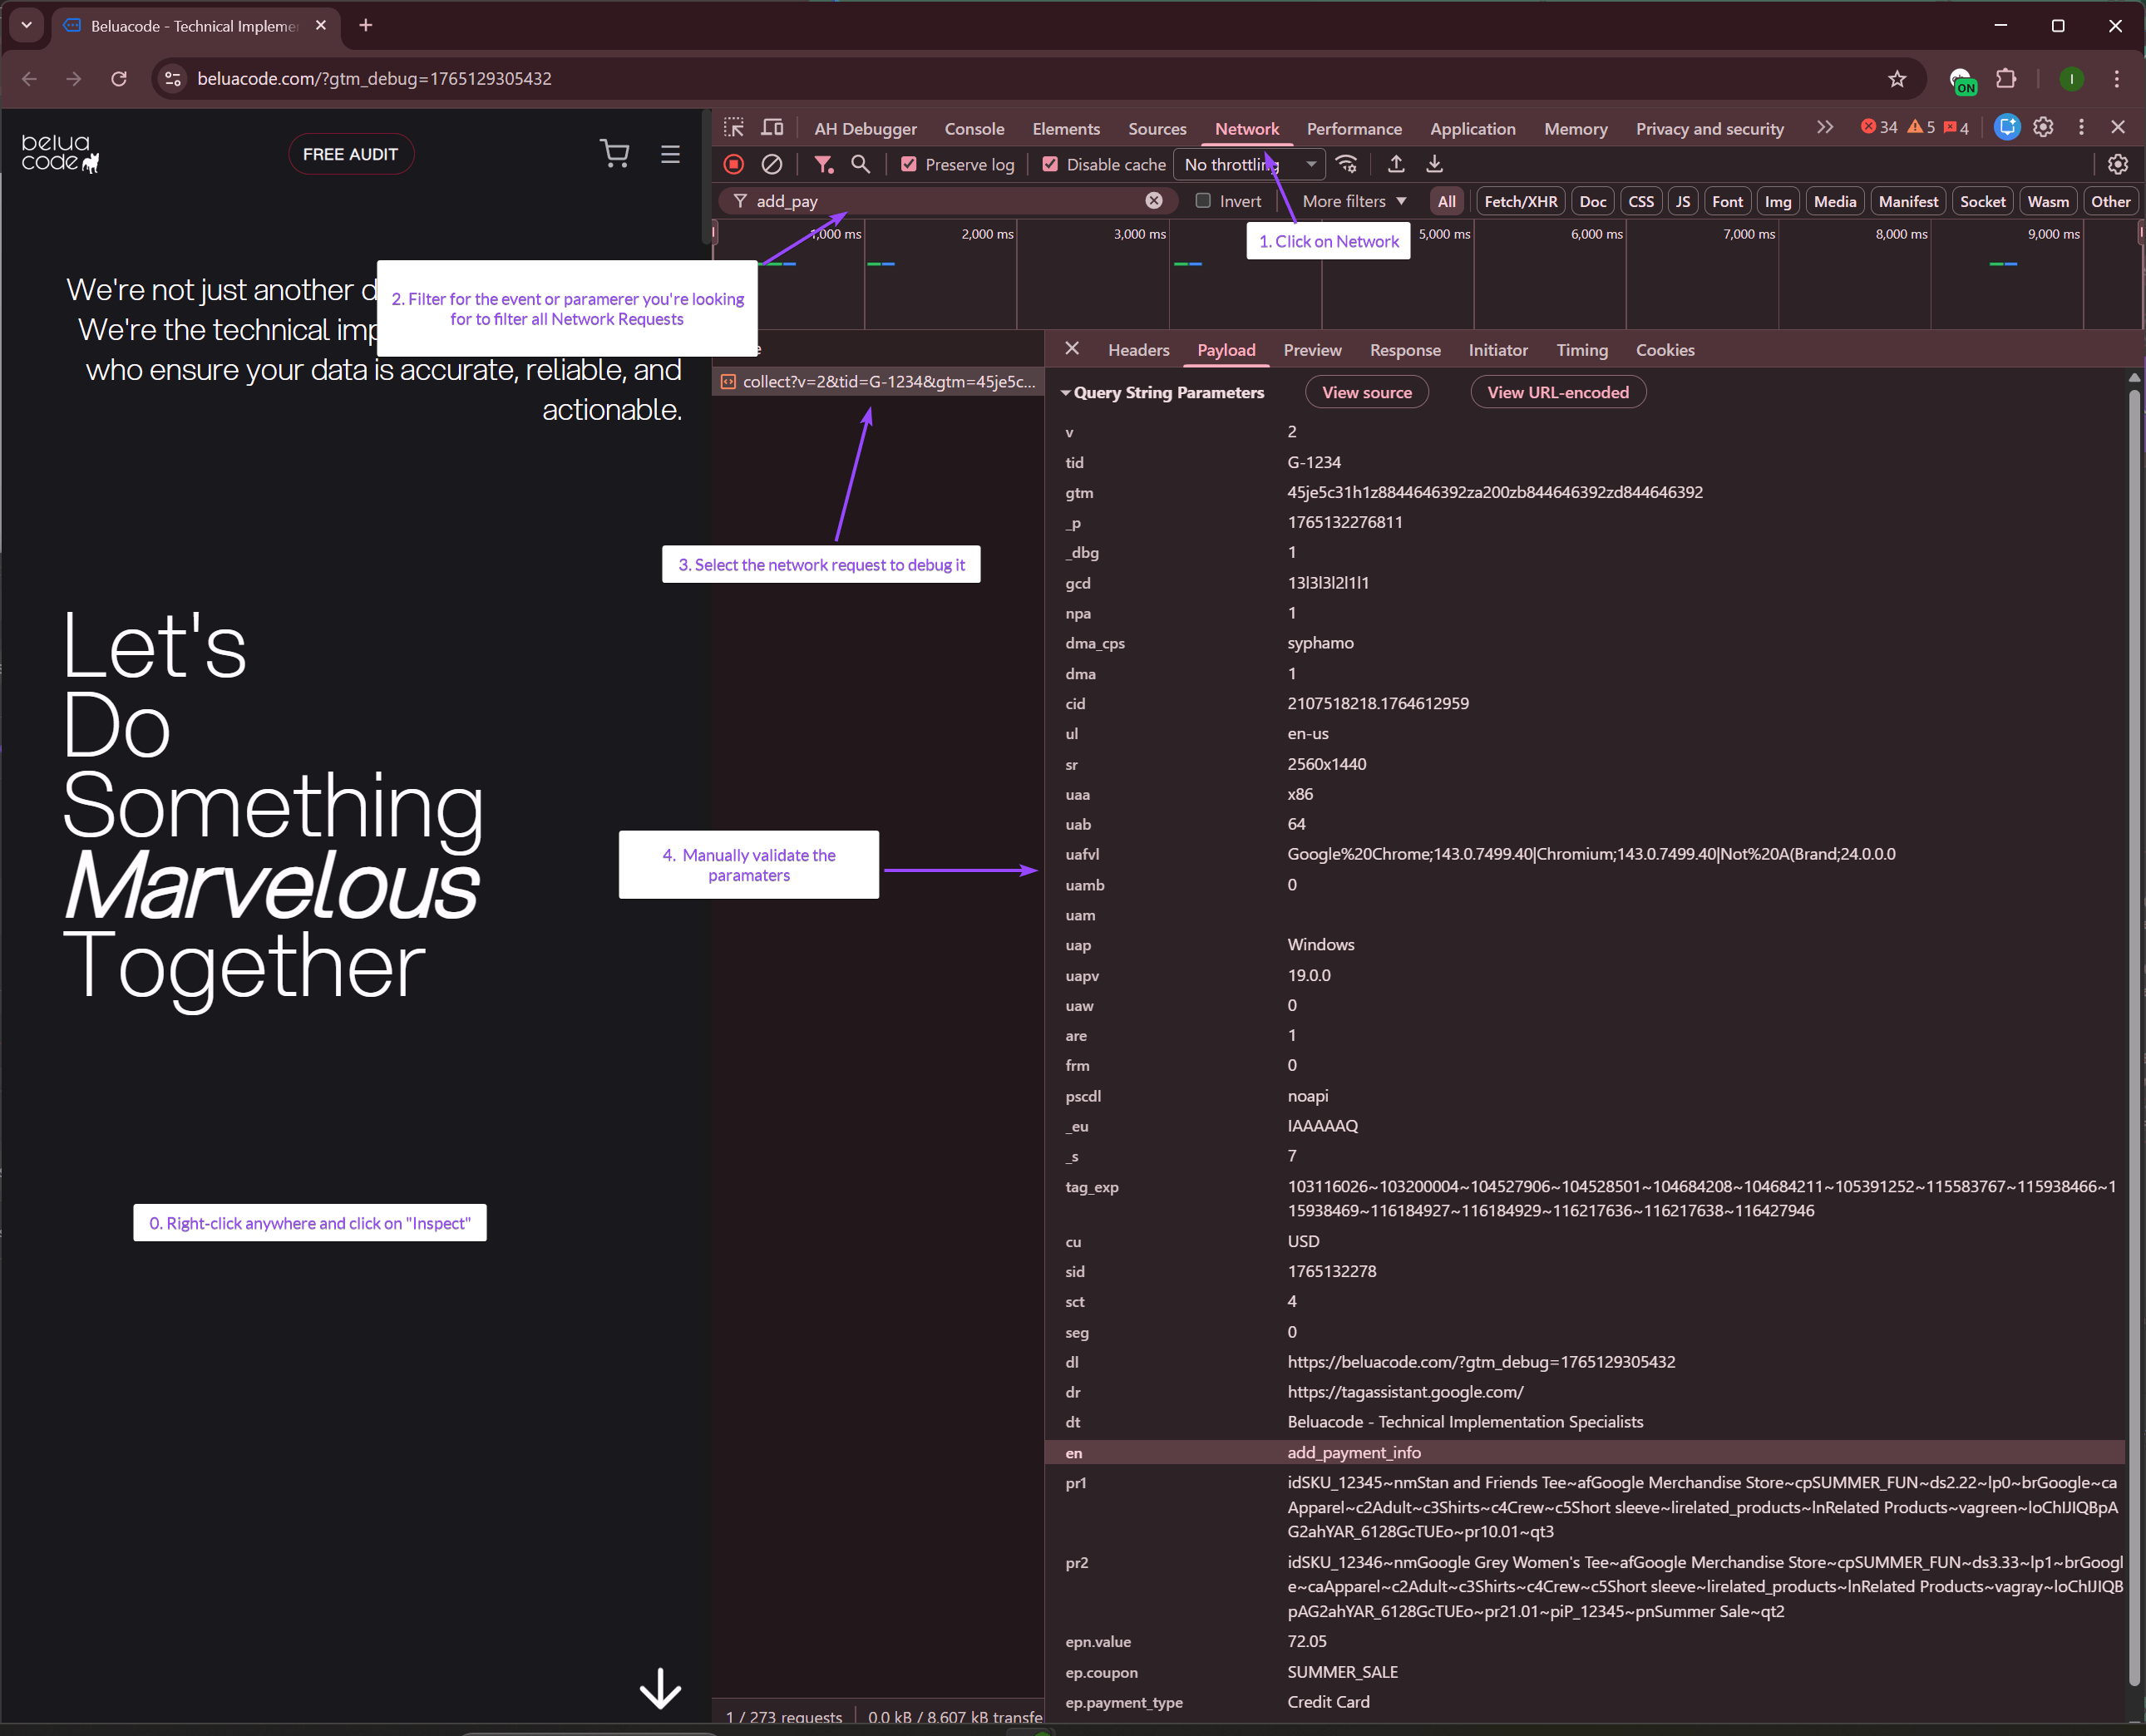
Filter and Inspect GA4 Requests
In the filter box, type: collect to show only GA4 requests or the event name.
Select the request you want to validate, open the Payload tab, and find Query String Parameters.
en=purchase              ← Event name
v=2                      ← Protocol version
tid=G-XXXXXXXXXX         ← Your Measurement ID
epn.value=77.97          ← Value (number type)
epc.currency=USD         ← Currency
pr1id=TSHIRT001          ← First item ID
pr1nm=Blue%20T-Shirt     ← First item name
pr1pr=29.99              ← First item price
pr1qt=2                  ← First item quantity
pr2id=SHORTS001          ← Second item ID
pr2pr=17.99              ← Second item price
pr2qt=1                  ← Second item quantity
The catch: You have to visually verify nested items arrays across 11 different ecommerce events. Every time developers push a site update, doing this manually becomes a massive bottleneck.
Validate Request Status
Look at the Status column:
- 2xx (shown in green) = Success
- 4xx (red) = Bad request
- 5xx (red) = Bad request
- Failed (red) = Network error, ad blocker, Google Ads account suspended. Usually with error code “-1”
2. The Faster Way: AH Debugger Chrome Extension
If you are doing ad-hoc testing, you need a tool that helps you quickly validates the schema without requiring you to dig through raw JSON payloads in the Network Requests Tab.
Enter the AH Debugger Chrome Extension.
Install and Enable AH Debugger
-
Install AH Debugger extension from Chrome Web Store ,
-
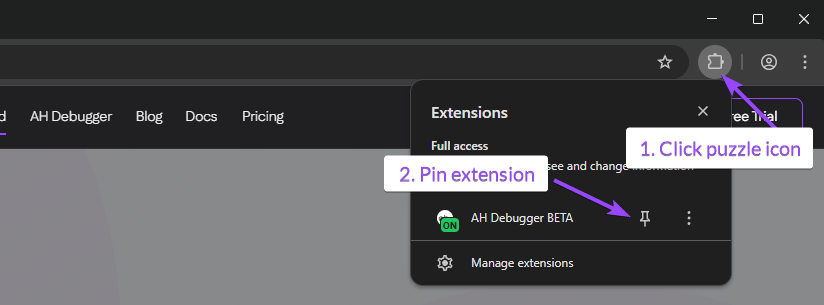
Click on the puzzle Icon on the top right of your browser,
-
Optionally pin the AH Debugger extension for easy access.
-
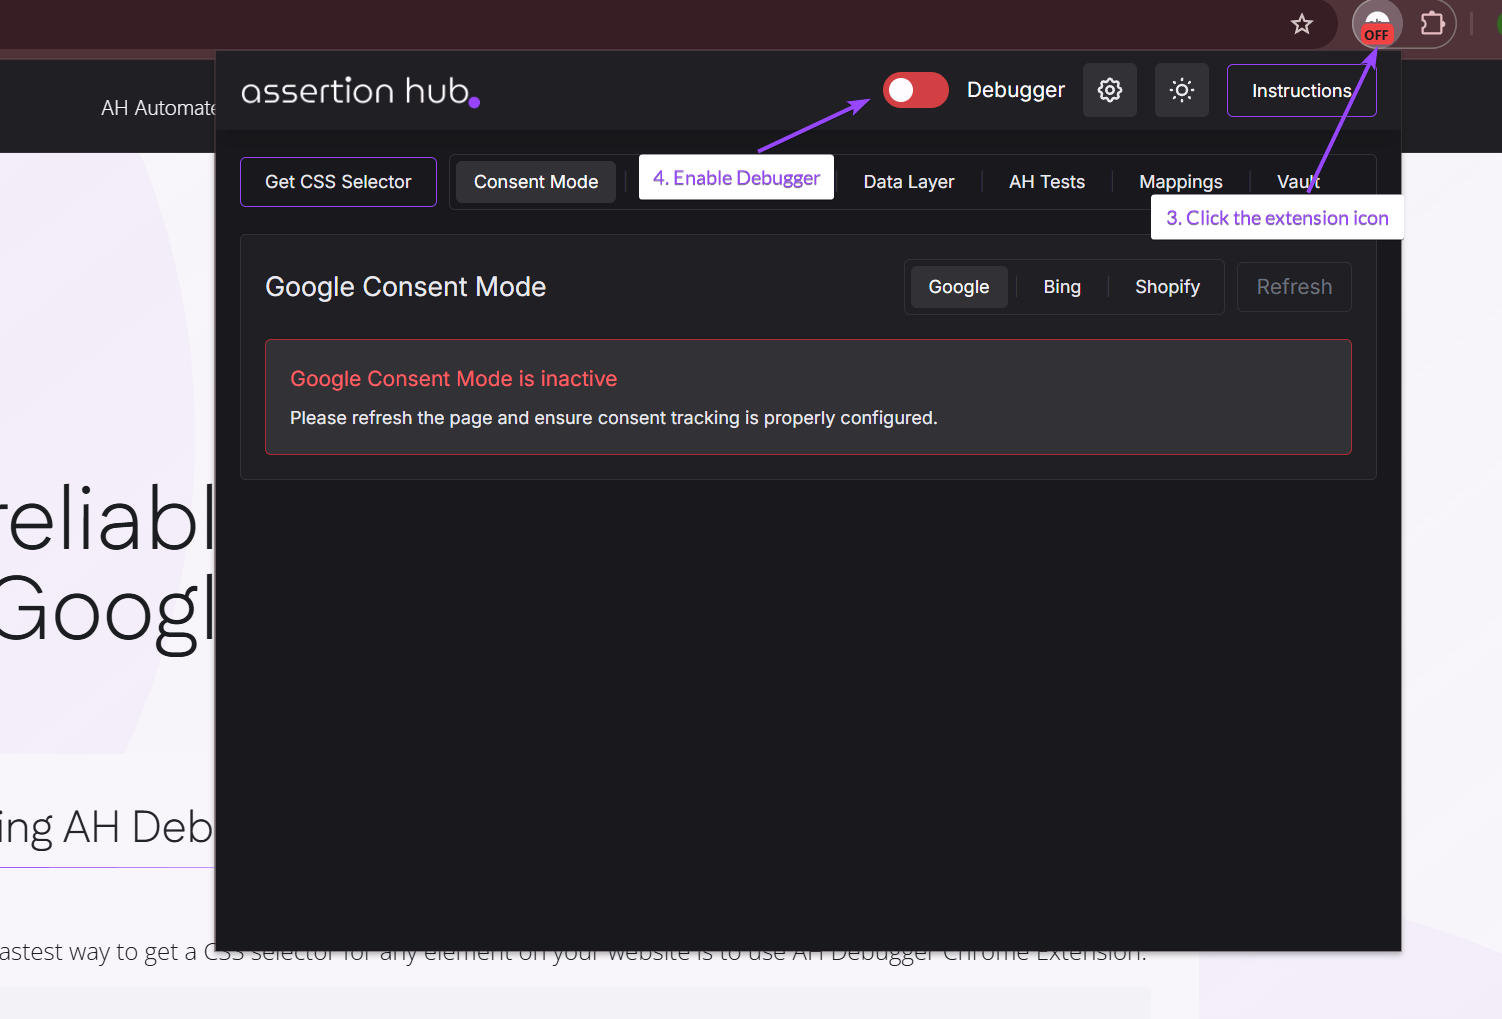
Click on the extension icon
-
Enable the debugger clicking on red toggle
View Event in Console Tab
-
Open Chrome DevTools by pressing
F12or right-clicking anywhere and selecting Inspect. -
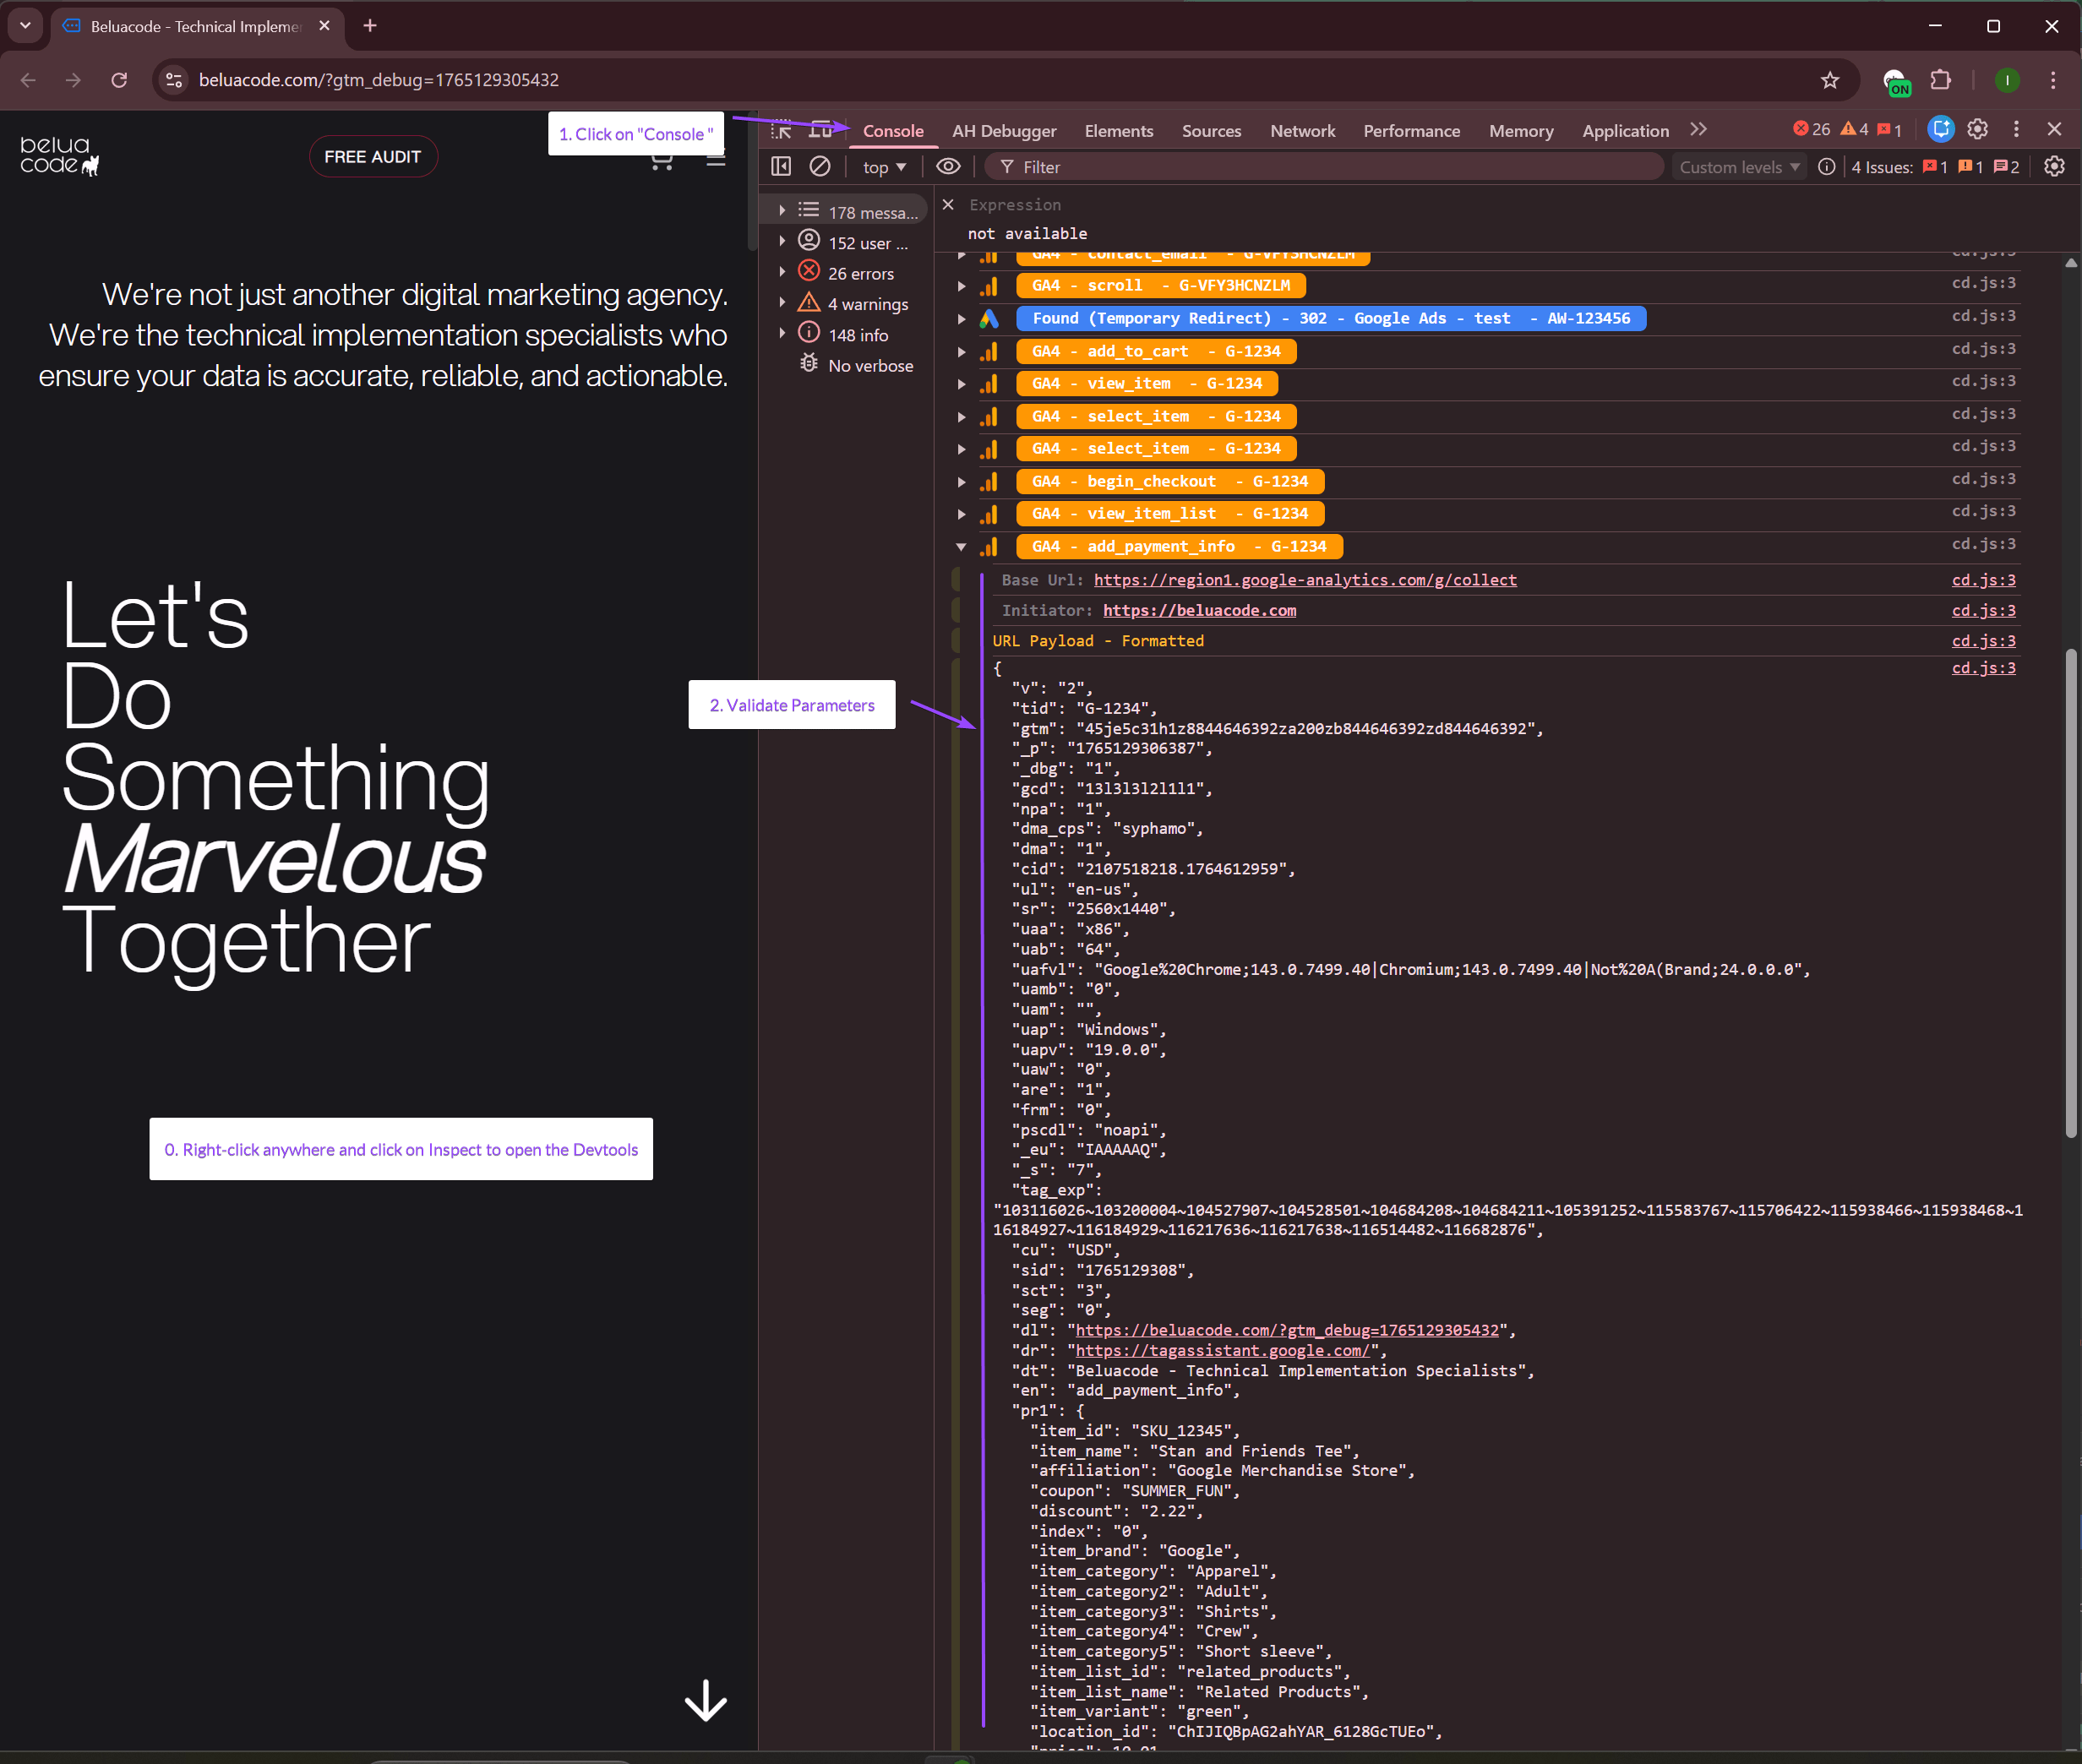
Click the Console tab in DevTools and trigger the event on your website.
-
Check for the event name you want to validate, and click to expand it and check the hit parameters
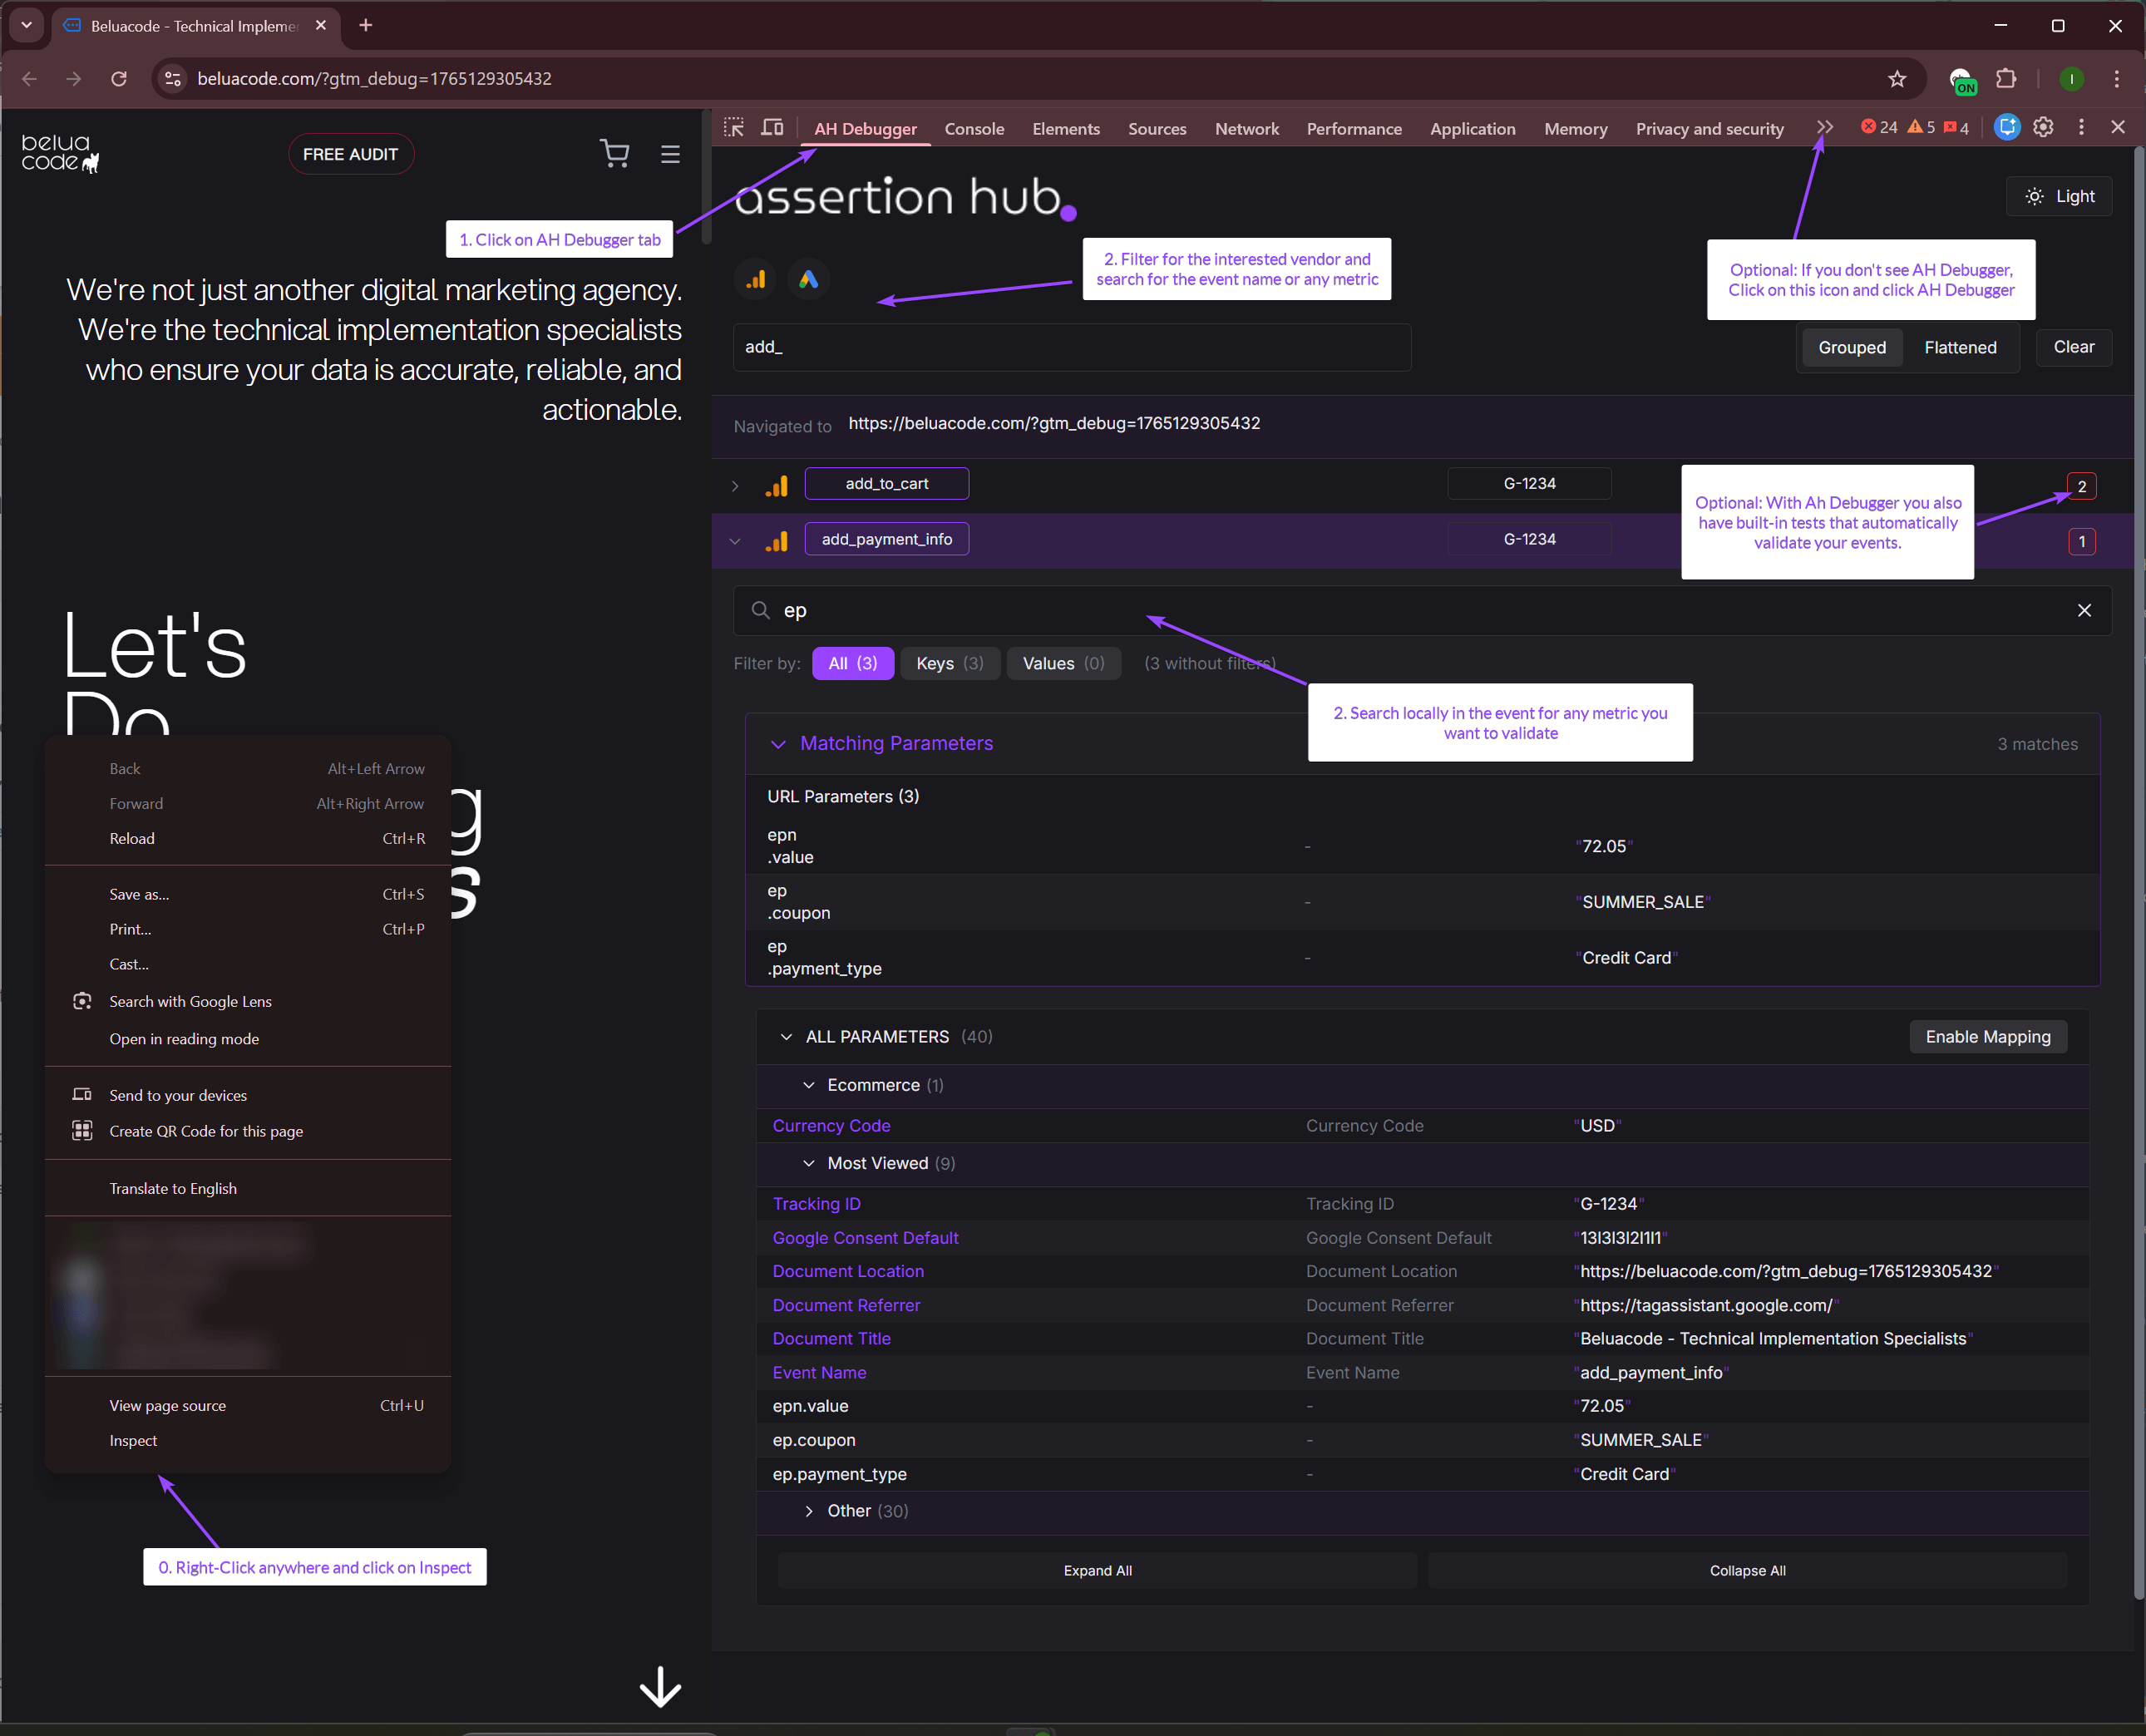
View Event in AH Debugger Panel
-
Open Chrome DevTools by pressing
F12or right-clicking anywhere and selecting Inspect. -
Click on AH Debugger panel. If not present, click on the double-arrow on the right and from the dropdown click on AH Debugger.
-
Use Global and Local search to find the or specific parameters you want to validate.
-
Start validating the parameters to ensure they match with what GA4 expects to receive for that event.
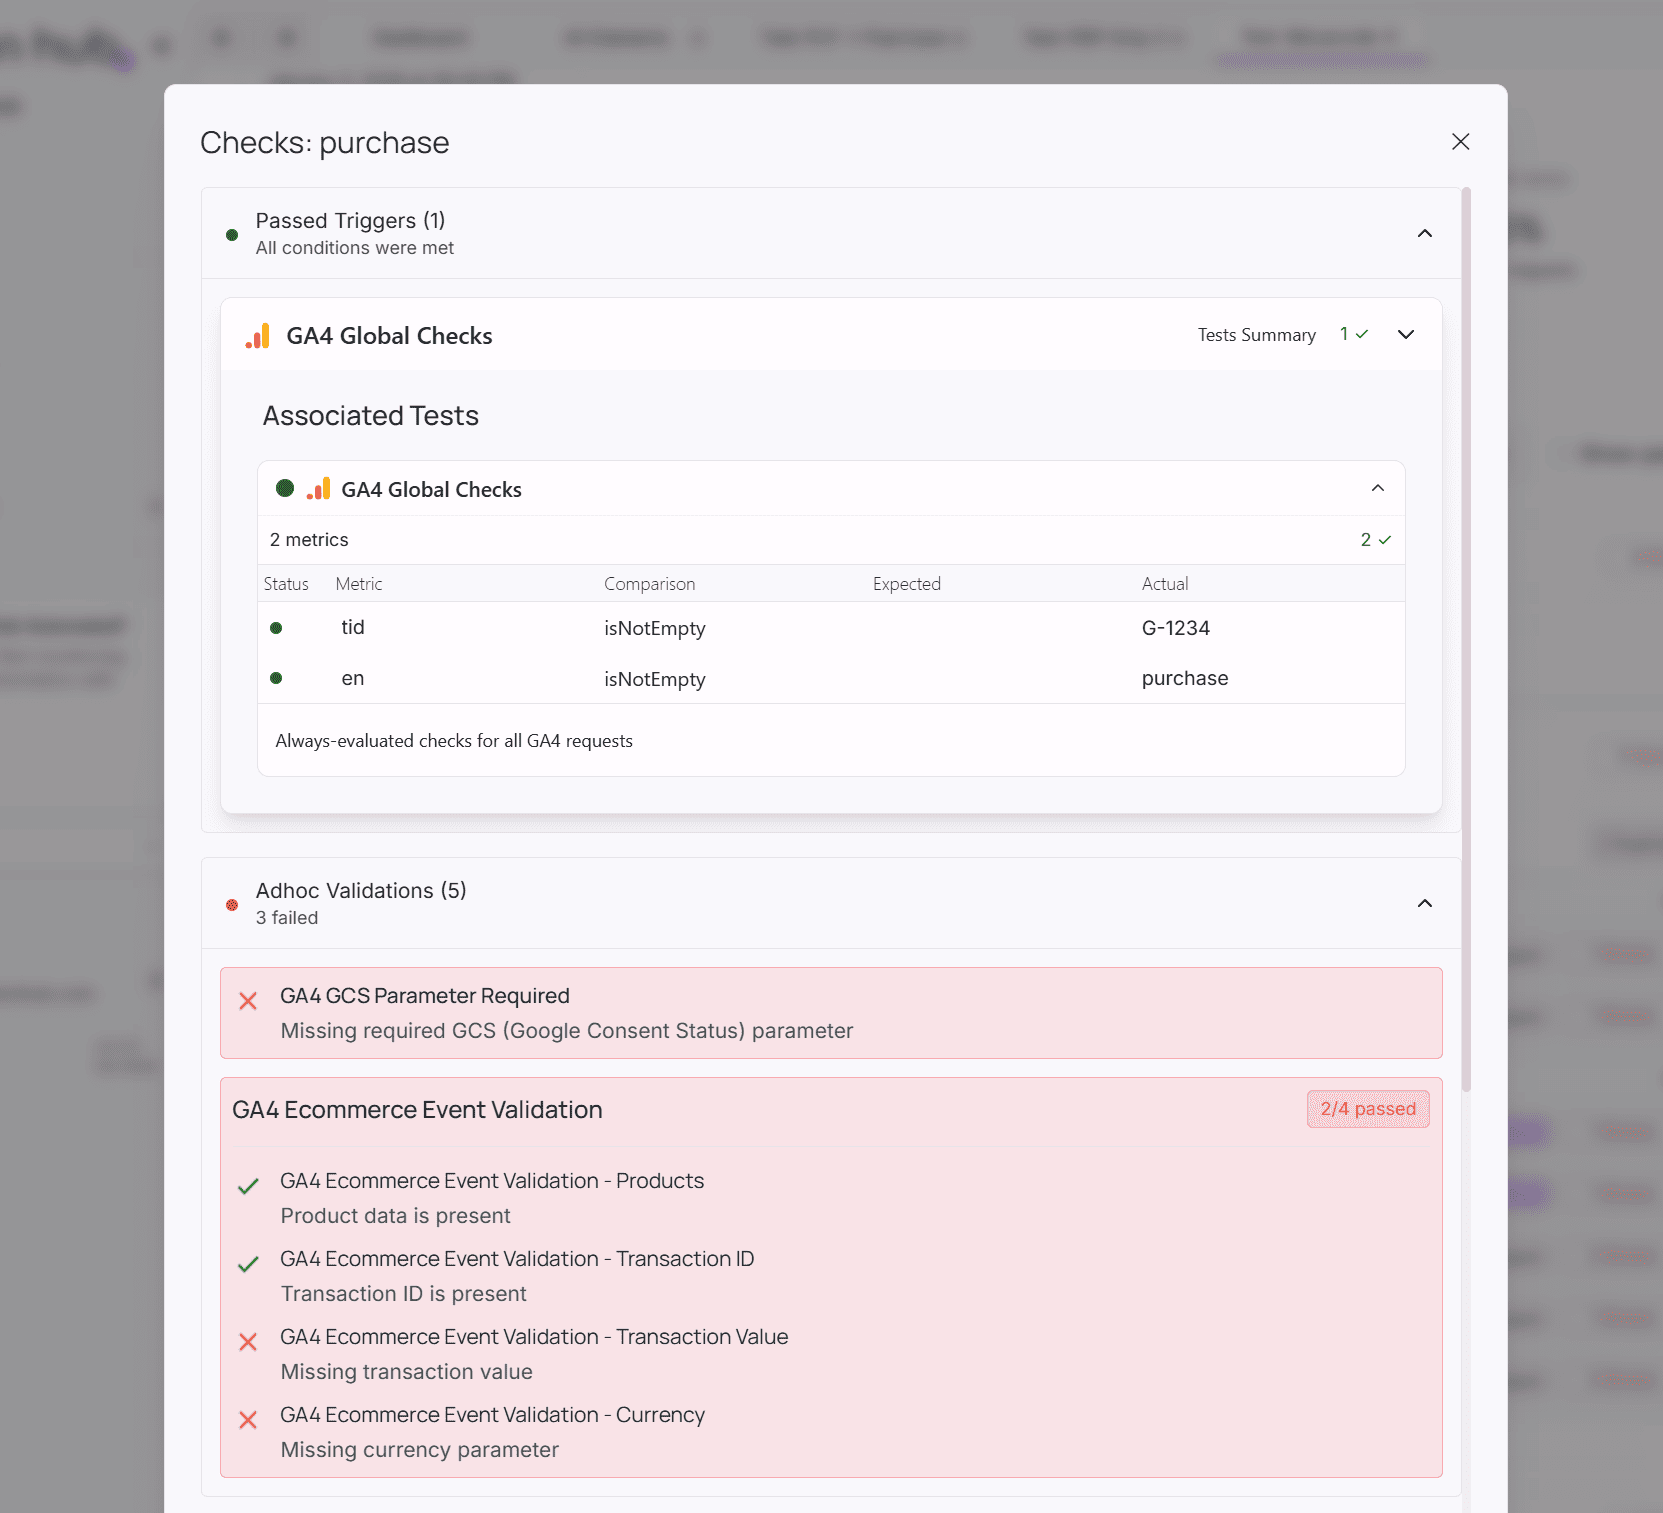
- Built-in Tests: If any is present, you will see on the right side the results. Click on the number and a modal with the results will show up.
3. The Scalable Way: Automated Tests with AssertionHub
Why not automate this? NOT with AI, something deterministic that you can actually rely on. You don’t want to debug AI hallucinations on errors that don’t even exist.
Why existing “automated” tools weren’t the answer
I’ve had your same issues in the past and tried some of the “automated” and “low code” solutions out there, and:
- Established tools will end up costing more in testing than you spend running your entire business.
- Even if you’re willing to invest, the learning curve takes time and they don’t guide you much with test creation.
- Some tools are too broad and focus on the wrong things. Sometimes you really don’t need to audit 10k near-identical product pages where the only thing that changes is the product info.
For a while I solved the problem with heavy-code solutions that started to look all very similar after a while. Then I started seeing a pattern and then a possible product that could solve all the issues I encountered.
That’s where AssertionHub started. Initially it was just an extension, which itself grew from the pain of using all the extensions and pixel helpers on the market. Read more about AH Debugger, our free Chrome Extension with built-in checks and search capabilities to instantly debug your events.
But then we decided to think about “Data Quality” more as a mission. Why should only enterprises have proper testing infrastructure? Why not democratize this and let every shop bet on their data quality?
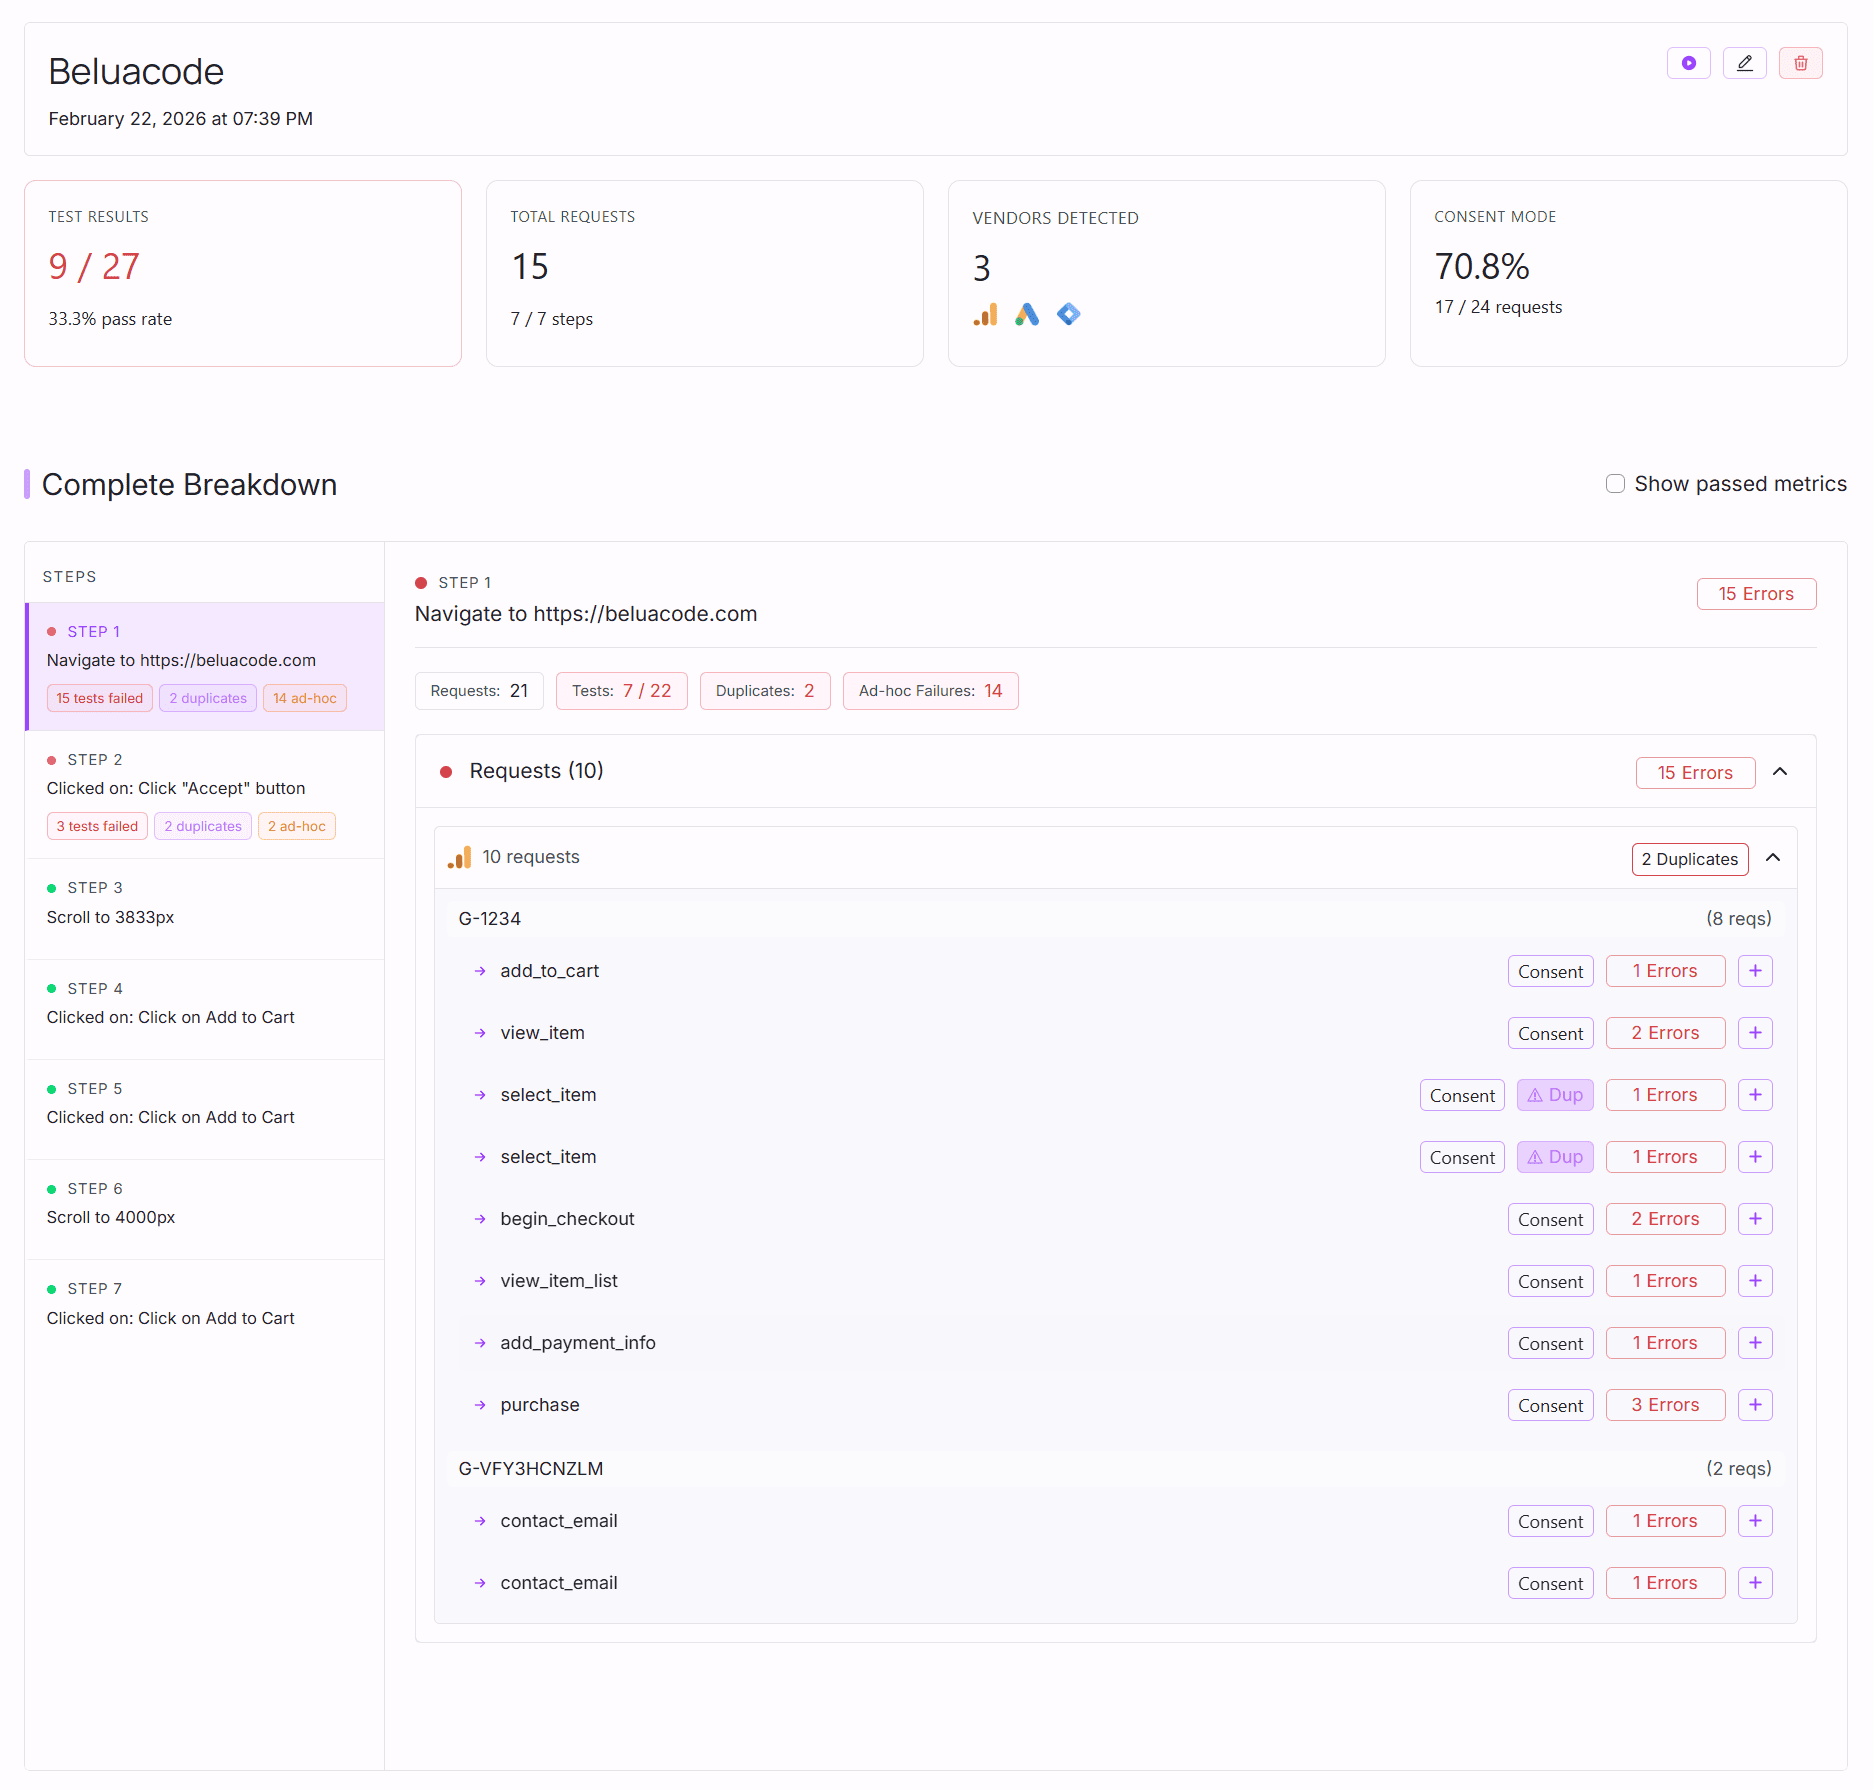
And that’s how AssertionHub Automated was created. A no-code, self-service solution that you can setup to continuously monitor your web analytics and alerts you via email or Slack when something breaks.
No-Code, External Testing
AssertionHub tests your site from outside, like a real user, no script to install, no performance impact, works with any tech stack:
- Visits your pages
- Monitors network requests to GA4, Facebook Pixel, Google Ads, and more
- Validates event parameters
- Checks GTM DataLayer pushes
You don’t need to write 1 line of javascript to test all your analytics and marketing events.
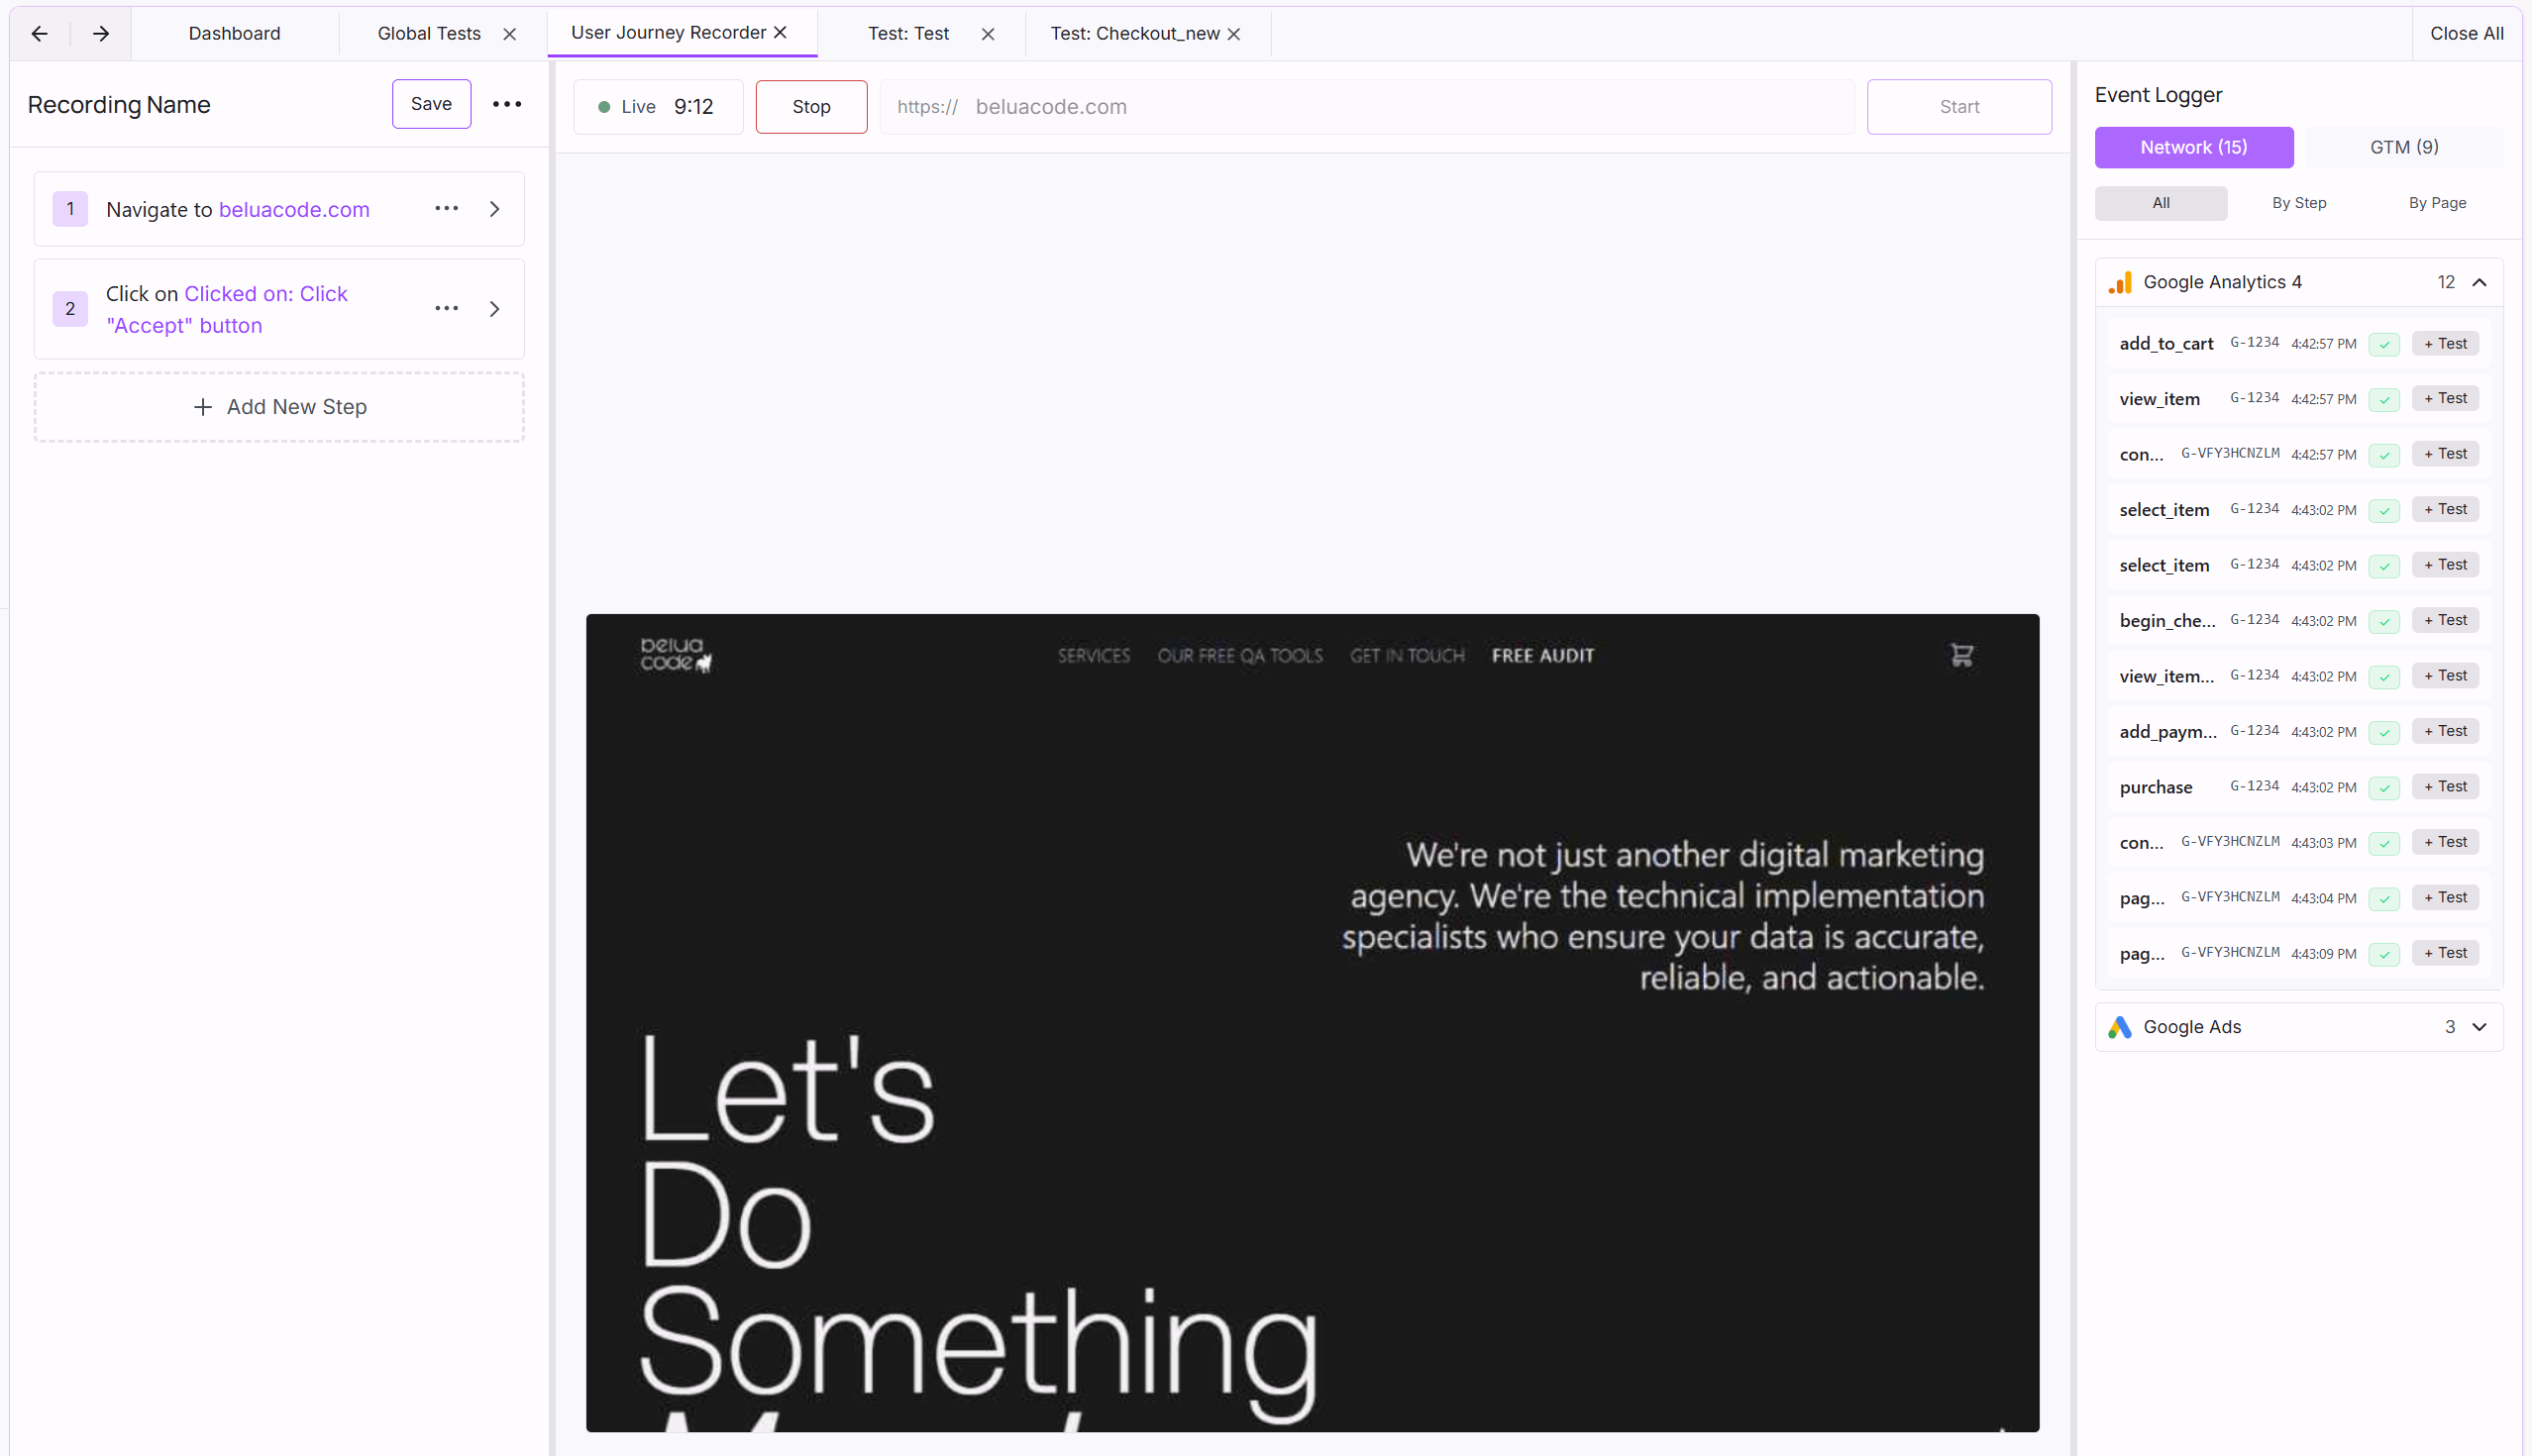
Built-in Browser Recorder
AssertionHub includes a built-in recorder. Enter your website URL, hit Start Recording, and navigate as a real user: add products to cart, go through checkout, complete a purchase. Every interaction is automatically added to the step list.
You can also describe steps in plain text and let AI handle the rest: type “add the first product to cart” and the AI picks the right element at execution time. No DOM knowledge needed.
When a site update breaks a selector, an AI fallback generates an alternative automatically; you review and decide whether to save it. No more hunting down updated CSS selectors every time the HTML changes.
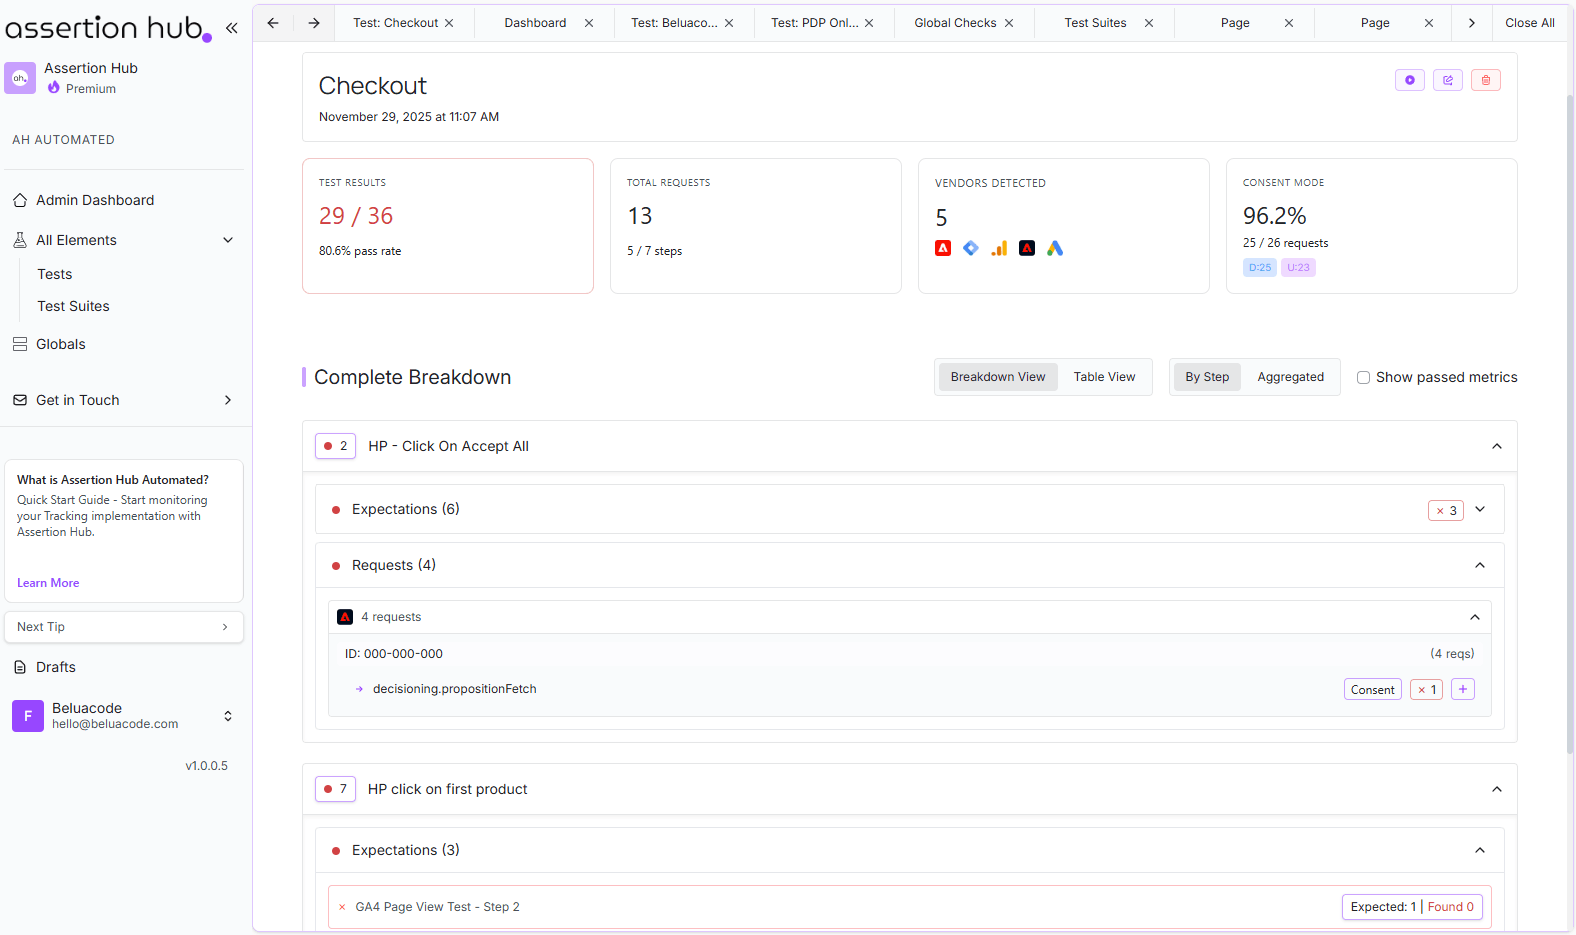
Built-in Checks From Day One
The first problem we wanted to solve was: “What do I need to test now?”, and this actually stalls more people than you’d think. Everybody wants “as many tests as I can do” but sometimes you don’t know where to start, or you end up creating too many tests and stop looking at them.
We solved it with built-in checks. As soon as you create an account, an audit of your specified page starts automatically and you already have your events validated for checks like:
- Is your GA4 missing GDPR-related fields like
gcsto confirm tracking is compliant? - Does your GA4 data stream ID have the right format (e.g. is the
G-prefix present)? - Is your ecommerce event missing mandatory parameters?
- And more added on each release
Test Creation Based on Your Actual Events
Another issue with other automated tools is that test creation feels unguided and difficult to wrap your head around.
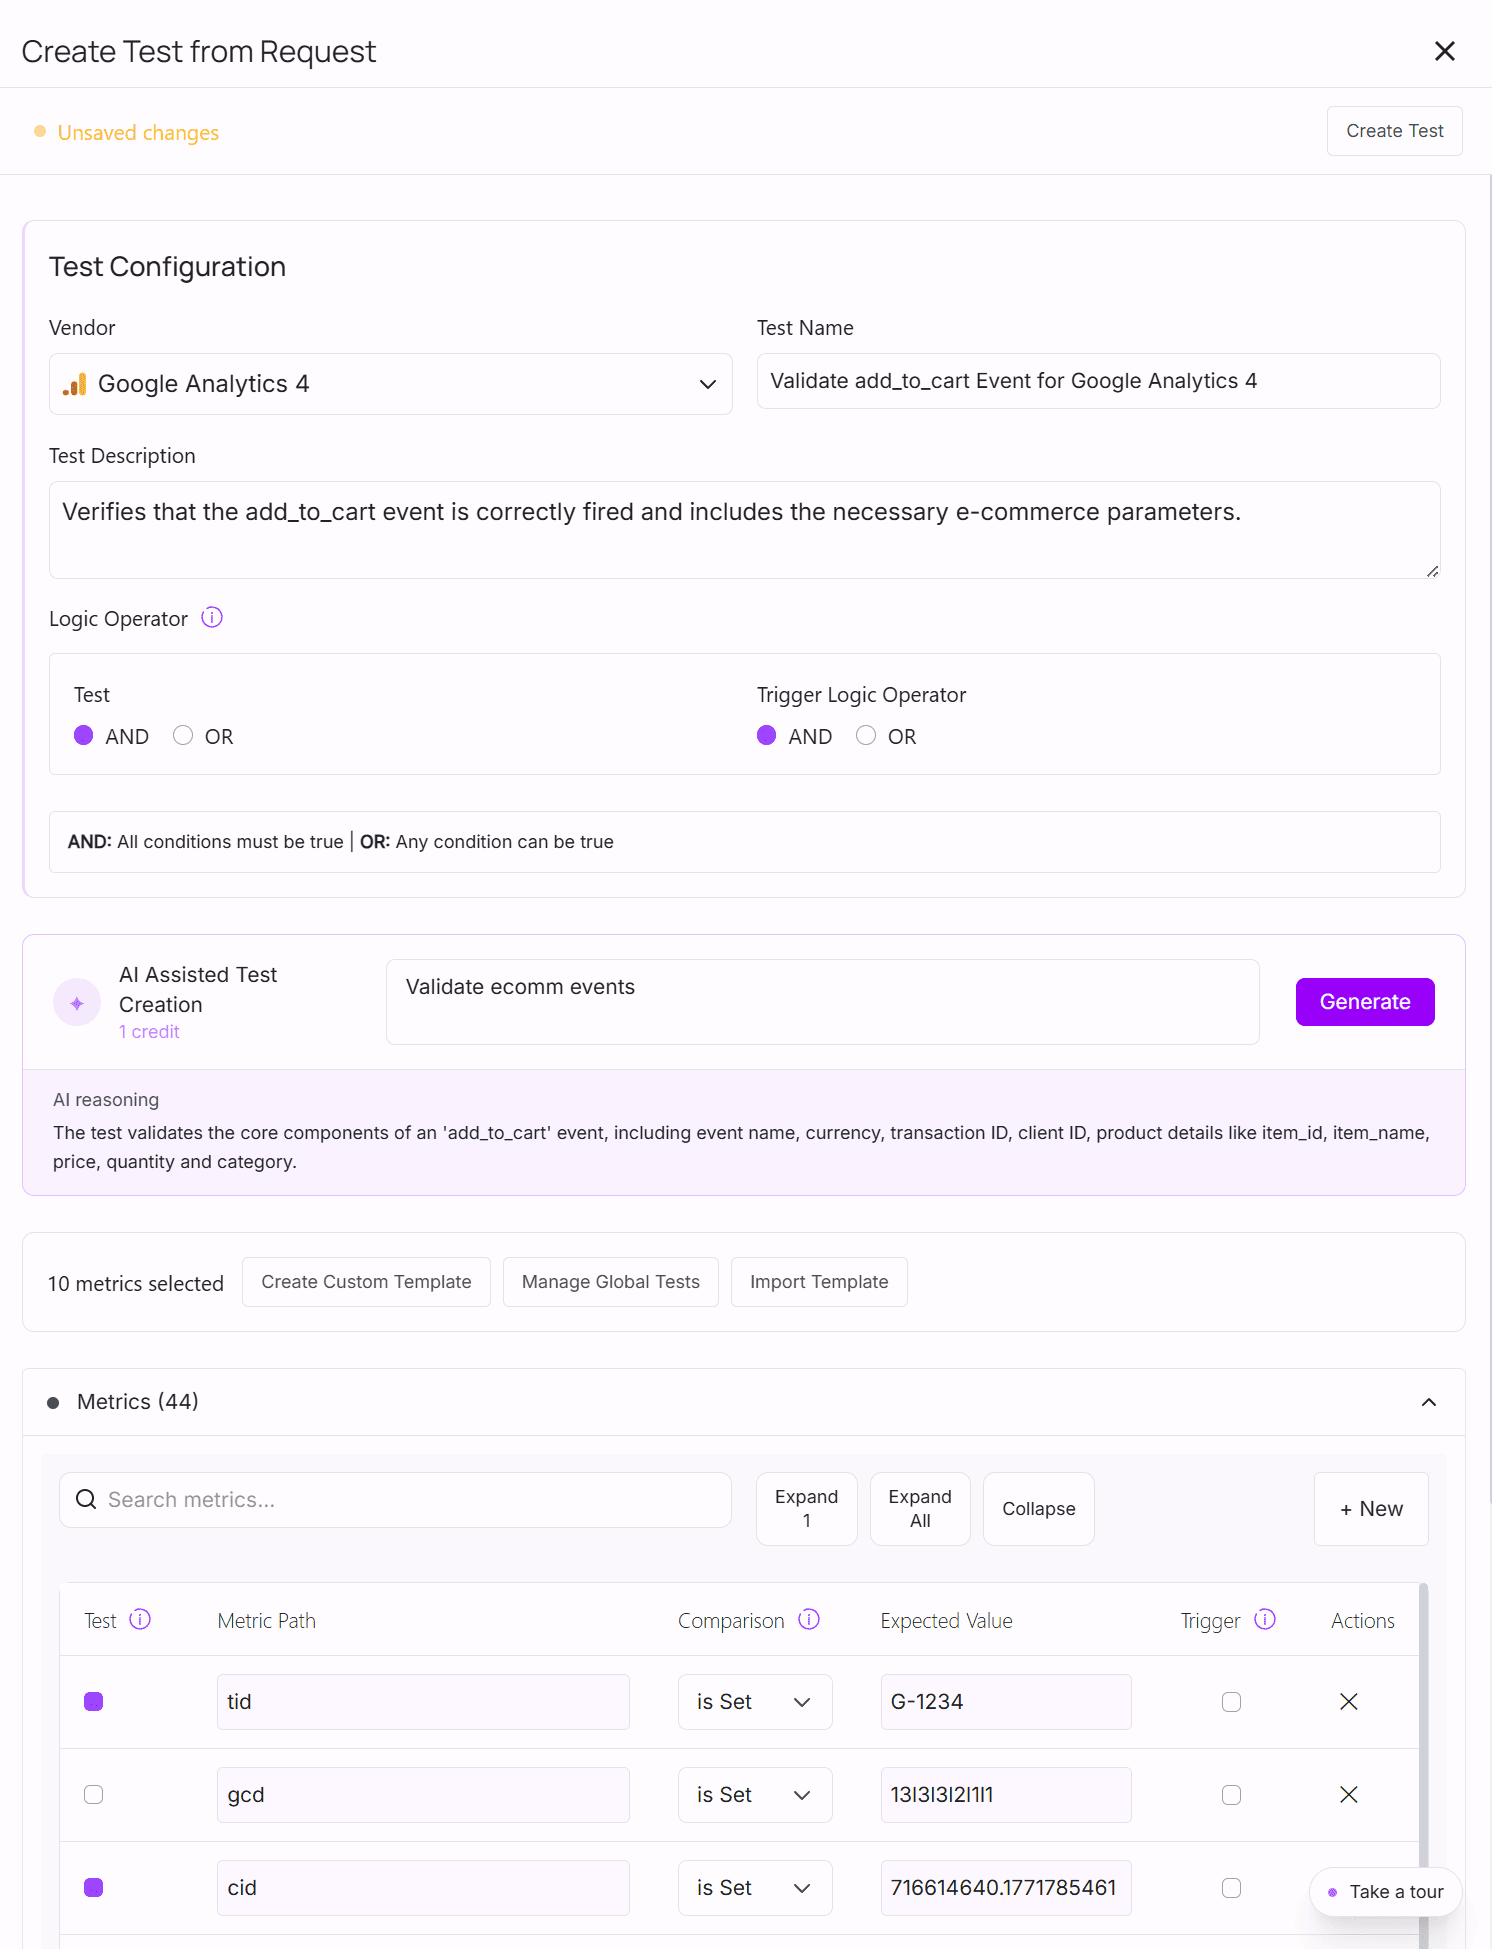
With AssertionHub, you create tests based on the events that were actually collected on your site. While recording, a live panel shows every GA4 network request and DataLayer push detected, grouped by step and page. Click on any event and every captured metric is pre-filled. Pick what you want to assert and save. No blank-canvas configuration, no guessing at field names.
Not sure which metrics matter? Describe what you want to validate in plain text and the AI selects the right metrics, you review and confirm.
User Journeys Tests - Reusable Across Your Entire Funnel
Even once you get the hang of it, specifying the same validation rules over and over across different pages takes time. And if you need to change a rule, you have to hunt it down manually everywhere it was applied.
We solved this by letting you assign tests across multiple steps grouped into User Journeys (Homepage → Product page → Checkout process). Tests are highly portable unlike some tools that force you to recreate rules for every funnel step, AssertionHub lets you define a rule once and reuse it wherever it applies.
If tracking breaks, you get an instant Slack or email alert: no manual checking required.
GA4 Ecommerce validation Checklist
The Purchase Event
The purchase event is the most critical. Here is what a perfectly formatted GA4 purchase payload looks like:
- Mandatory:
currency,transaction_id,value,itemsarray. - Suggested:
tax,shipping,coupon. - Strict Validation Rules:
- Value Calculation: The
valueparameter must be a numeric float/integer. It should equal the total revenue (including tax and shipping). If you send a currency symbol (e.g.,$50.00), the event will fail.
- Value Calculation: The
Browsing & Discovery Events
view_item_list&select_item- Mandatory:
itemsarray - Suggested:
item_list_id,item_list_name - Strict Validation: If you include
item_list_id, ensure it matches exactly across both events to track list performance accurately.
- Mandatory:
view_item- Mandatory:
currency,value,itemsarray - Strict Validation: Even though
valueis required, it must represent the value of the item viewed, not a cart total.
- Mandatory:
Cart Interactions
add_to_cart,remove_from_cart,view_cart- Mandatory:
currency,value,itemsarray - Strict Validation: For
add_to_cart, thevalueshould represent the total value of the items being added during that specific click, multiplied by thequantity.
- Mandatory:
Checkout Process
begin_checkout,add_shipping_info,add_payment_info- Mandatory:
currency,value,itemsarray - Suggested:
shipping_tier(for shipping info),payment_type(for payment info). - Strict Validation: Unlike Universal Analytics, GA4 does not use “checkout steps” (1, 2, 3). You must use these specific event names, or the default Checkout Journey exploration will remain completely empty.
- Mandatory:
The items Array (Applies to all events)
The items array is the engine of GA4 ecommerce. Inside this array:
- Mandatory:
item_idORitem_name. - Suggested:
price,quantity,item_category,item_brand. - Strict Validation Rules:
pricemust be a number, not a string.
Getting Started
Stop relying on hope and manual clicking to protect your most valuable business data.
Whether you use our free AH Debugger extension for quick spot-checks, or the full AssertionHub platform to automate your funnel validation, you can secure your tracking today. No installation or access to your GA4/GTM workspace is required to begin.
Create a free accountFrequently Asked Questions
What are the mandatory parameters for the GA4 purchase event?
currency (3-letter ISO 4217 format), transaction_id (a unique identifier for the transaction), value (numeric, representing total revenue including tax and shipping), and items (non-empty array). Missing any of these will result in incomplete or untracked purchases.How do I test GA4 ecommerce events without developer access to my site?
Do I need to implement all 11 GA4 ecommerce events?
purchase event is essential. Add begin_checkout, add_to_cart, and view_item for funnel analysis. The full event set is the gold standard but not always practical for every implementation.Co-founder of BeluaCode and AssertionHub
Analytics Developer specialised in tracking implementation,
implementations QA, tag management and highly customised solutions
when standard tools don't fit.
Runs
BeluaCode
as an implementation agency helping other experts when things get
too complex and
AssertionHub
to automate tracking validation on Analytics events.